Coming from part 3, where I wanted to move the antenna, I finally got the antenna up on the roof. Our chimney was decommissioned by the previous owners and as far as I can tell, there isn’t brick under the siding (also why does our chimney have siding on it). So it is sitting a little lower than it should be but it is basically at the highest position of the roof. This has dramatically increased the ability to receive aircraft ADS-B signals.
Results
The results are pretty amazing. We’ve had bad weather for a week now but it’s going to be a clear day today. As of 9:12AM, my Raspberry Pi PiAware ADS-B signal receiver sees 116 aircraft, of which 103 are reporting positions. It is receiving 607 messages per second. The map looks like this:
116 aircraft signals received, 103 with position. farthest out is 190 NM.
You can see aircraft lining up to arrive into KDEN spaced out at regular intervals. It’s also picking up 3 planes on the ground at KBJC which is the closest airport to the antenna.
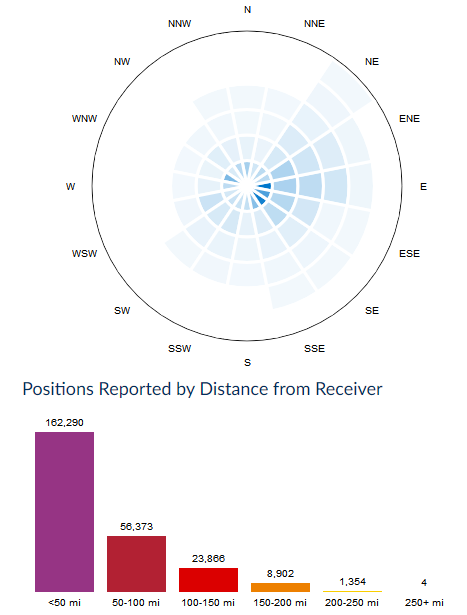
FlightAware has a cool radar type map that shows positions by compass direction and distance. The numbers speak for themselves.
Before
Max distance reported is in the 100-150 nm bucket (327 total reports)
After
That same 100-150 nm bucket now has 24k reports
Interesting features
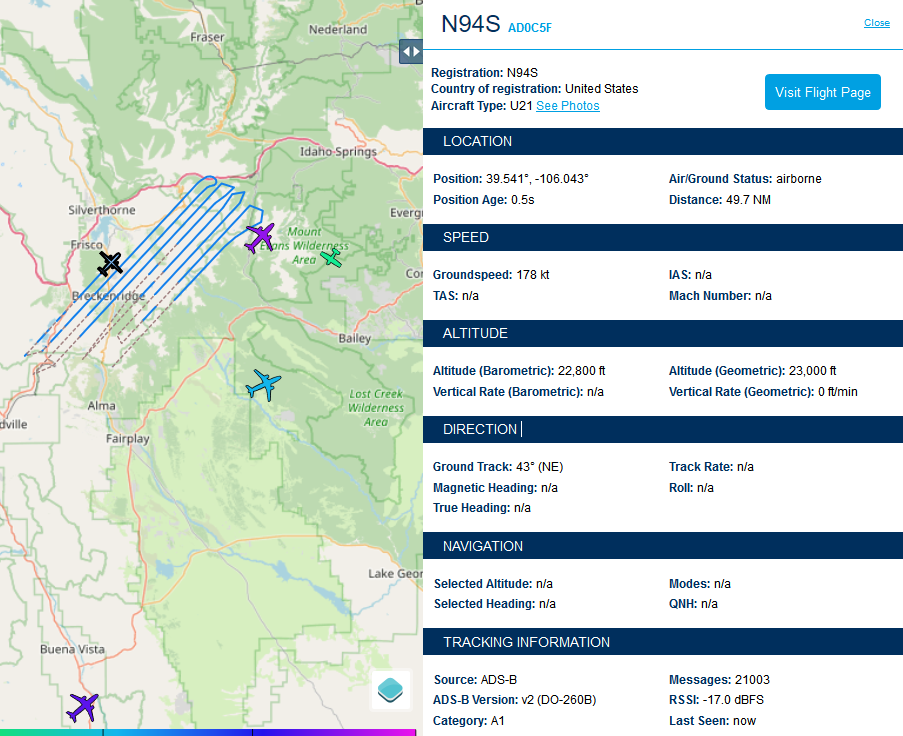
While typing this post, the position count increased to 118. There are some interesting features I’m seeing – a survey plane over the Breckenridge area, a lot of planes on the ground at KBJC (not line of sight to my antenna), and even plane on the ground at KDEN (KDEN is definitely not line of sight to my antenna).
Survey grid being flown by N94S
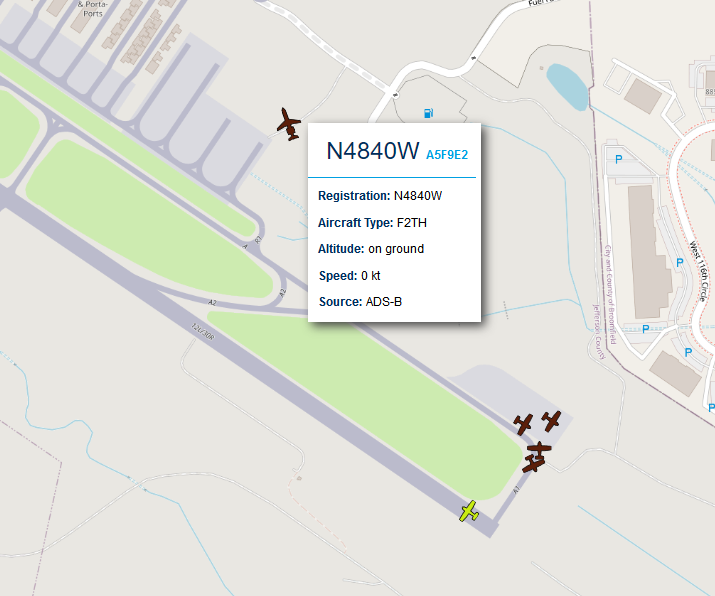
Planes on the ground at KBJC
I see 4 Cessna/trainer type planes waiting for takeoff for 30R at KBJC. I’m even picking up a corporte jet type aircraft on the ground by the hangars (N4840W). None of this is line of sight to my antenna. There’s a chance the ADS-B signals are bouncing off buildings or something. I shouldn’t be seeing these.
The elevation profile to 30R at KBJC. Antenna on left, run up area on the right. Barely not LOS (line of sight).
Plane on the ground at KDEN
United UAL364 / N802UA (an Airbus A319) on the ground on runway 16L/34R heading southElevation profile to south end of 16L/34R at KDEN. Antenna on left, 16L/34R on right. Definitely not LOS. No idea how I’m picking up these signals. I see a plane on the ground at KDEN multiple times a day since moving the antenna.
151 planes!
I started this post around 9am on 4/18. Just before noon, there were 151 planes being tracked by my PiAware station! 773 messages per second. Notice that plane way out there over west central Nebraska – that’s probably 210 NM out!
Conclusion
Moving my FlightAware ADS-B antenna to the roof drastically increased the range and messages received. As a reminder from when I detailed the equipment in Post 2 – the antenna feeds a 1090MHz ADS-B filter, which in turn feeds the FlightAware Pro Stick. I don’t think I’ll make any other changes to the system other than put it on a battery with solar charger.
Recently ran into an issue where I added a node to my Proxmox cluster while a node was disconnected & off. That node (prox) caused the others to become unresponsive for a number of Proxmox things (it was missing from the cluster) upon boot.
Set node to local mode
The solution was to put the node that had been offline (called prox) into “local” mode. Thanks to Nicholas of Technicus / techblog.jeppson.org for the commands to do so:
This allows editing of the all-important /etc/pve/corosync.conf file.
Manually update corosync.conf
I basically just had to copy over the config present on the two synchronized nodes to node prox, then reboot. This allowed node prox to join the cluster again and things started working fine.
The difference is that third node item as well as incrementing the config_version from 4 to 5. After I made those changes on node prox and rebooted, things worked fine.
This post will be a basic SSH key tutorial. In my Securing this WordPress blog from evil hackers! post, I recommended turning off password based SSH authentication and moving exclusively to SSH key based authentication. This post will go over the steps to set up SSH key authentication. The outline is:
Generate SSH public/private key pair
Transfer the public key to the host in question
manual method (Windows)
automatic method (Linux/Mac)
Verify the SSH key authentication is functional.
At the end of this post is my user creation script which does all of this automatically.
I do go over this in a good amount of detail in my first ever YouTube video which you can view here if you’d prefer a video instead of text.
I will be generating keys on my new laptop and transferring them to the Raspberry Pi I set up in my second YouTube video (Austin’s Nerdy Things Ep 2 – Setting up a Raspberry Pi) – https://youtu.be/u5dHvEYwr9M.
Step 1 – Generate the SSH key pair
The first thing we need to do is generate the SSH key pair. On all major OSes these days, this command is included (Windows finally joined the other “real” OSes in 2018 with full SSH support out of the box). We will be using ED25519, which is advised for basically anything build/updated since 2014.
ssh-keygen -t ed25519
This will start the generation process. I hit enter when it prompts for the location (it defaults to C:/Users/<user>/.ssh/id_<type> which is fine). I also hit enter again at the passphrase prompt twice because I don’t want to use a passphrase. Using a passphrase increase security but it can’t be used for any automated processes because it’ll prompt every time for the passphrase. This is the full output from the process:
C:\Users\Austin>ssh-keygen -t ed25519
Generating public/private ed25519 key pair.
Enter file in which to save the key (C:\Users\Austin/.ssh/id_ed25519): [press enter here]
Enter passphrase (empty for no passphrase): [press enter here]
Enter same passphrase again: [press enter here]
Your identification has been saved in C:\Users\Austin/.ssh/id_ed25519.
Your public key has been saved in C:\Users\Austin/.ssh/id_ed25519.pub.
The key fingerprint is:
SHA256:t0FIIk<snip.......................snip>6Rx4 austin@DESKTOP-3IPSAN3
The key's randomart image is:
+--[ED25519 256]--+
|o++++++ .        |
|*  + * o .       |
|o.o o   . .      |
| . .     .       |
|..... o S o      |
| . + .  .o.o..   |
|  = . o.+.+=o..  |
|   +.o.  +a..o   |
|  ..ooo o+...    |
+----[SHA256]-----+
Step 2 – Transfer the SSH public key
For Windows, they included all the useful SSH utilities except one: ssh-copy-id. This is the easy way to transfer SSH keys. It is possible to transfer the key without using this utility. For this SSH key tutorial, I will show both.
Step 2a – Transfer SSH key (Windows)
First we need to get the contents of the SSH public key. This will be done with the little-known type command of Windows. In Step 1, the file was placed at C:\Users\Austin\.ssh\id_ed25519 so that’s where we will read:
The contents of the file are the single line of the SSH public key (starting with the type of key “ssh-ed25519” and then continuing with the key contents “AAAAC3” and ending with the username and host the key was generated on “austin@DESKTOP-3IPSAN3”). This is the data we need to transfer to the new host.
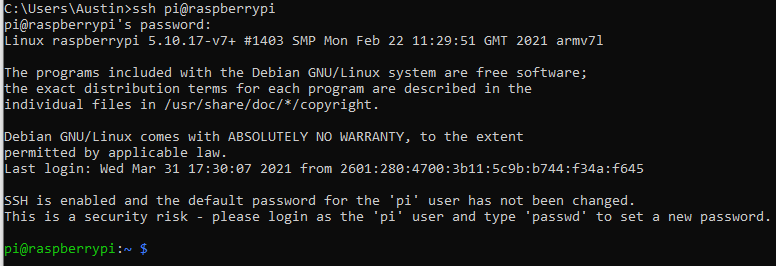
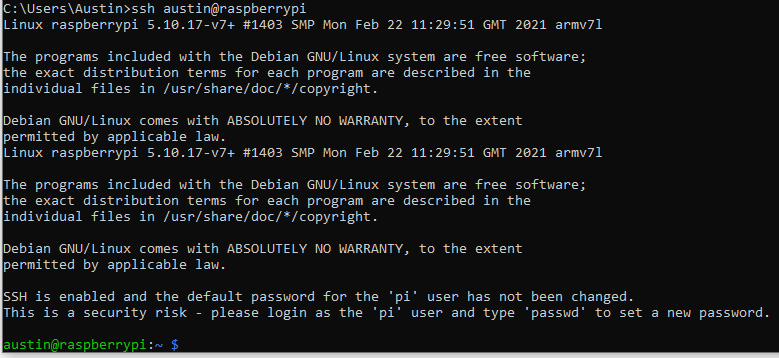
I will first log onto the Raspberry Pi with the username/password combo from the default installation:
ssh pi@raspberrypi
I am now logged into the Pi:
Logged into the Raspberry Pi
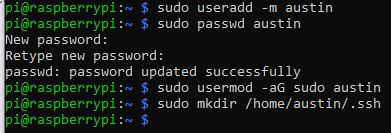
Now on the target machine we need to create the user account and set up some initial things. We use sudo on all of these since root level permissions are required.
# create user austin with home directory (-m means create the home directory)
sudo useradd -m austin

# set the password for user austin
sudo passwd austin

# add user austin to sudo group
sudo usermod -aG sudo austin

# make the .ssh directory for user austin
sudo mkdir /home/austin/.ssh
User created, password set, sudo added, and directory created
With those four commands run, the user is created, has a password, can run sudo, and has an empty .ssh directory ready for the keys.
Now we need to create the authorized_keys file:
sudo nano /home/austin/.ssh/authorized_keys
In this file, paste (by right-clicking) the single line from the id_ed25519 file:
line pasted and ready to save
To save the file, press CTRL+O and a prompt will appear. Press enter again to save. Now to exit, press CTRL+X. There should be no “are you sure” prompt because the contents are saved.
Lastly, we need to change the owner of the .ssh directory and all of it’s contents to the new user (sudo means they were created as root):
sudo chown -R austin:austin /home/austin/.ssh
Now we can test. From the machine that generated the SSH key, SSH to the target with the new user specified:
ssh austin@raspberrypi
You should get in without having to type a password!
Successfully logged in without typing a password (the SSH key worked)
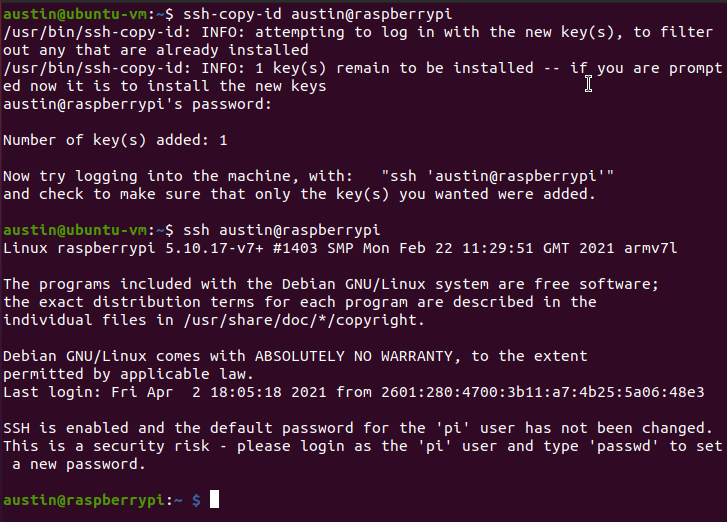
Step 2b – Transfer SSH key (Linux)
This is much easier. The ssh-copy-id utility does what we just did in a single command.
# make sure you've already generated keys on your Linux/Mac machine
ssh-copy-id austin@raspberrypi
ssh-copy-id copied the keys and did everything for us in a single command
Microsoft – will you please add ssh-copy-id to default Windows installations?
Step 3 – Verify
We did this at the end of each of the other methods.
User creation script
This is the script I use on any new Linux virtual machine or container I spin up. It updates packages, installs a few things, sets the timezone, does all the user creation stuff and sets the SSH key. Lastly, it changes the shell to bash. Feel free to modify this for your own use. It is possible to copy the data from /etc/shadow so you don’t have to type in the password. I haven’t got that far yet.
Python service to consume Ambient Weather API data
Continuing from the last post (Handling data from Ambient Weather WS-2902C to MQTT), we have a working script that reads the data coming from the Ambient Weather WS-2902 base station (Ambient Weather API) and sends it to a MQTT broker. In this post, we will turn that script into a Linux service that starts at boot and runs forever. This type of thing is perfect for Linux. Non-server Windows versions aren’t really appropriate for this since they reboot often with updates and such. If you want to run Windows Server, more power to you, you probably don’t need this guide. We will thus be focusing on Linux for consuming the Ambient Weather API. A Raspberry Pi is a perfect device for this (plenty of power, as big as a credit card, and less than $100).
Linux Services
Linux is made up of many individual components. Each component is designed to handle a single task (more or less). This differs from Windows where there are large executables/processes that handle many tasks. We will be taking advantage of Linux’s single task theory to add a new service that will run the Python script for ingesting and consuming the Ambient Weather API. In this instance for Austin’s Nerdy Things, the weather data is being provided by the Ambient Weather WS-2902C weather station.
Creating the service
For Ubuntu/Debian based distributions, service files live under /etc/systemd/system. Here is a list of services on the container I’m utilizing.
In this file we need to define our service. The After lines mean don’t start this up until the listed services are running. The rest is pretty straight forward. I’m not 100% sure what the WantedBy line is for but it’s present in most of my service files. The contents of ambient-weather-api.service are as follows:
[Unit]
Description=Python script to ingest Ambient Weather API data
After=syslog.target
After=network.target

[Service]
Type=simple
User=root
Group=root
ExecStart=/usr/bin/python3 /srv/ambient-weather-api/main.py
ExecStartPre=/bin/sleep 5
Restart=always
RestartSec=5s
# Give the script some time to startup
TimeoutSec=10

[Install]
WantedBy=multi-user.target
Save the file. The service definition is looking for Python at /usr/bin/python3 and the python script at /srv/ambient-weather-api/main.py. You will probably be fine with the Python executable, but be sure to mv or cp the main.py file to /srv/ambient-weather-api/main.py.
We will need to reload the service definitions:
systemctl daemon-reload
Now we can start the service:
systemctl start ambient-weather-api.service
And verify it is running:
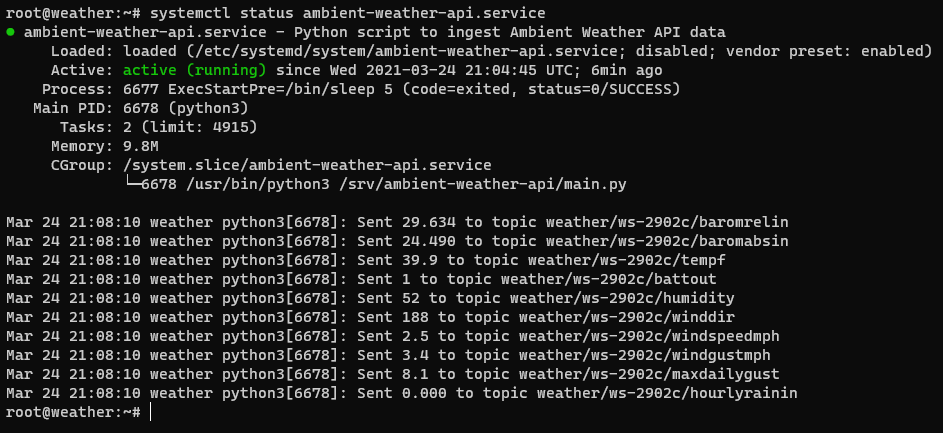
systemctl status ambient-weather-api.service
Ambient Weather API service status
The above screenshot shows it is indeed running and active. It is still showing the print messages in the log as well, which we should disable by commenting out the lines by adding a # in front of the print line. In this case, it is coming from line 56 (the status check in the publish function).
Handling data from Ambient Weather WS-2902C API to MQTT
As I mentioned in my initial Ambient Weather WS-2902C post, there is a new feature that allows sending data to a custom server. I coded up a python script to take the sent data, and publish it to MQTT. This allows for super easy data ingestion with Home Assistant and other similar solutions. I should probably publish on GitHub but I’ll post here first.
Installation
This script is reliant on Paho-MQTT. EDIT: during the creation of the service to run this at boot, I discovered version 1.5.1 will throw errors. Use version 1.5.0. Install it with pip:
sudo pip install paho-mqtt==1.5.0
Create a python file and name it main.py. Paste in the following:
# Python script to decode Ambient Weather data (from WS-2902C and similar)
# and publish to MQTT.
# original author: Austin of austinsnerdythings.com
# publish date: 2021-03-20

# some resources I used include
#https://askubuntu.com/questions/29152/how-do-i-use-python-with-apache2
#https://www.toptal.com/python/pythons-wsgi-server-application-interface
#https://www.emqx.io/blog/how-to-use-mqtt-in-python

from urllib.parse import urlparse, parse_qs
import paho.mqtt.client as mqtt
import time, os

# set MQTT vars
MQTT_BROKER_HOST  = os.getenv('MQTT_BROKER_HOST',"mqtt")
MQTT_BROKER_PORT  = int(os.getenv('MQTT_BROKER_PORT',1883))
MQTT_CLIENT_ID    = os.getenv('MQTT_CLIENT_ID',"ambient_weather_decode")
MQTT_USERNAME     = os.getenv('MQTT_USERNAME',"")
MQTT_PASSWORD     = os.getenv('MQTT_PASSWORD',"")

# looking to get resultant topic like weather/ws-2902c/[item]
MQTT_TOPIC_PREFIX = os.getenv('MQTT_TOPIC_PREFIX',"weather")
MQTT_TOPIC 		  = MQTT_TOPIC_PREFIX + "/ws-2902c"

# mostly copied + pasted from https://www.emqx.io/blog/how-to-use-mqtt-in-python and some of my own MQTT scripts
def on_connect(client, userdata, flags, rc):
    if rc == 0:
        print(f"connected to MQTT broker at {MQTT_BROKER_HOST}")
    else:
        print("Failed to connect, return code %d\n", rc)

def on_disconnect(client, userdata, flags, rc):
    print("disconnected from MQTT broker")

# set up mqtt client
client = mqtt.Client(client_id=MQTT_CLIENT_ID)
if MQTT_USERNAME and MQTT_PASSWORD:
    client.username_pw_set(MQTT_USERNAME,MQTT_PASSWORD)
    print("Username and password set.")
client.will_set(MQTT_TOPIC_PREFIX+"/status", payload="Offline", qos=1, retain=True) # set LWT
client.on_connect = on_connect # on connect callback
client.on_disconnect = on_disconnect # on disconnect callback

# connect to broker
client.connect(MQTT_BROKER_HOST, port=MQTT_BROKER_PORT)
client.loop_start()

def publish(client, topic, msg):
    result = client.publish(topic, msg)
    # result: [0, 1]
    status = result[0]

    # uncomment for debug. don't need all the success messages.
    if status == 0:
        #print(f"Sent {msg} to topic {topic}")
        pass
    else:
        print(f"Failed to send message to topic {topic}")


def application(environ, start_response):
    # construct a full URL from the request. HTTP_HOST is FQDN, PATH_INFO is everything after
    # the FQDN (i.e. /data/stationtype=AMBWeatherV4.2.9&&tempinf=71.1&humidityin=35)
    url = "http://" + environ["HTTP_HOST"] + environ["PATH_INFO"]

    # unsure why I need to parse twice. probably just need to do it once with variable url.
    parsed = urlparse(url)
    result = parse_qs(parsed.geturl())

    # send to our other function to deal with the results.
    # result is a dict
    handle_results(result)

    # we need to return a response. HTTP code 200 means everything is OK. other HTTP codes include 404 not found and such.
    start_response('200 OK', [('Content-Type', 'text/plain')])

    # the response doesn't actually need to contain anything
    response_body = ''

    # return the encoded bytes of the response_body.
    # for python 2 (don't use python 2), the results don't need to be encoded
    return [response_body.encode()]


def handle_results(result):
    """ result is a dict. full list of variables include:
    stationtype: ['AMBWeatherV4.2.9'], PASSKEY: ['<station_mac_address>'], dateutc: ['2021-03-20 17:12:27'], tempinf: ['71.1'], humidityin: ['36'], baromrelin: ['29.693'],	baromabsin: ['24.549'],	tempf: ['58.8'], battout: ['1'], humidity: ['32'], winddir: ['215'],windspeedmph: ['0.0'],	windgustmph: ['0.0'], maxdailygust: ['3.4'], hourlyrainin: ['0.000'],	eventrainin: ['0.000'],	dailyrainin: ['0.000'],
    weeklyrainin: ['0.000'], monthlyrainin: ['0.000'], totalrainin: ['0.000'],	solarradiation: ['121.36'],
    uv: ['1'],batt_co2: ['1'] """

    # we're just going to publish everything. less coding.
    for key in result:
        # skip first item, which is basically a URL and MQTT doesn't like it. probably resulting from my bad url parsing.
        if 'http://' in key:
            continue

        #print(f"{key}: {result[key]}")
        # resultant topic is weather/ws-2902c/solarradiation
        specific_topic = MQTT_TOPIC + f"/{key}"

        # replace [' and '] with nothing. these come from the url parse
        msg = str(result[key]).replace("""['""", '').replace("""']""", '')
        #print(f"attempting to publish to {specific_topic} with message {msg}")
        publish(client, specific_topic, msg)

# this little guy runs a web server if this python file is called directly. if it isn't called directly, it won't run.
# Apache/Python WSGI will run the function 'application()' directly
# in theory, you don't need apache or any webserver. just run it right out of python. would need
# to improve error handling to ensure it run without interruption.
if __name__ == '__main__':
    from wsgiref.simple_server import make_server

    # probably shouldn't run on port 80 but that's what I specified in the ambient weather console
    httpd = make_server('', 80, application)
    print("Serving on http://localhost:80")

    httpd.serve_forever()
Execute with python3:
python3 main.py
Watch the results populate in the console window:
PS C:\Users\Austin\source\repos\ambient-weather-decode> python3 c:\Users\Austin\source\repos\ambient-weather-decode\main.py
connected to MQTT broker at mqtt
Serving on http://localhost:80
Sent E0:98:06:A3:42:65 to topic weather/ws-2902c/PASSKEY
Sent 2021-03-20 17:57:31 to topic weather/ws-2902c/dateutc
Sent 70.7 to topic weather/ws-2902c/tempinf
Sent 36 to topic weather/ws-2902c/humidityin
Sent 29.675 to topic weather/ws-2902c/baromrelin
Sent 24.531 to topic weather/ws-2902c/baromabsin
Sent 66.2 to topic weather/ws-2902c/tempf
Sent 1 to topic weather/ws-2902c/battout
Sent 26 to topic weather/ws-2902c/humidity
Sent 207 to topic weather/ws-2902c/winddir
Sent 0.2 to topic weather/ws-2902c/windspeedmph
Sent 1.1 to topic weather/ws-2902c/windgustmph
Sent 3.4 to topic weather/ws-2902c/maxdailygust
Sent 0.000 to topic weather/ws-2902c/hourlyrainin
Sent 0.000 to topic weather/ws-2902c/eventrainin
Sent 0.000 to topic weather/ws-2902c/dailyrainin
Sent 0.000 to topic weather/ws-2902c/weeklyrainin
Sent 0.000 to topic weather/ws-2902c/monthlyrainin
Sent 0.000 to topic weather/ws-2902c/totalrainin
Sent 697.92 to topic weather/ws-2902c/solarradiation
Sent 6 to topic weather/ws-2902c/uv
Sent 1 to topic weather/ws-2902c/batt_co2
Verification
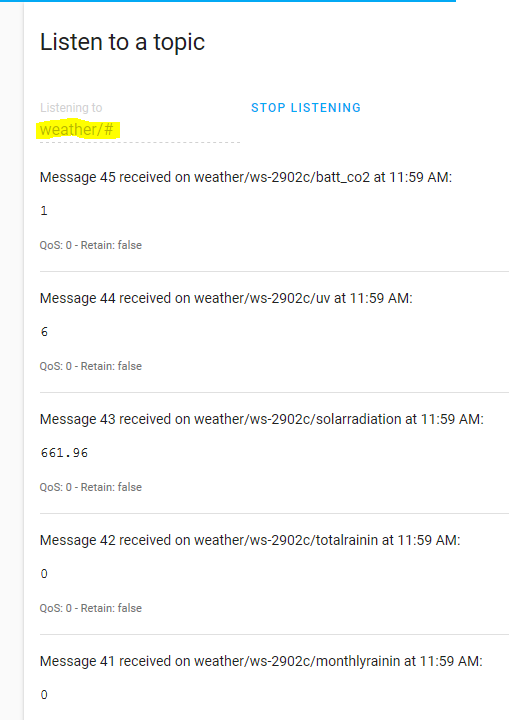
Verify in MQTT by subscribing to topic ‘weather/#’. The # is a wildcard and will include all subtopics: