Introduction
In the last two PPS posts (the original in 2021 and the revisit in 2025), we explored how to get microsecond-accurate time with a Raspberry Pi and a GPS module that outputs a once-per-second pulse (PPS). That project was a ton of fun—and borderline overkill for most home setups—but it got us into the realm of microseconds! Now we’re going to shoot for yet another SI prefix leap and aim for nanosecond accuracy. That’s 1 ns = 0.000000001 seconds (alternatively, it means there are 1 billion nanoseconds in one second).
How? By using the Precision Time Protocol (PTP, IEEE 1588). PTP is designed for high-precision time synchronization over a network, commonly used in financial trading, industrial control, and telecom environments. With the right hardware and configuration, you can synchronize clocks across your devices to within hundreds of nanoseconds with common homelab gear. Is the title a little misleading? Maybe, but technically it still makes sense to use the nano prefix for the numbers that we’re talking about here (anything >1000 nanoseconds should probably be referred to in microseconds).
To be clear, the nanosecond here refers to the synchronization between devices on your network! Depending on how your Pi is set up, and the quality of it’s oscillator, it is unlikely that your Pi’s timing, as determined by the PPS signals, will be as accurate or precise as the PTP synchronization.
As always, do you need nanosecond-level timing at home? Absolutely, 100% no. But this is Austin’s Nerdy Things, so here we are (again)!
Why would you need time this accurate at home?
You don’t, at all. Even microsecond-level accuracy is already overkill for home usage. But there are some niche use cases:
- Amateur radio or signal processing that needs super-tight phase alignment.
- High-speed data acquisition where you want to correlate measurements with precise timestamps.
- Simply pushing the limits of what’s possible because (if you read far enough back in my about me) the last four digits of my phone number spell NERD (seriously. and I’ve had my phone number since I was 15.)
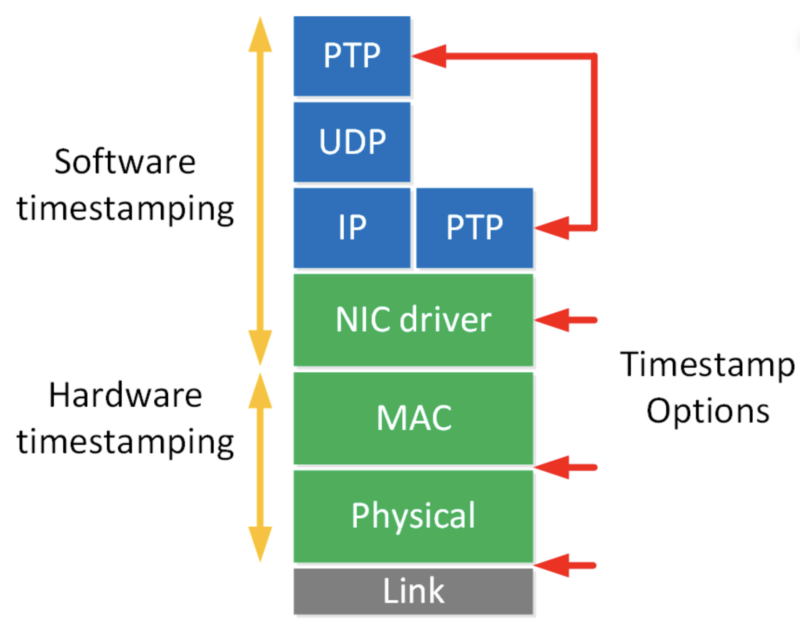
PTP can outperform NTP by a few orders of magnitude if everything is set up correctly with hardware timestamping. With PTP, your network cards (and potentially switches) handle timestamps in hardware, avoiding much of the jitter introduced by the kernel and software layers.

Disclaimer
My experiments appear to be relatively successful but I need to get this out of the way: this level of timing is solidly into the realm of experts. I kinda sorta understand most of what’s going on here but there are a ton of super detailed nuances that go way over my head. Pretty sure some people spend a lifetime on this kind of stuff (particularly at places like the US National Institute of Standards and Technology – NIST, which is “up the street” from where I live and is one of the NTP sources I use). Nanoseconds are being reported but I have no way to verify.
Materials needed
- Two machines/computers with NIC (network interface card) that have hardware timestamping – many server NICs have this, and quite a few “prosumer” Intel NICs do too (examples: i210, i340, i350, some i225/i226), and, essential for the revisiting PPS NTP post, Raspberry Pi 5s do too. PTP is also known as IEEE 1588, which is the PTP standard, so you may see either on datasheets.
- A very local area network. From what I’ve read, this won’t work well over a WAN, especially if there is asymmetric latency (a typical homelab network, even across a couple switches, will be fine)
- A machine with highly accurate time (perhaps from PPS GPS sync) to be used as the “grandmaster”, which is PTP-speak for server.
Procedure
The general procedure will be to set up the server first, which involves syncing the PHC (physical hardware clock) of the NIC to the system clock, which is discipline from elsewhere. After the PHC is synchronized to the system clock, we will use linuxptp (ptp4l) to act as a server. After that, we will essentially do the opposite on any client machines – synchronize the PHC from the PTP grandmaster, and then sync the system clock with the PHC.
0 – Ensure your NIC supports hardware timestamps
Run ethtool to check if your NIC supports hardware timestamps. The format is ethtool -T [nic name]. My NIC is named enp0s31f6 so I will use that. This is a I219-LM in a Dell Optiplex 7040 which is not exactly new but works very well as a Proxmox Backup Server.
ethtool -T enp0s31f6
root@pbs:~# ethtool -T enp0s31f6
Time stamping parameters for enp0s31f6:
Capabilities:
        hardware-transmit
        software-transmit
        hardware-receive
        software-receive
        software-system-clock
        hardware-raw-clock
PTP Hardware Clock: 0
Hardware Transmit Timestamp Modes:
        off
        on
Hardware Receive Filter Modes:
        none
        all
        ptpv1-l4-sync
        ptpv1-l4-delay-req
        ptpv2-l4-sync
        ptpv2-l4-delay-req
        ptpv2-l2-sync
        ptpv2-l2-delay-req
        ptpv2-event
        ptpv2-sync
        ptpv2-delay-req

root@pbs:~# ip l
1: lo: <LOOPBACK,UP,LOWER_UP> mtu 65536 qdisc noqueue state UNKNOWN mode DEFAULT group default qlen 1000
    link/loopback 00:00:00:00:00:00 brd 00:00:00:00:00:00
2: enp0s31f6: <BROADCAST,MULTICAST,UP,LOWER_UP> mtu 1500 qdisc pfifo_fast state UP mode DEFAULT group default qlen 1000
    link/ether 48:4d:7e:db:98:6b brd ff:ff:ff:ff:ff:ff

root@pbs:~# lspci | grep Ether
00:1f.6 Ethernet controller: Intel Corporation Ethernet Connection (2) I219-LM (rev 31)
The lines to look for are in the capabilities section
- hardware-transmit
- hardware-receive
We have those so we’re good to go on the client side. I haven’t explored those hardware receive filter modes yet but they look interesting.
The server is the Raspberry Pi 5 which shows similar output:
austin@raspberrypi5:~ $ ethtool -T eth0
Time stamping parameters for eth0:
Capabilities:
        hardware-transmit
        software-transmit
        hardware-receive
        software-receive
        software-system-clock
        hardware-raw-clock
PTP Hardware Clock: 0
Hardware Transmit Timestamp Modes:
        off
        on
        onestep-sync
Hardware Receive Filter Modes:
        none
        all
1 – Synchronize the hardware clock
First, install linuxptp on both server and client
sudo apt install linuxptp
With linuxptp installed, we will use phc2sys to synchronize the various clocks. Despite the name, phc2sys can be used to synchronize either direction (from PHC to system clock or from system clock to PHC).
With that out of the way, let’s get to the command:
# s = source
# c = destination, replace with your NIC name
# O = offset, PTP traditionally uses TAI, which doesn't use leap seconds and as of Feb 2025, is 37 seconds off of UTC, 0 means use whatever system clock is using
# step_threshold means any delta above this amount should just be jumped instead of slowly shifted by fast/slow frequency
# m = print out status messages
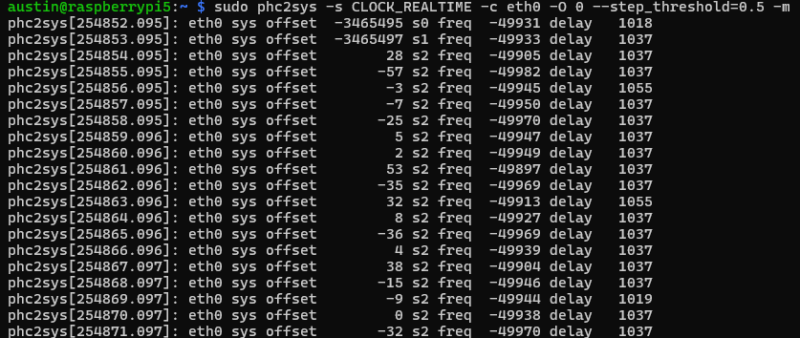
sudo phc2sys -s CLOCK_REALTIME -c eth0 -O 0 --step_threshold=0.5 -m
And the results:

Here we see three fields with numbers (offset/delay in nanoseconds and freq in parts per billion (ppb)):
- Offset is how far off the PHC is from the realtime clock (starting at 3.4 million nanoseconds = 3.4 milliseconds and then stepping down to 28 nanoseconds)
- Frequency is the frequency adjustment of the destination clock (in this case, the eth0 NIC PHC)
- Delay is the estimated amount of time to get the message from the source to destination (which is suspiciously high for this NIC, other machines typically show much lower numbers)
Leave this running (we’ll daemon-ize things at the end).
2 – Tune the Raspberry Pi 5 NIC driver to reduce latency
Raspberry Pi ethernet driver by collects packets over a period of time, which is 49 microseconds by default.

We can reduce that to the driver minimum of 4 microseconds:
sudo ethtool -C eth0 tx-usecs 4
sudo ethtool -C eth0 rx-usecs 4
This will not persist over reboot, so we’ll need to add a daemon to do so upon boot.
In /etc/systemd/system/ptp_nic_coalesce.service:
[Unit]
Description=NIC coalesce minimize
Requires=network.target
After=network.target

[Service]
ExecStart=/usr/sbin/ethtool -C eth0 tx-usecs 4 rx-usecs 4
Type=oneshot

[Install]
WantedBy=multi-user.target
Then enable/start:
sudo systemctl enable ptp_nic_coalesce.service
sudo systemctl start ptp_nic_coalesce.service
3 – Serve the PHC time over the network
Next up is to use ptp4l to serve the time via PTP over your network.
We need a configuration file to give to ptp4l. This isn’t entirely necessary, most config items can be presented as arguments in the command line but I like config files.
Call this file whatever (perhaps ptp-gm.conf, for precision time protocol grandmaster):
[global]
# extra logging
verbose               1

# use hardware timestamping (alternative is software, which isn't nearly as accurate/precise)
time_stamping         hardware

# you can specify a "domain number", which is analogus to VLAN
#domainNumber          0

# force this node to act as a master (won't revert to slave).
masterOnly            1

# priority settings, 128 is default. lower numbers are higher priority in case there are multiple grandmasters
priority1             128

# clockClass=6 for GNSS reference
# other classes = https://documentation.nokia.com/srlinux/24-10/books/network-synchronization/ieee-1588-ptp.html
clockClass            6

# timeSource is where time comes from - 0x10 is "atomic clock" which is a bit sus for us but not ultimately wrong
# https://support.spirent.com/csc30/s/article/FAQ14011
timeSource            0x10

# log output to a file, summary interval is 2^x, so 1 = 2^1 = every 2 seconds
# can also output with -m
# summary_interval     1
# logfile             /var/log/ptp4l.log
Now run ptp4l also!
sudo ptp4l -f ptp-gm.conf -i eth0
You’ll see some outputs around getting things set up and running. Key things to look for “selected local clock … as best master” and “assuming grand master role”. The MAC shown is actually from the NIC.

Now we are ready to serve this time to clients.
4 – Receive PTP over the network
To get PTP over the network, you can use NICs that support software timestamping but we’re going for higher accuracy/precision than that so select a machine that has a NIC that supports PTP/IEEE 1588 (see step 0 for reference).
Setting system time via PTP is really a two step process – synchronizing the NIC PHC with PTP and then using phc2sys to synchronize the system clock with the PHC. If you are thinking this sounds similar to the end of step 2, you are correct, it is just in reverse for the clients.

We will use ptp4l again to set the PHC via PTP:
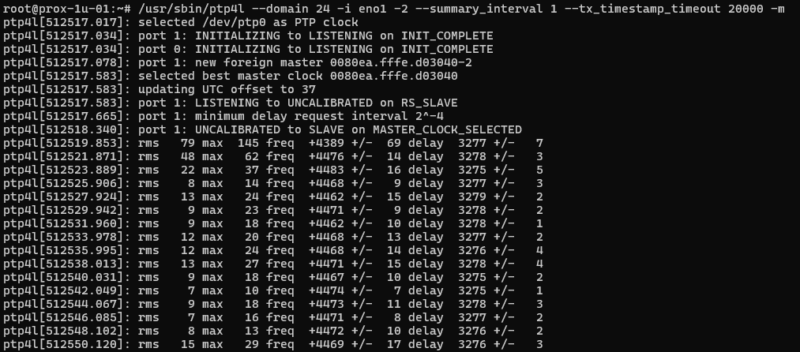
root@pbs:~# ptp4l -i enp0s31f6 -m --summary_interval 1
And you will start seeing some init messages followed by some statistics scrolling past:

The output looks a bit different if there are more requests/polls than summary outputs – RMS will be added, which is root mean squared error, along with max error, and some +/- indicators on the frequency and delay. That delay is still suspicious…
We see here that we have achieved double-digit nanosecond synchronization across the network!
Now compare to a Supermicro Xeon v4 server running Intel i350 NICs synchronizing to a OSA 5401 SyncPlug – super stable and tight precision.

The OSA 5401 has an oscillator rated to 1 ppb, and is exceptionally stable. That is half of the equation – the i350 is certainly better than the i219, but probably not by orders of magnitude like the OSA 5401 is.

Actually, I can try synchronizing the i219-LM to the syncplug. Long story short on this, I use ethernet layer 2 on this system (not layer 3) because the proxmox hosts share their NICs and it was just how I did it originally. I also use domain number = 24 because that’s what the OSA 5401 came with from eBay.
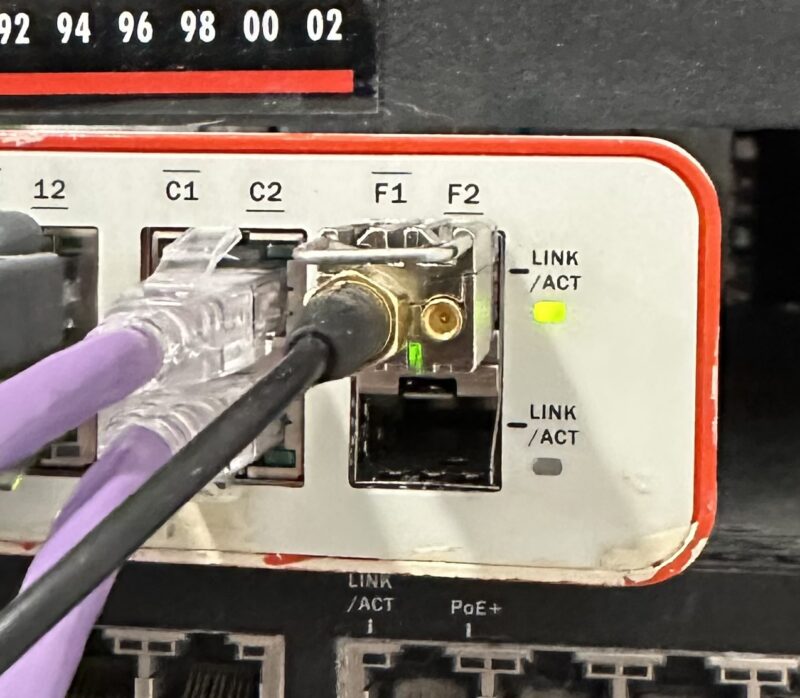
We can see it is a little bit better, but still not nearly as good as the i350. I am now tempted to try my Solarflare/Mellanox NICs, especially since the one I just looked at in my cupboard has u.fl connectors for both PPS in and out… topic for a future post.

With the PHC of the client system synchronized, we are 3/4 of the way to completion. Last up – setting the system clock from the PHC.
5 – Setting client clock from PHC
I originally just use the PHC in Chrony as a source. This will work well. Through my research for this post, I saw that it also possible to share a memory segment from ptp4l to Chrony. I like just using the PHC so we’ll use that approach here.
Add this line to your chrony config:
refclock PHC /dev/ptp0 poll 0 dpoll -5 tai
The poll = 0 means poll the source every second, dpoll -5 means query the source many times per second (2^-5 = 32 hz), and tai is the 37 second offset.
Restart chrony
sudo systemctl restart chrony
After a minute or so check Chrony’s sources with – chronyc sources:
root@prox-1u-01:~# chronyc sources
MS Name/IP address         Stratum Poll Reach LastRx Last sample
===============================================================================
#* PHC0                          0   0   377     0     -1ns[   -1ns] +/-   13ns
=? pi-ntp.home.fluffnet.net      0   4     0     -     +0ns[   +0ns] +/-    0ns
^- 10.98.1.18                    2   7   377   82h   -117ms[  +69us] +/-  660us
=- 10.98.1.174                   1   0   377     1    -60us[  -60us] +/-   31us
We can see that Chrony has successfully selected the PHC and has synchronized the system clock with it to within one single nanosecond!
6 – Serving PTP to other clients
You can of course repeat the process for N other clients. Alternatively, you can just have Chrony use hardware timestamps and enable the F323 experimental field. That enables some NTPv5 features that help a ton with synchronization. There is also a F324 field that I haven’t tried that appears to run PTP over NTP packets.
The relevant lines from my Chrony config:
peer 10.98.1.172 minpoll 0 maxpoll 0 iburst xleave extfield F323
peer 10.98.1.174 minpoll 0 maxpoll 0 iburst xleave extfield F323

# use tai if synchronized to a true TAI source, which ignores leap seconds
refclock PHC /dev/ptp0 poll 0 dpoll -5 tai prefer trust

allow all

hwtimestamp *
7 – Setting up the daemons and enabling
File – /etc/systemd/system/phc2sys-grandmaster.service
[Unit]
Description=sync PHC with system clock (grandmaster)
After=network-online.target
Wants=network-online.target

[Service]
Type=simple
ExecStart=/usr/sbin/phc2sys -s CLOCK_REALTIME -c eth0 -O 0 --step_threshold=0.5
Restart=always
RestartSec=3

[Install]
WantedBy=multi-user.target
File – /etc/systemd/system/ptp4l-grandmaster.service
[Unit]
Description=Precision Time Protocol (PTP) service (Grandmaster)
After=network-online.target
Wants=network-online.target

[Service]
Type=simple
ExecStart=/usr/sbin/ptp4l -f /etc/ptp4l/ptp-gm.conf -i eth0
Restart=always
RestartSec=3

[Install]
WantedBy=multi-user.target
Grandmaster services reload & start:
sudo systemctl daemon-reload
sudo systemctl enable phc2sys-grandmaster.service
sudo systemctl enable ptp4l-grandmaster.service
sudo systemctl start phc2sys-grandmaster.service
sudo systemctl start ptp4l-grandmaster.service
File – /etc/systemd/system/ptp4l-client.service
[Unit]
Description=Precision Time Protocol (PTP) service (Client)
After=network-online.target
Wants=network-online.target

[Service]
Type=simple
ExecStart=/usr/sbin/ptp4l -i [NIC here] -m --summary_interval 3
Restart=always
RestartSec=3

[Install]
WantedBy=multi-user.target
And if you don’t want to mess with Chrony and just want to synchronize your system clock directly from the PHC on your clients – /etc/systemd/system/phc2sys-client.service
[Unit]
Description=Synchronize system clock with PHC (Client)
After=ptp4l-client.service
Requires=ptp4l-client.service

[Service]
Type=simple
ExecStart=/usr/sbin/phc2sys -s [NIC here] -c CLOCK_REALTIME -O 0 --step_threshold=0.5 -m
Restart=always
RestartSec=3

[Install]
WantedBy=multi-user.target
Client services reload & start:
sudo systemctl daemon-reload
sudo systemctl enable ptp4l-client.service
sudo systemctl enable phc2sys-client.service  # If not using Chrony
sudo systemctl start ptp4l-client.service
sudo systemctl start phc2sys-client.service   # If not using Chrony
Conclusion
We’ve come a long way in our pursuit of precise timing – from using GPS PPS signals for microsecond accuracy to achieving nanosecond-level synchronization with PTP. While this level of precision is absolutely overkill for most home setups (as was the microsecond timing from our previous adventures), it demonstrates what’s possible with relatively accessible hardware like the Raspberry Pi 5 and common Intel NICs.
The key takeaways from this exploration:
- PTP with hardware timestamping can achieve double-digit nanosecond synchronization even with consumer-grade hardware
- The quality of your network interface cards matters significantly – as we saw comparing the i219-LM, i350, and the OSA 5401
- Simple optimizations like adjusting packet coalescing can have meaningful impacts on timing precision
- Modern tools like Chrony make it relatively straightforward to integrate PTP into your existing time synchronization setup
For those interested in pushing timing precision even further, there are still frontiers to explore – from specialized timing NICs to advanced PTP profiles. But for now, I think I’ll stop here and enjoy my massively overengineered home time synchronization setup. At least until the next timing-related rabbit hole comes along…
References:
https://github.com/by/ptp4RaspberryPi/blob/main/Setup.md
https://chrony-project.org/documentation.html


8 replies on “Nanosecond accurate PTP server (grandmaster) and client tutorial for Raspberry Pi”
[…] Almost four years ago, I wrote the original post to this series – Microsecond accurate NTP with a Raspberry Pi and PPS GPS. Some things have changed since then, some haven’t. PPS is still an excellent way to get a microsecond accurate Raspberry Pi. Some of the commands and configurations have changed. So let’s run through this again now in 2025. This will basically be the same post but with some updated commands and material suggestions so you can use your Raspberry Pi 5 as a nanosecond accurate PTP (precision time protocol) grandmaster! […]
Great post. I could not get hardware time stamping to work without adding “hwts_filter full” to my ptp-gm.conf file with my Raspberry pi5.
me too Thanks for the tip!
And now after some number of OS/firmware updates to my Pi5 hardware timestamping fails with unable to open /dev/ptp0. Back to software timestamping.
As far as I can tell, the OSA is rated to 10ppb. Still orders of magnitude better than regular crystals.
Thanks for the guide, it was super useful!
I just wanted to point out, the IEEE 1588 spec defines timeSource 0x20 for GPS, so you’d probably wanna use that.
I also made a little write up on my website (click my name), that uses the built in Debian package’s services, and to document the issues I came across.
[…] (Beim Boot per systemd-Unit setzen.) Austin’s Nerdy Things […]
[…] Revisiting Microsecond Accurate NTP for Raspberry Pi with GPS PPS in 2025 Nanosecond accurate PTP server (grandmaster) and client tutorial for Raspberry Pi […]