Categories
Offgrid Solar Uncategorized

Sending MPP inverter data to MQTT and InfluxDB with Python

Catching up

Hey there, welcome back to Austin’s Nerdy Things. It’s been a while since my last post – life happens. I haven’t lost sight of the blog. Just needed to do some other things and finish up some projects before documenting stuff.

Background

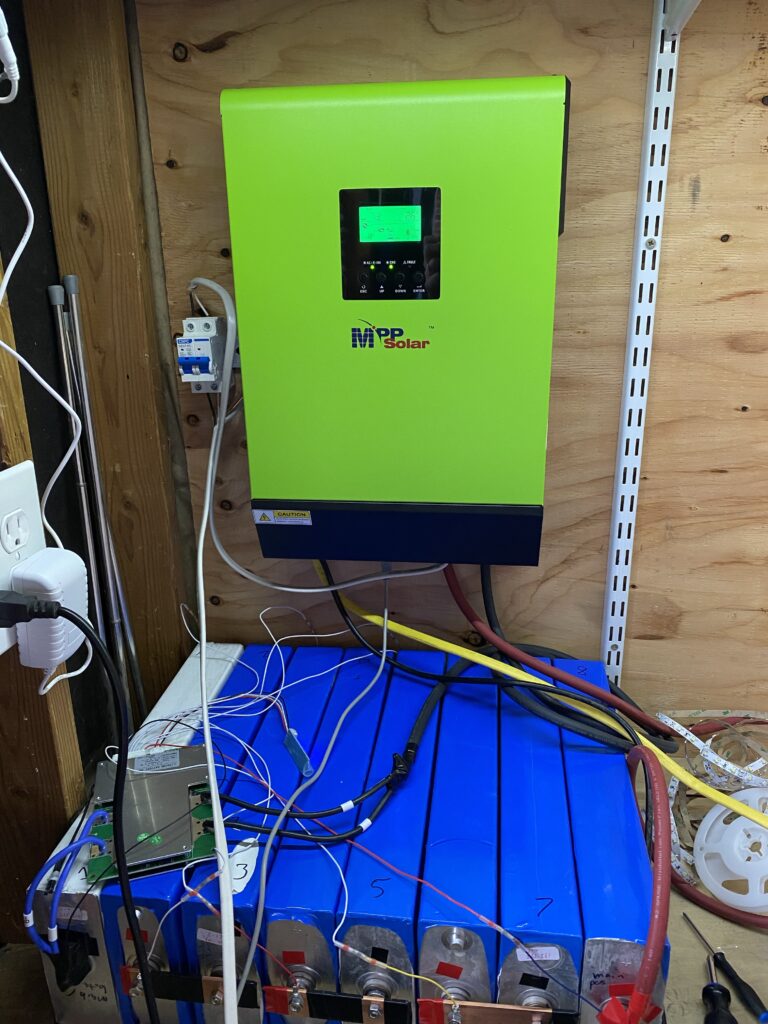
If you recall, my DIY hybrid solar setup with battery backup is up and running. I wrote about it here – DIY solar with battery backup – up and running!

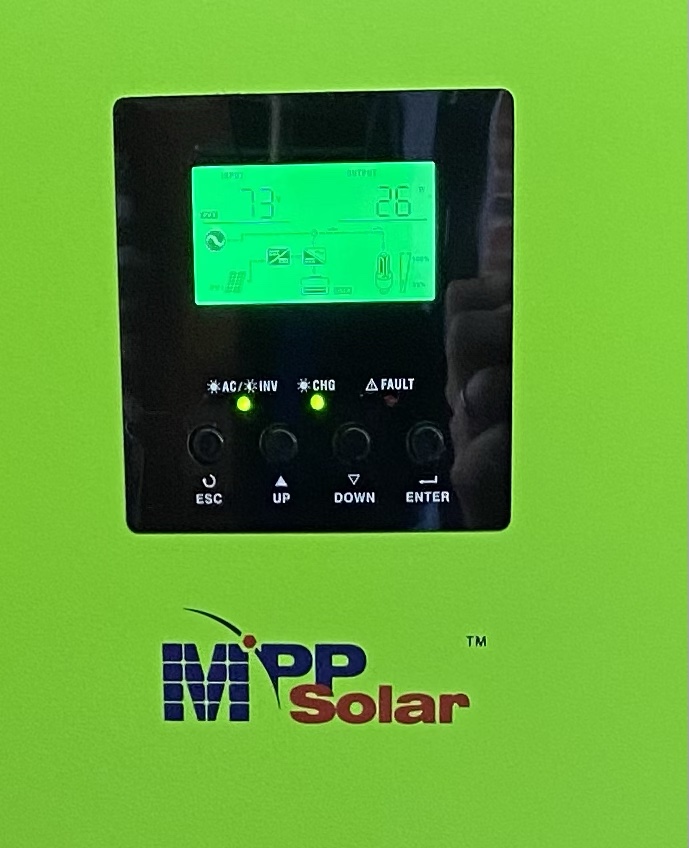
The MPP LV2424 inverter I’m using puts out a lot of data. Some of it is quite useful, some of it not so much. Regardless, I am capturing all of it in my InfluxDB database with Python. This allows me to chart it in Grafana, which I use for basic monitoring stuff around the house. This post will document getting data from the MPP inverter to Grafana.

Jumping ahead

Final product first. This is a screenshot showing my complete (work-in-progress) Grafana dashboard for my DIY hybrid solar setup.

screenshot showing Grafana dashboard which contains various charts and graphs of MPP solar inverter voltages and datat
Solar dashboard as seen in Grafana pulling data from InfluxDB

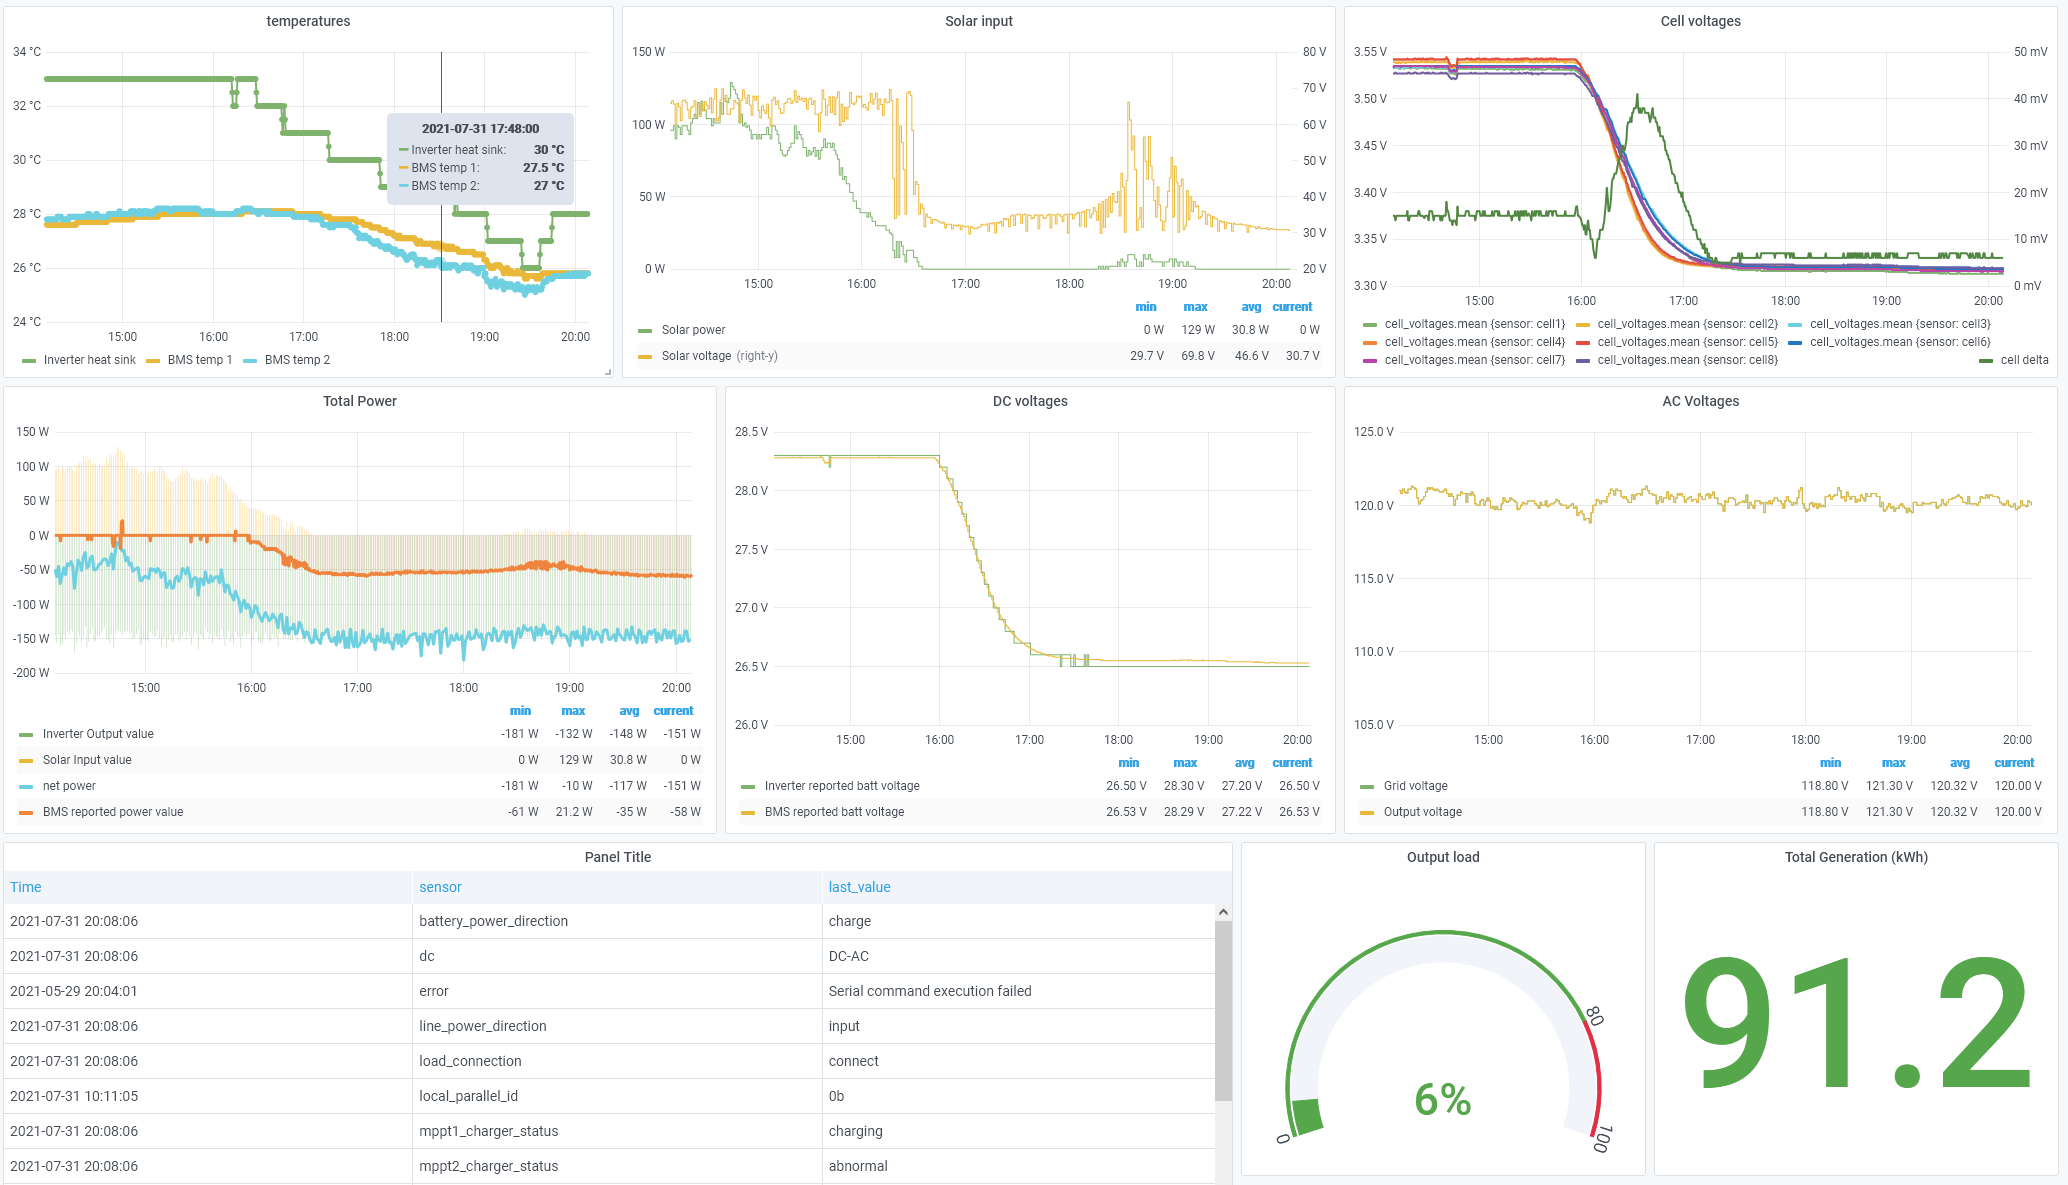
The screenshot shows the last 6 hours worth of data from my system. It was a cloudy and then stormy afternoon/evening here in Denver (we got 0.89 inches of rain since midnight as of typing this post!), so the solar production wasn’t great. The panels are as follows:

  • Temperatures – showing temperatures from 3 sources: the MPP LV2424 inverter heat sink, and both BMS temperature probes (one is on the BMS board itself, the other is a probe on the battery bank). The inverter has at least 2 temperature readings, maybe 3. They all basically show the same thing.
  • Solar input – shows solar voltage as seen by the solar charge controller as well as solar power (in watts) going through the charge controller.
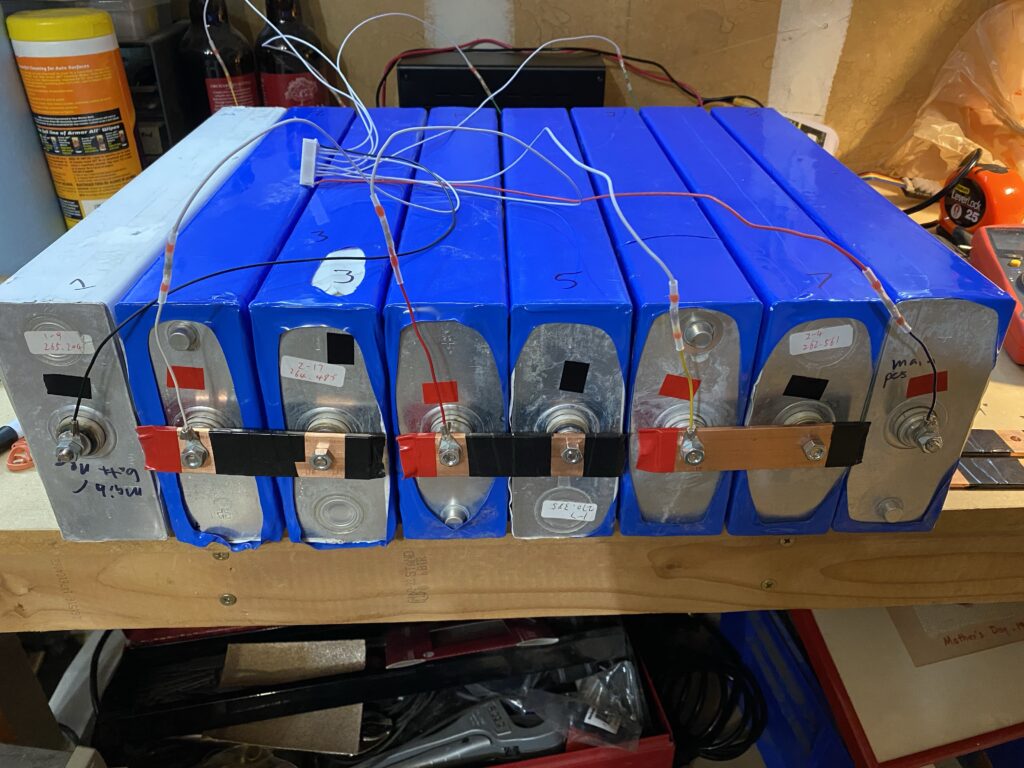
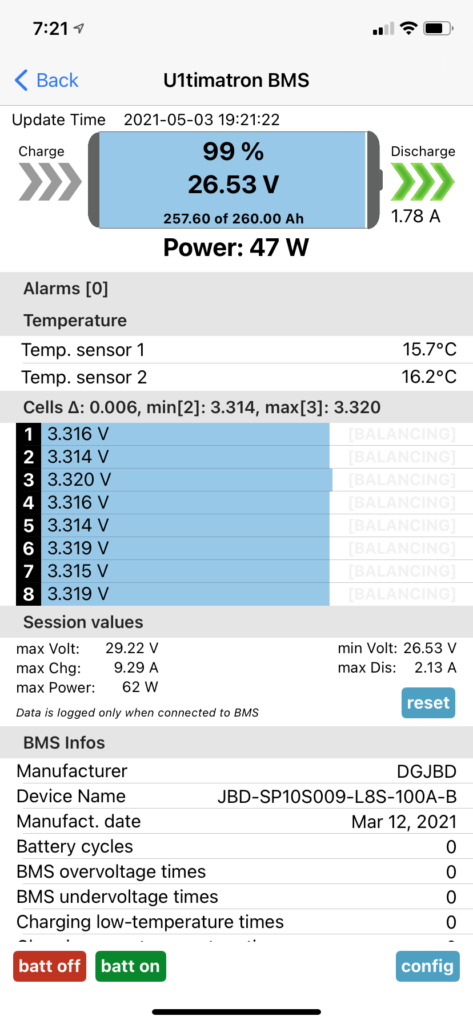
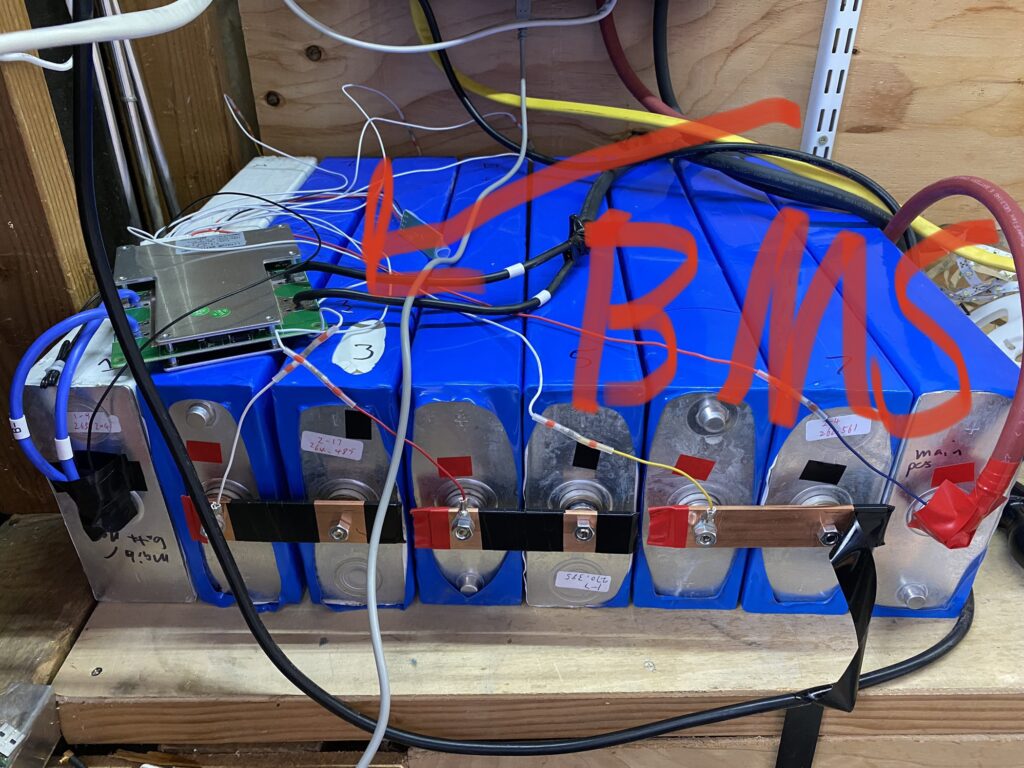
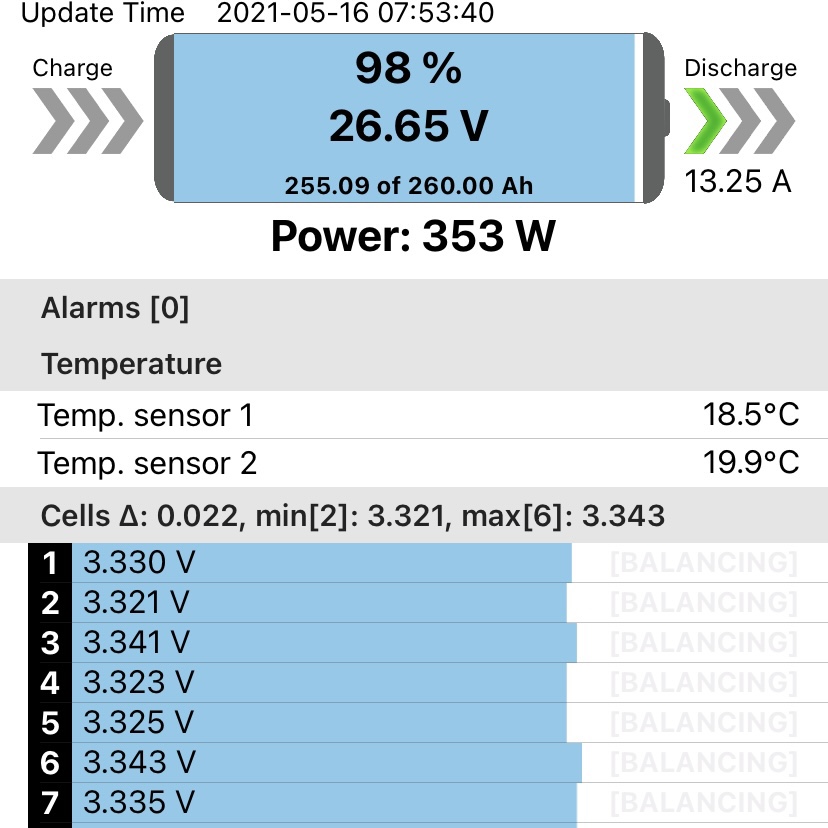
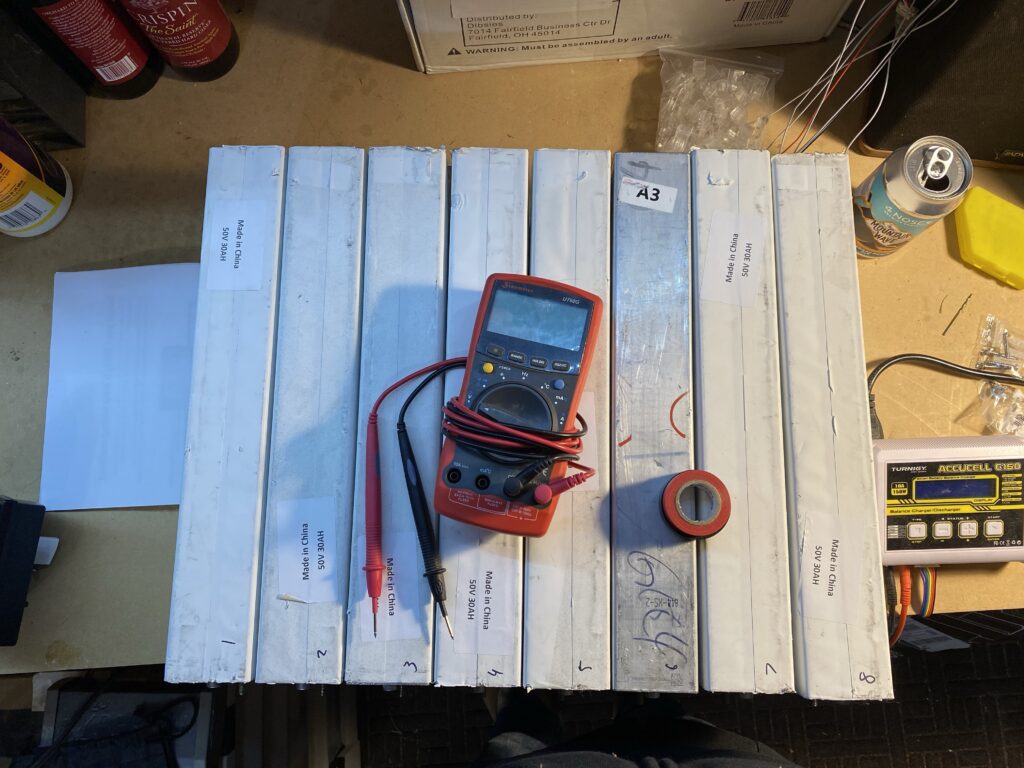
  • Cell voltages – the voltage reading of each of my 8 battery bank cells as reported by the BMS. The green graph also shows the delta between max and min cells. They are still pretty balanced in the flat part of the discharge curve.
  • Total power – a mashup of what the inverter is putting out, what the solar is putting in, the difference between the two, and what the BMS is reporting. I’m still trying to figure out all the nuances here. There is definitely a discrepancy between what the inverter is putting out and what the solar is putting in when the batteries are fully charged. I believe the difference is the power required to keep the transformer energized (typically ranges from 30-60W).
  • DC voltages – as reported by the inverter and the BMS. The inverter is accurate to 0.1V, the BMS goes to 0.01V.
  • AC voltages – shows the input voltage from the grid and the output voltage from the inverter. These will match unless the inverter is disconnected from the grid.
  • Data table – miscellaneous information from the inverter that isn’t graphable
  • Output load – how much output I’m using compared to the inverter’s limit
  • Total Generation – how much total energy has been captured by the inverter/solar panels. This is limited because I’m not back feeding the grid.

Getting data out of the MPP Solar LV2424 inverter with Python to MQTT

I am using two cables to plug the inverter into a computer. The first is the serial cable that came with the inverter. The second is a simple USB to RS232 serial adapter plugged into a Dell Micro 3070.

The computer is running Proxmox, which is a virtual machine hypervisor. That doesn’t matter for this post, we can ignore it. Just pretend the USB cable is plugged directly into a computer running Ubuntu 20.04 Linux.

The main bit of software I’m using is published on GitHub by jblance under the name ‘mpp-solar’ – https://github.com/jblance/mpp-solar. This is a utility written in Python to communicate with MPP inverters.

There was a good bit of fun trying to figure out exactly what command I needed to run to get data out of the inverter as evidenced by the history command:

Trying to figure out the usage of the Python mpp-solar utility

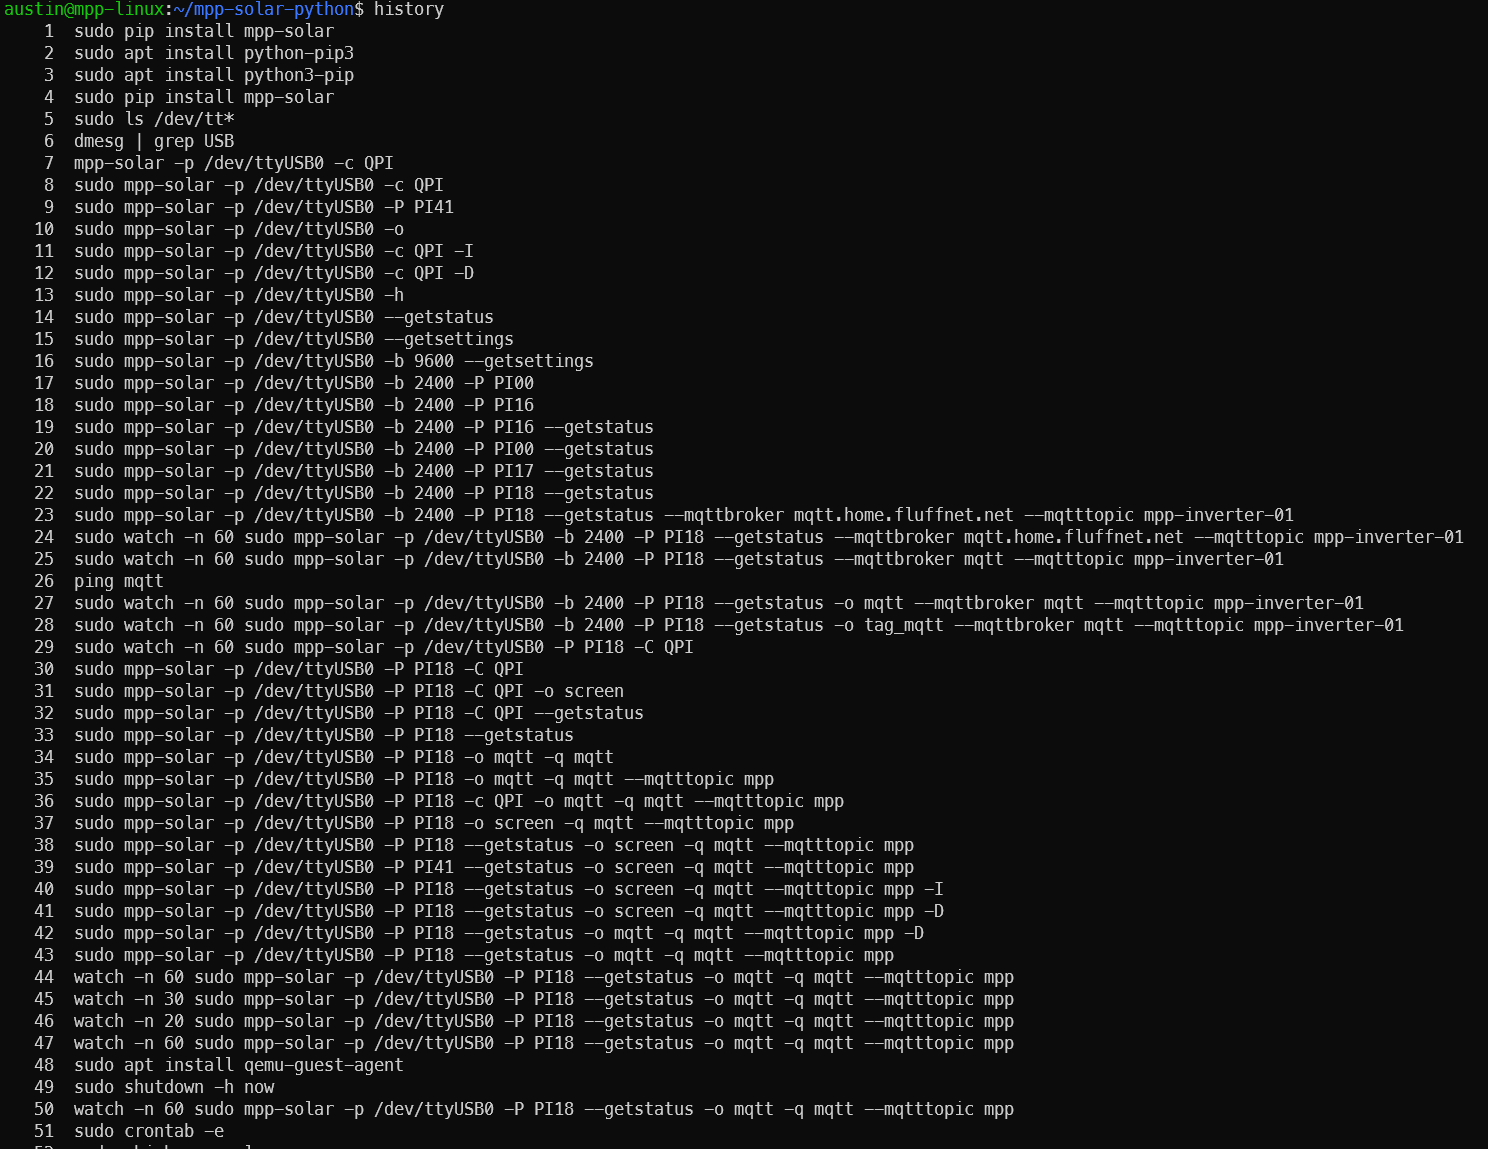
In the end, what worked for me to get the data is the following. I believe the protocol (-P) will be different for different MPP Solar inverters:

sudo mpp-solar -p /dev/ttyUSB0 -b 2400 -P PI18 --getstatus

And the results are below. The grid voltage reported is a bit low because the battery started charging from the grid a few minutes before this was run.

austin@mpp-linux:~/mpp-solar-python$ sudo mpp-solar -p /dev/ttyUSB0 -b 2400 -P PI18 --getstatus
Command: ET - Total Generated Energy query
------------------------------------------------------------
Parameter                       Value           Unit
working_mode                    Hybrid mode(Line mode, Grid mode)
grid_voltage                    111.2           V
grid_frequency                  59.9            Hz
ac_output_voltage               111.2           V
ac_output_frequency             59.9            Hz
ac_output_apparent_power        155             VA
ac_output_active_power          139             W
output_load_percent             5               %
battery_voltage                 27.1            V
battery_voltage_from_scc        0.0             V
battery_voltage_from_scc2       0.0             V
battery_discharge_current       0               A
battery_charging_current        19              A
battery_capacity                76              %
inverter_heat_sink_temperature  30              °C
mppt1_charger_temperature       0               °C
mppt2_charger_temperature       0               °C
pv1_input_power                 0               W
pv2_input_power                 0               W
pv1_input_voltage               0.0             V
pv2_input_voltage               0.0             V
setting_value_configuration_state       Something changed
mppt1_charger_status            abnormal
mppt2_charger_status            abnormal
load_connection                 connect
battery_power_direction         charge
dc/ac_power_direction           AC-DC
line_power_direction            input
local_parallel_id               0
total_generated_energy          91190           Wh

And to get the same data right into MQTT I am using the following:

sudo mpp-solar -p /dev/ttyUSB0 -P PI18 --getstatus -o mqtt -q mqtt --mqtttopic mpp

The above command is being run as a cron job once a minute. The default baud rate for the inverter is 2400 bps (yes, bits per second), which is super slow so a full poll takes ~6 seconds. Kind of annoying in 2021 but not a huge problem. The cron entry for the command is this:

# this program feeds a systemd service to convert the outputted mqtt to influx points
* * * * * /usr/local/bin/mpp-solar -p /dev/ttyUSB0 -P PI18 --getstatus -o mqtt -q mqtt --mqtttopic mpp

So with that we have MPP inverter data going to MQTT.

Putting MPP data into InfluxDB from MQTT

Here we need another script written in… take a guess… Python! This Python basically just opens a connection to a MQTT broker and transmits any updates to InfluxDB. The full script is a bit more complicated and I actually stripped a lot out because my MQTT topic names didn’t fit the template the original author used. I have started using this framework in other places to do the MQTT to InfluxDB translation. I like things going to the intermediate MQTT so they can be picked up for easy viewing in Home Assistant. Original code from https://github.com/KHoos/mqtt-to-influxdb-forwarder. The original code seems like it was built to be more robust than what I’m using it for (read: I have no idea what half of it does) but it worked for my purposes.

You’ll need a simple text file with your InfluxDB password and then reference it in the arguments. If your password is ‘password’, the only contents of the file should be ‘password’. I added the isFloat() function to basically make sure that strings weren’t getting added to the numeric tables in InfluxDB. I honestly find the structure/layout of storing stuff in Influx quite confusing so I’m sure there’s a better way to do this.

#!/usr/bin/env python
# -*- coding: utf-8 -*-
####################################
# originally found at/modified from https://github.com/KHoos/mqtt-to-influxdb-forwarder
####################################

# forwarder.py - forwards IoT sensor data from MQTT to InfluxDB
#
# Copyright (C) 2016 Michael Haas <[email protected]>
#
# This program is free software; you can redistribute it and/or modify
# it under the terms of the GNU General Public License as published by
# the Free Software Foundation; either version 3 of the License, or
# (at your option) any later version.
#
# This program is distributed in the hope that it will be useful,
# but WITHOUT ANY WARRANTY; without even the implied warranty of
# MERCHANTABILITY or FITNESS FOR A PARTICULAR PURPOSE.  See the
# GNU General Public License for more details.
#
# You should have received a copy of the GNU General Public License
# along with this program; if not, write to the Free Software Foundation,
# Inc., 51 Franklin Street, Fifth Floor, Boston, MA 02110-1301  USA

import argparse
import paho.mqtt.client as mqtt
from influxdb import InfluxDBClient
import json
import re
import logging
import sys
import requests.exceptions


class MessageStore(object):

        def store_msg(self, node_name, measurement_name, value):
                raise NotImplementedError()

class InfluxStore(MessageStore):

        logger = logging.getLogger("forwarder.InfluxStore")

        def __init__(self, host, port, username, password_file, database):
                password = open(password_file).read().strip()
                self.influx_client = InfluxDBClient(
                        host=host, port=port, username=username, password=password, database=database)

        def store_msg(self, database, sensor, value):
                influx_msg = {
                        'measurement': database,
                        'tags': {'sensor': sensor},
                        'fields': {'value' : value}
                }
                self.logger.debug("Writing InfluxDB point: %s", influx_msg)
                try:
                        self.influx_client.write_points([influx_msg])
                except requests.exceptions.ConnectionError as e:
                        self.logger.exception(e)

class MessageSource(object):

        def register_store(self, store):
                if not hasattr(self, '_stores'):
                        self._stores = []
                self._stores.append(store)

        @property
        def stores(self):
                # return copy
                return list(self._stores)

def isFloat(str_val):
  try:
    float(str_val)
    return True
  except ValueError:
    return False

def convertToFloat(str_val):
    if isFloat(str_val):
        fl_result = float(str_val)
        return fl_result
    else:
        return str_val

class MQTTSource(MessageSource):

        logger = logging.getLogger("forwarder.MQTTSource")

        def __init__(self, host, port, node_names, stringify_values_for_measurements):
                self.host = host
                self.port = port
                self.node_names = node_names
                self.stringify = stringify_values_for_measurements
                self._setup_handlers()

        def _setup_handlers(self):
                self.client = mqtt.Client()

                def on_connect(client, userdata, flags, rc):
                        self.logger.info("Connected with result code  %s", rc)
                        # subscribe to /node_name/wildcard
                        #for node_name in self.node_names:
                        # topic = "{node_name}/#".format(node_name=node_name)
                        topic = "get_status/status/#"
                        self.logger.info("Subscribing to topic %s", topic)
                        client.subscribe(topic)

                def on_message(client, userdata, msg):
                        self.logger.debug("Received MQTT message for topic %s with payload %s", msg.topic, msg.payload)
                        list_of_topics = msg.topic.split('/')
                        measurement = list_of_topics[2]
                        if list_of_topics[len(list_of_topics)-1] == 'unit':
                                value = None
                        else:
                                value = msg.payload
                                decoded_value = value.decode('UTF-8')
                                if isFloat(decoded_value):
                                        str_value = convertToFloat(decoded_value)
                                        for store in self.stores:
                                                store.store_msg("power_measurement",measurement,str_value)
                                else:
                                        for store in self.stores:
                                                store.store_msg("power_measurement_strings",measurement,decoded_value)


                self.client.on_connect = on_connect
                self.client.on_message = on_message

        def start(self):
                print(f"starting mqtt on host: {self.host} and port: {self.port}")
                self.client.connect(self.host, self.port)
                # Blocking call that processes network traffic, dispatches callbacks and
                # handles reconnecting.
                # Other loop*() functions are available that give a threaded interface and a
                # manual interface.
                self.client.loop_forever()


def main():
        parser = argparse.ArgumentParser(
                description='MQTT to InfluxDB bridge for IOT data.')
        parser.add_argument('--mqtt-host', default="mqtt", help='MQTT host')
        parser.add_argument('--mqtt-port', default=1883, help='MQTT port')
        parser.add_argument('--influx-host', default="dashboard", help='InfluxDB host')
        parser.add_argument('--influx-port', default=8086, help='InfluxDB port')
        parser.add_argument('--influx-user', default="power", help='InfluxDB username')
        parser.add_argument('--influx-pass', default="<I have a password here, unclear if the pass-file takes precedence>", help='InfluxDB password')
        parser.add_argument('--influx-pass-file', default="/home/austin/mpp-solar-python/pass.file", help='InfluxDB password file')
        parser.add_argument('--influx-db', default="power", help='InfluxDB database')
        parser.add_argument('--node-name', default='get_status', help='Sensor node name', action="append")
        parser.add_argument('--stringify-values-for-measurements', required=False,      help='Force str() on measurements of the given name', action="append")
        parser.add_argument('--verbose', help='Enable verbose output to stdout', default=False, action='store_true')
        args = parser.parse_args()

        if args.verbose:
                logging.basicConfig(stream=sys.stdout, level=logging.DEBUG)
        else:
                logging.basicConfig(stream=sys.stdout, level=logging.WARNING)

        print("creating influxstore")
        store = InfluxStore(host=args.influx_host, port=args.influx_port, username=args.influx_user, password_file=args.influx_pass_file, database=args.influx_db)
        print("creating mqttsource")
        source = MQTTSource(host=args.mqtt_host,
                                                port=args.mqtt_port, node_names=args.node_name,
                                                stringify_values_for_measurements=args.stringify_values_for_measurements)
        print("registering store")
        source.register_store(store)
        print("start")
        source.start()

if __name__ == '__main__':
        main()

Running the MQTT to InfluxDB script as a system daemon

Next up, we need to run the MQTT to InfluxDB Python script as a daemon so it starts with the machine and runs in the background. If you haven’t noticed by now, this is the standard pattern for most of the stuff I do – either a cron job or daemon to get data and another daemon to put it where I want it. Sometimes they’re the same.

austin@mpp-linux:~$ cat /etc/systemd/system/mpp-solar.service
[Unit]
Description=MPP inverter data - MQTT to influx
After=multi-user.target

[Service]
User=austin
Type=simple
Restart=always
RestartSec=10
# data feeds this script from a root cronjob running every 60s
ExecStart=/usr/bin/python3 /home/austin/mpp-solar-python/main.py

[Install]
WantedBy=multi-user.target

Then activate it:

austin@mpp-linux:~$ sudo systemctl daemon-reload
austin@mpp-linux:~$ sudo systemctl enable mpp-solar.service
austin@mpp-linux:~$ sudo systemctl start mpp-solar.service
austin@mpp-linux:~$ sudo systemctl status mpp-solar.service
● mpp-solar.service - MPP inverter data - MQTT to influx
     Loaded: loaded (/etc/systemd/system/mpp-solar.service; enabled; vendor preset: enabled)
     Active: active (running) since Sat 2021-07-31 02:21:32 UTC; 1 day 13h ago
   Main PID: 462825 (python3)
      Tasks: 1 (limit: 1072)
     Memory: 19.2M
     CGroup: /system.slice/mpp-solar.service
             └─462825 /usr/bin/python3 /home/austin/mpp-solar-python/main.py

Jul 31 02:21:32 mpp-linux systemd[1]: Started MPP inverter data - MQTT to influx.

All done

With that, you should now have data flowing into your InfluxDB instance from your MPP inverter via this Python script. This is exactly what I’m using for my LV2424 but it should work with others like the PIP LV2424 MSD, PIP-4048MS, IPS stuff, LV5048, and probably a lot of others.

Next Steps

Next post will cover designing the Grafana dashboard to show this data.

Categories
DIY Offgrid Solar

DIY solar with battery backup – up and running!

Update

As of 5/13/2021, I have everything up and running! My DIY solar system with battery backup has produced 5.9 kWh over the last few days. It has been very wet and rainy this spring here in the Front Range of the Rockies and I don’t think we’ve had a full day of sunshine in a couple weeks. In terms of dollars, that 5.9 kWh is worth $0.649. Not much, but knowing I can power the whole house for 6 hours (based on average consumption) is a pretty good feeling. Check out my last post for some detail on how I got the battery bank set up – DIY Solar System with battery backup update.

Battery bank

The battery bank has performed great so far. I am in the process of doing a full discharge test. These cells did each come with a discharge test sheet from Battery Hookup, all showing more than 260Ah (most around 262Ah). Total for the batteries was $1082.

8x260Ah LiFePO4 cell battery bank ready for BMS

Under discharge in the flat part of the curve, the cells are extremely close in voltage. Below is a screenshot of my BMS app (XiaoxiangBMS, which is a super handy app. the fastest I’ve ever spent $6 on the pro version of an app) showing minor discharge current and the cells are within 6 millivolts of each other. It really doesn’t get much better than that.

BMS app (I am not creative enough to name my BMS the U1timatron) showing closely matched cell voltages during discharge

BMS

The BMS is a JBD 8s 100A model I got from eBay that comes with bluetooth monitoring ability. It has worked flawlessly so far. I love it when technology just works. Every setting can be configured. It keeps track of every alarm event. It has temperature protection. Great BMS.

JBD 8S 100A Battery monitoring system (BMS) keeping tabs on my LiFePO4 cells
BMS showing a modest discharge. I’ve taken it to 1200W so far.

Inverter

The all-in-one inverter (inverter, battery charger, MPPT solar controller) is a MPP Solar LV2424 hybrid model. Everything works as expected. I’ve tested all the features successfully. I even got the monitoring software going. The main downside so far to this inverter (and I think this is common) is a relatively high idle power consumption. The BMS reports ~56-60W draw with the inverter on and nothing plugged in. The “idle” power draw decreases as a proportion of the total load on the inverter but it never drops to 0. For example, at 0 load, the inverter draws 60W. At 120W load (based on a questionable Kill-A-Watt), the inverter is drawing 160W, meaning the “idle” power dropped to 40W. This inverter was $665.

Inverter mounted above the battery bank. The solar breaker is to the left.

Solar panels

My $100 each solar panels from Craigslist have been hooked up on and off over the last few days. I haven’t seen more than 480W from the 2 of them combined but they are laying completely flat (they should be tilted towards the sun for maximum power). Overall, happy for the price. I need to get them mounted on the roof.

The main testing location on the south side of our house. They’re basically flat, maybe tilted a degree or two to the south. I haven’t seen more than 480W from them (rated for 2×310=620W) yet but they were cheap so I’m not too disappointed.
Inverter showing the panels putting out 26W on a very cloudy day recently. It has apparently decided that 73V was optimal for whatever conditions were present.

What’s next

My DIY solar system with battery backup is commissioned! Things are functional. Things aren’t located optimally. I need to get the solar panels mounted on the roof and do some tidying around the batteries/inverter. I plan on mounting some drywall above the battery cells to protect from whatever and covering up all the battery terminals. The rear of the cells are covered. The mains are covered. Some of the intermediate terminals are not.

I’m already looking on Craigslist for more solar panels, but I need to 100% finish this project before adding on to it according to my lovely wife (I am sure some of you know exactly what I’m talking about!). With that, I’ll be signing off for the night. The baby is having a very hard time falling asleep tonight. Until next time!

Categories
DIY Offgrid Solar

DIY Solar System with battery backup update

Update

As of 5/1/2021, all of the main components of my DIY solar system with battery backup have arrived. I posted about the requirements, component select, and some fun with shipping from China in my initial solar post – Planning my 600W DIY solar system with 6 kWh battery backup. If you want some background of how we got here, head to that link then come on back.

Background

To recap, my DIY solar system with battery backup consists of a few main components:

  • 8x 260 amp hour prismatic LiFePO4 battery cells. They will be placed in series for a 24V nominal system with around 6.0 kilowatt hours of usable storage.
  • MPP LV2424 hybrid all-in-one inverter. This device handles converting direct current (DC, like a car battery) to alternating current (AC, like household outlets) and charging the batteries
  • 2x 310W Canadian solar panels. These will be wired in series for 72V maximum power point voltage.
  • 8S JBD 100A battery management system – to protect the batteries from a number of undesirable conditions

The other miscellaneous things that I need are: battery bus bars, wiring, ring terminals, and general connection things.

Materials arriving and resting battery voltages

We were on vacation when the batteries (and inverter) arrived so they sat for a few days before I got a chance to unbox them. The batteries were very well packaged and I can’t thank Battery Hookup enough for how fast they shipped after what I’ve been dealing with from China.

battery cells unpacked

Upon unboxing, I made sure to record the resting voltage of each cell. Below were the resting voltages:

cellvoltage
13.341
23.345
33.435
43.339
53.351
63.376
73.343
83.363
min3.339
max3.435
avg3.362
delta0.096
Resting voltages of the 260 amp hour BYD LiFePO4 cells

Cell #2 had the lowest voltage and cell #3 the highest. This presented an easy chance to test out my bus bars for voltage equalization. I did not measure the cell internal resistance so I wasn’t really sure how much current would flow from cell 3 to 2 when shorted together so I did a quick estimate based on Ohm’s law (V=IR -> I=V/R). With an estimated internal resistance (IR) of 20 milliohms (I’ve had LiPo in this range after some degradation), and a voltage difference of 0.096V, that would mean a current of 0.096/0.020=4.8A. That wasn’t a huge number so I was comforable just connecting the cells with the bus bars. But first I wanted to actually measure with a multimeter.

I was expecting about 5A based on the calculation above. I’m not sure how I was 10x off on the estimate but after hooking up my multimeter, the equalization current was 0.6A. That was plenty low so I set my mind to balancing. But before that, I needed bus bars to connect all the cells in parallel.

Constructing copper bus bars

Bus bars are used to conduct high amounts of current in electrical applications. In essence, they are oversized, flat wires. I ordered 2x copper bars from McMaster Carr that are 1″x1/8″x3′. They arrived in two days with free shipping… Amazon is gaining competition. I got to work drilling holes.

bus bars ready for drilling
copper bus bars ready for drilling with marks spaced 2.5″ apart
drilling 2mm pilot hole
drilling 6mm hole
drilling 6mm final hole
copper shards after drilling
filing down rough edges

Heat shrinking the cells

With the bus bars ready, it was time to heat shrink the battery cells. Battery Hookup said they were uncovered and needed to be heat shrunk for every cell. Turns out 7 of 8 had a covering on them already. I heat shrunk them anyways for two reasons: 1) to further protect the cells from damage and short circuits and 2) so they look better. The cell on the left will be re-done with more heat shrink. I guestimated how much I needed and was short a few inches.

cells ready for heat shrink
cells heat shrunk with BMS
cells heat shrunk with BMS on top

Balancing in 2 sets of 4 cells each

When making the bus bars, I put together a mental picture of what I needed to make and how many I needed. This worked fine for the final battery but I would need double for balancing. I had the full extra 3′ copper bar but it took forever to cut so I just decided to balance the cells in 2 groups of 4. Balancing is charging all cells in parallel as one low voltage, giant capacity battery to their rated voltage (3.65V for LiFePO4). Doing 4 cells at a time meant it was a 3.2V battery with a capacity of 1040 amp hours. The resting voltages were in the upper end of the voltage curve chart so it wouldn’t take super long. If the battery was fully depleted, it would take 104 hours at the 10 amps my bench power supply puts out.

So I got the bus bars hooked up and started balancing by setting my power supply to 3.65V and current to max.

battery cells hooked up in parallel
battery cells hooked up in parallel (4x cells in parallel means a single 3.2V 1000Ah “cell”)
Measurement discrepancies and voltage drop

The first thing I did when I started charging was take voltage measurements to make sure things were right. I noticed some irregularities.

The first irregularity was the fact that the bench power supply was over-reporting the voltage by 0.034V or so when comparing the display to the terminals. This isn’t a huge deal and is actually a pretty decent level of accuracy for a $40 bench power supply from Amazon.

verifying DC power supply output voltage
verifying DC power supply output voltage (set to 3.650V, actual output is 3.614V)

The next thing I noticed is that for a 10A power supply, it is putting out a lot less than 10A. So I measured the voltage at the bus bars.

measuring voltage at bus bars
measuring voltage at bus bars. this is a pretty big voltage drop through the charger wires. 3.616V at the terminals – 3.363V at the bus bars is 0.253V drop. At 3.962A, that is a resistance of (V=IR -> V/I=R) 0.063 ohms. the wires were warm.

By leaving the voltage set to 3.65V at the DC power supply, the voltage drop means I wouldn’t get anywhere the rated 10A. The actual drop would decrease proportionally as the battery voltage neared the terminal voltage.

Regardless, it only took a couple hours until the cells were topped off for each set of 4. They are currently resting. I will check their voltages again tomorrow morning. The amount the cells drop in voltage from where they left off indicates the strength of the cell, with larger drops meaning weaker cells.

balancing in progress
the very start of balancing the 2nd set of 4 cells. I do intend to rewrap cell 3 and wrap cell 1 when my next batch of shrinkwrap arrives.

Conclusion

This is where we will leave off for the day. The 8 cells have been balanced in 2 groups of 4 and are currently resting. After 24 hours I will recheck the voltages to see which cells are strong and which are weak. I need to buy more electrical tape to cover up the bus bar ends (I did start assembling the full battery but stopped because the potential for short-circuit was higher than I was comfortable with).

As of 5/17/2021, things are up and running! Check it out at DIY solar with battery backup – up and running!

Categories
DIY Offgrid Solar

Planning my 600W DIY solar system with 6 kWh battery backup

This post is a work in progress! Update log here:
  • 2021-03-15 – initial post (private)
  • 2021-04-06 – fleshing out the background and requirements
  • 2021-04-29 – updated with parts ordered, reasoning for choices, and some more background for my DIY solar system with battery backup

Background

I’ve always been interested in solar power. Being able to generate heat and electricity from the sun is just so cool on a fundamental level. When I was little, playing with magnifying glasses (read: setting things like plastics and mulch on fire) was always a good time. My mom got me a science book at one point that had a full letter sized (8.5×11″) fresnel lens.

large fresnel lens focused on pavement
The fresnel lens of my childhood wasn’t quite this big but but it sure seemed like it to my 10 year old brain

That fresnel lens upped my lighting things on fire game dramatically. Even since then I’ve wanted to harness large amounts of solar power. I’ve had 50-100W solar panels for a good portion of my adult life running fans and charging small deep cycle 12v batteries, and it is now time to move up to the big leagues. Read on to join my thought process for planning a large-ish system.

Requirements

The requirements for my DIY solar system with battery backup aren’t too strict. I’m looking for the following:

  • Run my homelab for 5-10 minute until it can be powered off
  • Provide a couple hours (1-2) of space heating/cooling for comfort with plenty of battery left over
  • Run the refrigerators for 6-12 hours
  • Run the cable modem/router/WiFi for ~6-12 hours
  • Run the furnace as needed
  • Ability for a generator (to be purchased) to charge the batteries
  • Ability for grid power to charge the batteries
  • Ability for solar panels to charge the batteries
  • Less than $2000 total to get started with a system that can grow
  • Use my 2x300W solar panels I picked up off Craigslist for $100 each
Nice to haves
  • USB/RS-232/RS-485/Ethernet Interface to read status via Raspberry Pi or similar
  • Decent warranty (I don’t usually worry about warranties but this will be a decent chunk of change)
  • Not waiting another two months to ship from China (I may have already ordered the batteries. Ordered Feb 26 2021. Still waiting for even a tracking number as of April 29.)

Initial plan

If we add up all the electricity requirements, we end up with a couple to a few kWh (I am being intentionally vague here. I’ll post details with my next update.). This DIY solar system with battery backup is intended to grow with me – I’m not building a data center-sized system to start. As such, I have a tentative list of the basics:

  • 2x300W solar panels. They are Canadian Solar CSUN-something 36V nominal. Already have these.
  • 8x272Ah LiFePO4 batteries in series for 24V nominal. These will total out to 6.9 kWh of storage assuming full capacity. For $101 per cell shipped, this deal is hard to beat even if it is taking the slow boat from China. 6.9 kWh divided by $101 per cell is $116/kWh.
  • A 2.5ish kW inverter. Current choices are MPP Solar LV2424 (2.4 kW 24V with most of my requirements for ~$700) or the Growatt SPF 3000TL LVM (3.0 kW 24V with basically the same features as the MPP for ~$700. but there will be at least a month shipping delay).
  • A quality 8S BMS (expect to spend around $150 for this)

Solar panels

I get an urge to troll craigslist for solar panels (and NAS’s) every couple weeks and came across a post that had 300W solar panels in Loveland, CO. They were in great shape and they were $100 each. $0.33/W is a pretty good price for solar panels so I jumped on them. I didn’t really have a use but knew I would in the future. There is a slight “prepper” tendency I always have in the back of my mind so part of me was thinking I’d be able to use them to charge stuff in the event of an extended power outage. Since I bought them, we have had 3 power outage – one for 2 hours, one for 1 hour, and another for 15 minutes.

[insert pic of solar panels]

Batteries

For batteries, there are a lot of good options. Some better than others. There are a few big decisions:

  • Battery chemistry
    • Lead acid – the traditional “car battery” type but deep cycle. Old tech, heavy, usable capacity is relatively little compared to the full rated capacity (generally recommended to not discharge deeper than 50%). Pretty good price in terms of watt-hours per dollar. Almost all inverters/chargers are designed around 12V/24V/48V as defined by the lead acid cell voltages.
    • Lithium-ion – new tech. Used in many electric car batteries – primarily Tesla. Lots of used cells available (often in bulk). Each cell is about 10Wh. This means many wire connections (500-1000) and soldering. Does not handle overcharging/discharging well. Can cause fires/explosions if handled improperly. No good solutions for 12V standard stuff. 7S (7 cells in series) can work for 24V. 13S works for 48V
    • Lithium polymer – very power dense. Not very energy density. Quite hazardous. That by itself is enough to write these off.
    • Lithium iron phosphate (LiFePO4) – new tech, decent tradeoff for all other aspects mentioned above. Used in electric buses in China (which is a source for cells). Very large capacity per cell (>200Ah), which means minimal wiring. Cell voltage is 3.2V, which matches up perfectly with traditional lead acid voltages (4S is 12V, 8S is 24V, 16S is 48V). Good cycle count/capacity curve (it takes many cycles to reduce capacity). I will be using LiFePO4 batteries in my system.
  • Battery bank voltage – requirements are for a 2.5kW inverter.
    • 12V – 200+ amps for a 2.5kW inverter. This would need large wires. Generally the amount of current at 12V throughout the system would be high. Ability to “start small” with only 4 LiFePO4 cells.
    • 24V – 100 amps for 2.5kW inverter. Much more reasonable. I will be using 24V for my system.
    • 48V – 50 amps for 2.5kW inverter. Even more reasonable but this requires greater up front investment to get enough batteries (16 cells for LiFePO4, meaning $2000+). Borders on what is considered “high voltage” for low voltage DC work (generally the cutoff is 50V).

Below is a table I created in Excel to help me make my decision. When I came across the group buy for the DIYSolar Michael Caro 272Ah cell group buy from China, I took 2 days to decide and ordered 8 cells. That was Feb 26, 2021. I still don’t even have a tracking number. I’ll probably cancel the order. Mid-April, 260Ah cells became available at batteryhookup.com. They weren’t the cheapest in terms of watt-hours per dollar, but they were in Pennsylvania and would arrive to me in a predictable amount of time. With my yearly bonus and tax refund firmly in my bank account, I figured I could have two orders opened at once. I placed the order with BatteryHookup. It took 6 days for 8 cells to arrive. I still don’t have a tracking number for the group buy from China. I can afford to wait. Or I could cancel the China order and get 8 more cells on my door step a few days from now… decisions, decisions.

namelg chem 4p modulesnissan volt 8 packbasen 280ah lifepo4varicore 280ahmichael diysolarbatteryhookup 260ah cells
linkbatteryhookupbatteryhookuplinklinklinklink
chemistryLi-IonLi-IonLiFePO4LiFePO4LiFePO4LiFePO4
nom voltage (V)3.67.63.23.23.23.2
rated cap (Ah)6064272280272260
cap remaining (%)70%70%100%95%100%100%
usable cap (Ah)4244.8272266272260
cell energy (wh)151.2340.48870.4851.2870.4832
cost ($/cell)2040116114.995101125
wh/$7.68.57.57.48.66.7
series738888
parallel221111
total cells1468888
nom bank V25.222.825.625.625.625.6
max bank V29.425.229.229.229.229.2
min bank V22.419.222.422.422.422.4
spares220000
total cells1688888
bank capacity211720436963681069636656
bank cost320320696919.968081000
shipping cost60542530088
total cost380374949919.968081088
bank $/kwh180183136135116163
prosmodular-ishmodular-ishnew, bignew, bignew, bigfast shipping, good capacity
consgood amount of hooking up, usedgood amount of hooking up, used, bad voltageslong shipping time (30-50 days)long shipping, grade Blong shippingexpensive

Inverter

For the inverter, it really came down to two options:

  • MPP Solar LV2424 – 24V 2.4kW 120V (able to be stacked for split phase and/or more current) – this is what I picked
  • Growatt SPF 3000TL LVM – 24V 3.0kW 120V (able to be stacked for split phase and/or more current)

I posted a poll on DIYSolar asking for the popular opinion. Most said go with the Growatt (5 votes to 2 as of 4/29/2021). Will Prowse (solar genius) said they’re basically the same. Both batteries allow charging by utility, have solar MPPT chargers, and monitoring via serial.

I ordered the battery and knew it wouldn’t take long to arrive. The option for Growatt involved waiting 3-4 weeks for a container to arrive at the Port of Long Beach from China. The MPP option shipped from Utah (I am in Colorado – one state to the east). I picked MPP mostly based on shipping time. Also because 8S 100A BMSs are pretty common (which works well for 2.4kW because 100A * 24V = 2.4kW) which usually have a trip limit of around 110A. The next step up is usually 200A which is a correspondingly large increase in cost.

Battery Management System (BMS)

The BMS is there to protect the battery. It protects from a number of conditions – overcharge, overdischarge, overcurrent, cold temperatures, short circuit, and others. The main criteria here is 100A nominal (with overcurrent kicking in around 110A), 8S for 24V, with some sort of monitoring capability (serial, bluetooth, WiFi, etc). An active balancer would be good but that appears to be in the next higher price range. I ended up going with the JBD 8S 100A BMS for $80. One of the things that really caught my eye was this thread about monitoring – it appears these are really capable of putting out data.

Conclusion

With all the main materials/parts ordered, it is time to focus on how to construct the system. When it is all hooked up and ready to go, I will have a small DIY solar system with battery backup to power a few select loads in the house. The main components are:

  • 8x 260Ah prismatic LiFePO4 cells for a 24V nominal system with 6.6 kWh of storage
  • MPP LV2424 inverter for 2.4kW of 120V power with ability to charge from grid, solar, or generator as well as expand with more units in parallel
  • 2x300W solar panels to charge in case of long term outage
  • JBD 8S 100A battery management system