This WordPress blog is decently protected from bots/hackers (read more at Securing this WordPress blog from evil hackers!) but I still get a ton of attempts on the site. Wordfence can block requests at the application layer but as I grow in traffic, I want to make sure CPU cycles aren’t wasted. Thus, I want to block some of these bots/hackers from even connecting to the server. I use Ubuntu, and UFW (Uncomplicated FireWall) is included. It’s pretty simple so I’ve stuck with it.
Blocking IPv4 is easy:
sudo ufw insert 1 deny from 1.2.3.4 comment "repeated unwanted hits on sdrforums.com"
The command broken down:
sudo – run as root since firewall modification requires root access
ufw – run the uncomplicated firewall program
insert – add a rule
1 – insert at the top of the rule list (firewalls evaluate rules from the top down – putting a deny after an allow would mean the traffic wouldn’t be blocked)
deny – deny the request
from – from the following IP
1.2.3.4 – IP address
comment – so you can leave a comment to remind yourself why the rule is in place (“unwanted hits on site.com”, “change request #123456”, “incident remedy #44444”, etc.)
Blocking IPv6 with UFW
So I tried the same command format with an IPv6 address and got an error message – “ERROR: Invalid position ‘1’”. I’ve never got that message before. Also, I do realize I need to widen this IPv6 subnet and block a much larger range of IPs but that’s a topic for a different day.
sudo ufw insert 1 deny from 2400:adc5:11f:5600:e468:9464:e881:b1c0 comment "repeated unwanted hits on sdrforums.com"
ERROR: Invalid position '1'
ufw ERROR: Invalid position ‘1’ screenshot
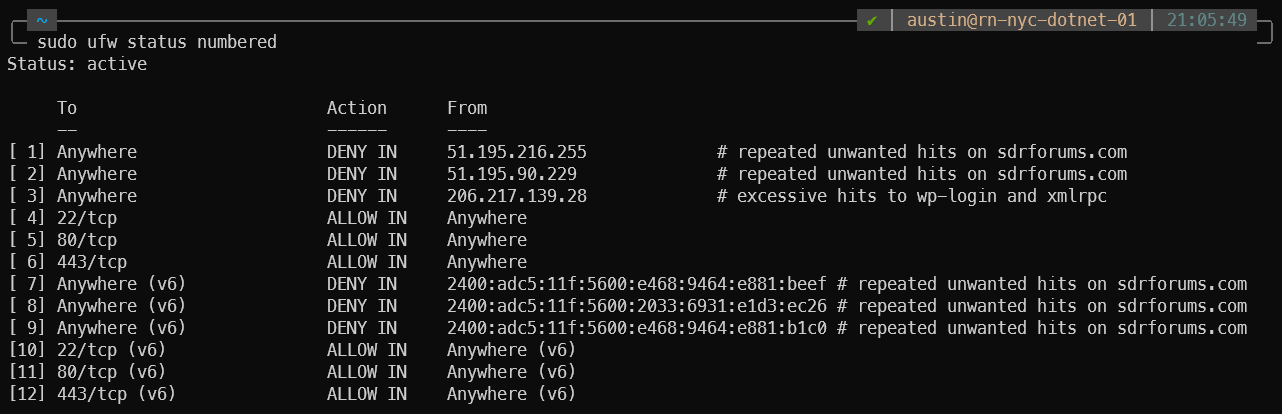
My rule list at the time looked like this:
austin@rn-nyc-01:~$ sudo ufw status numbered
Status: active

     To                         Action      From
     --                         ------      ----
[ 1] Anywhere                   DENY IN     51.195.216.255             # repeated unwanted hits on sdrforums.com
[ 2] Anywhere                   DENY IN     51.195.90.229              # repeated unwanted hits on sdrforums.com
[ 3] Anywhere                   DENY IN     206.217.139.28             # excessive hits to wp-login and xmlrpc
[ 4] 22/tcp                     ALLOW IN    Anywhere
[ 5] 80/tcp                     ALLOW IN    Anywhere
[ 6] 443/tcp                    ALLOW IN    Anywhere
[ 7] 22/tcp (v6)                ALLOW IN    Anywhere (v6)
[ 8] 80/tcp (v6)                ALLOW IN    Anywhere (v6)
[ 9] 443/tcp (v6)               ALLOW IN    Anywhere (v6)
Pretty easy to understand what’s going on here. I have a few IPv4 addresses blocked, but nothing specific to IPv6. A bit of searching later and I learned that the first IPv6 rule needs to come after the last IPv4 rule. So in this case I needed to add the rule to position #7, since that is where the first IPv6 rule current is located:
austin@rn-nyc-dotnet-01:~$ sudo ufw insert 7 deny from 2400:adc5:11f:5600:e468:9464:e881:b1c0 comment "repeated unwanted hits on
 sdrforums.com"
Rule inserted (v6)
SDR stands for software defined radio. It is a term used to describe devices that can receive radio frequency signals over a wide range of frequencies. These devices most commonly interface with USB drives of computers / Raspberry Pi / similar. There are standalone-devices but they often cost quite a bit more than the USB devices. The best part about the base-level SDRs? They’re less than $50. I have a couple that I paid $18 for.
So you’re here on the “Getting Started with SDR” post. In this SDR tutorial post we’ll get a SDR plugged into your Windows computer, install drivers, and start sniffing for signals. We’ll try FM radio first since they have very powerful transmitters and there is almost certainly one you can receive at your hose, followed by checking for those wireless temperature sensors, and then some aircraft position signals.
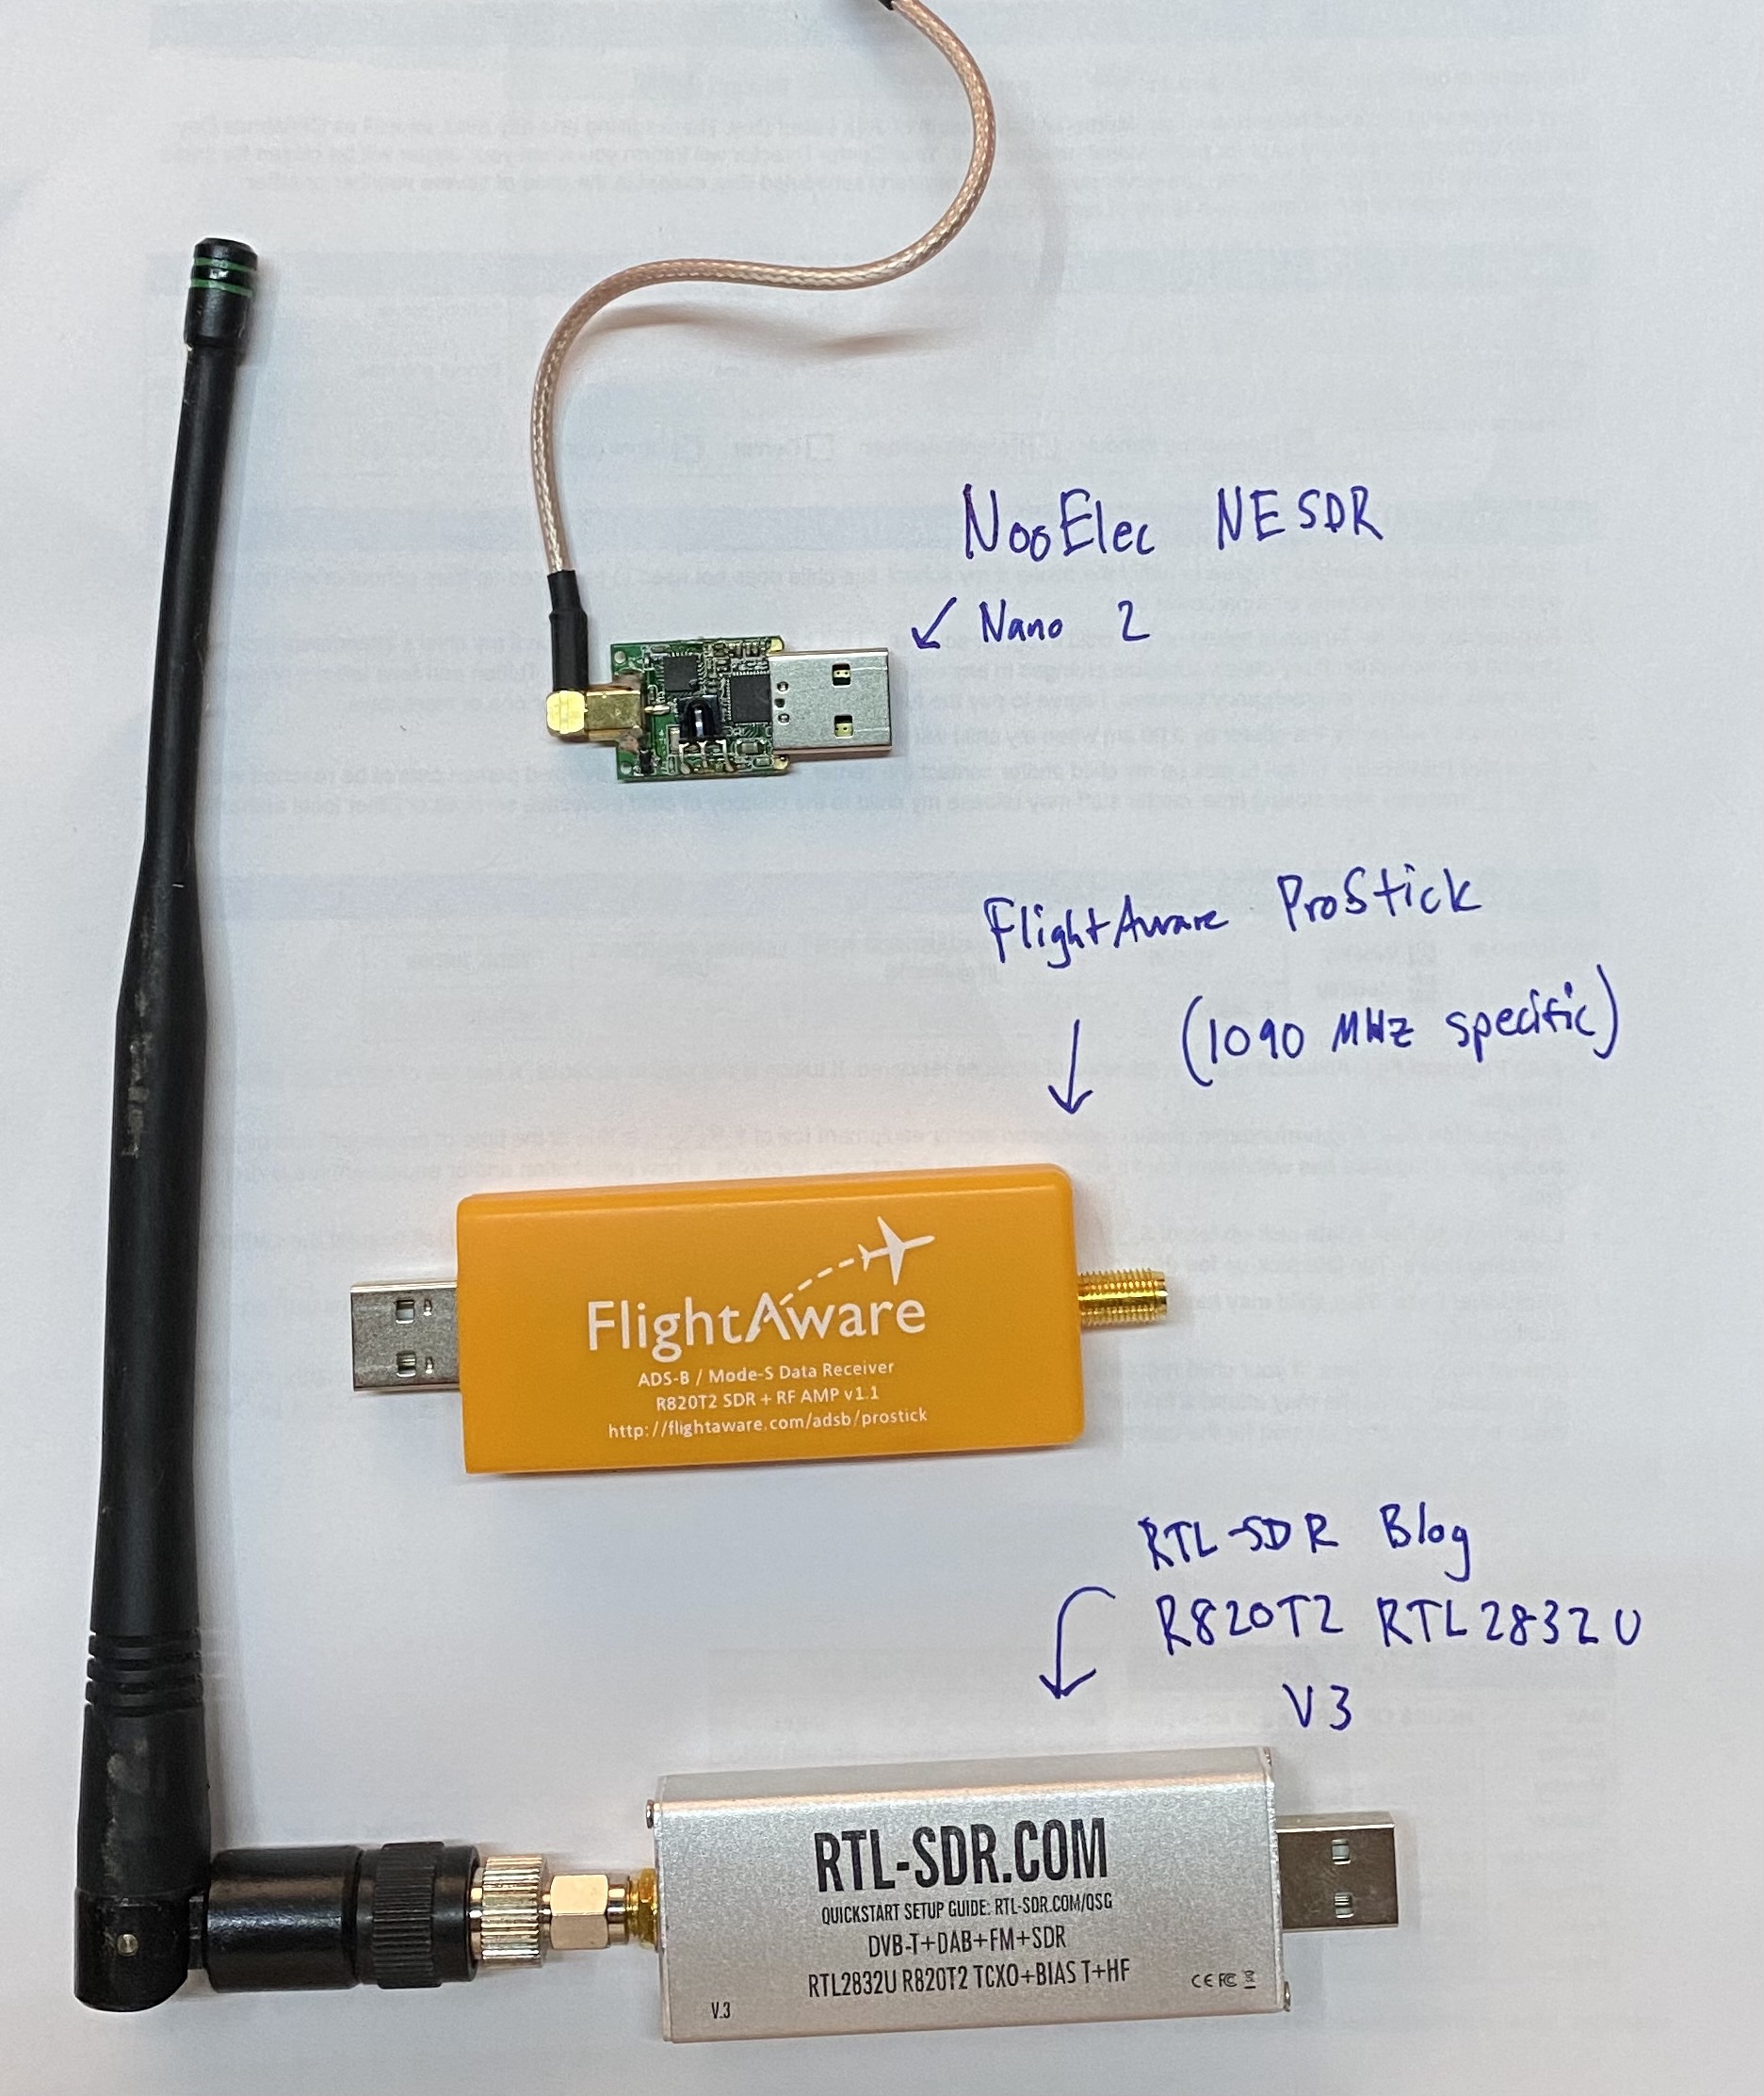
What does a SDR look like? Below is a image with 3 I have around the house that I snagged for a picture (USB plug for size reference). Below the picture is the table of contents for the post.
Example of a couple SDRs (all Realtek chipset-based, hence the RTL abbreviation)
SDR Tutorial Contents
Purchasing a suitable SDR
Plugging it into a Windows computer and installing drivers
Installing SDR# (a program to monitor any and all frequencies)
Listening to a FM radio station
Installing rtl_433 and listening for wireless temperature sensors
Installing dump1090 and listening for aircraft position signals
1 – Purchasing a suitable SDR
To get started, you’ll obviously need a RTL-SDR. I recommend the NooElec devices, specifically the NooElec NESDR Smart v5 bundle. NooElec devices have lasted the longest out of the 8 SDRs I’ve purchased and have been very useful for me. It includes 3 different antenna (433 MHz for sensors, 1090 MHz for ADS-B aircraft signals, and an adjustable antenna) which are useful for the rest of the tutorial:
With a SDR in hand, let’s get started!
2 – Installing drivers and plugging in the RTL-SDR
I use Windows 10 for this SDR tutorial, but I use Linux for the long-term monitoring I have in place around the house. Linux doesn’t ever automatically reboot for updates, and is generally much more stable (and doesn’t need a license). Windows is easy to get started so we’ll use it.
The instructions for installation are a bit long so I’ll just leave a link to the official source where they will always have the most up to date drivers and such – https://www.rtl-sdr.com/rtl-sdr-quick-start-guide/. I will re-write these at some point (and also make a video) but I’ll just leave the link for now.
3 – SDRSharp installation
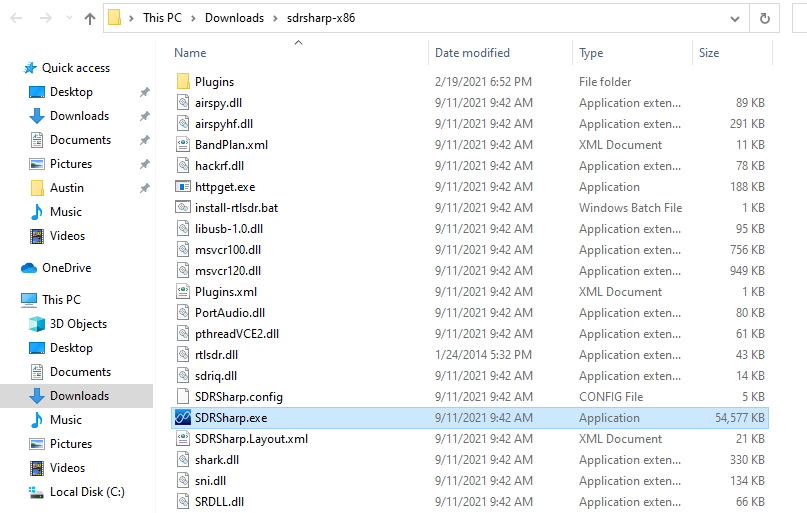
If you followed the instructions in the link above, you should have a file called SDRSharp.exe in the folder you used:
SDRSharp.exe present in working directory
This means it is already “installed” since it is just a simple executable file. No need to click next, next, next finish to install.
4 – Listening to a FM radio station with your RTL-SDR
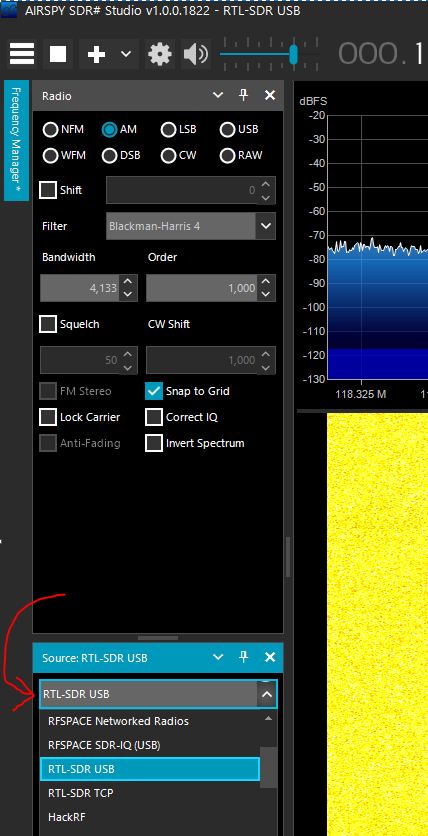
Go ahead and double-click on SDRSharp.exe and launch it! First thing you need to do is select the RTL-SDR USB option from the sources drop down menu:
Selecting the RTL-SDR USB source in SDRSharp
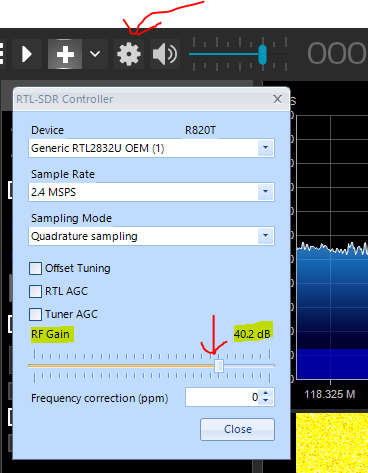
Next up, we need to crank the gain to get useful signal out of the SDR. Click the gear icon, make sure the RTL2832U device is selected, then set the RF gain slider to around 40dB, then click close:
Setting the RTL-SDR gain to 40.2 dB
Now we are ready to listen to FM radio!
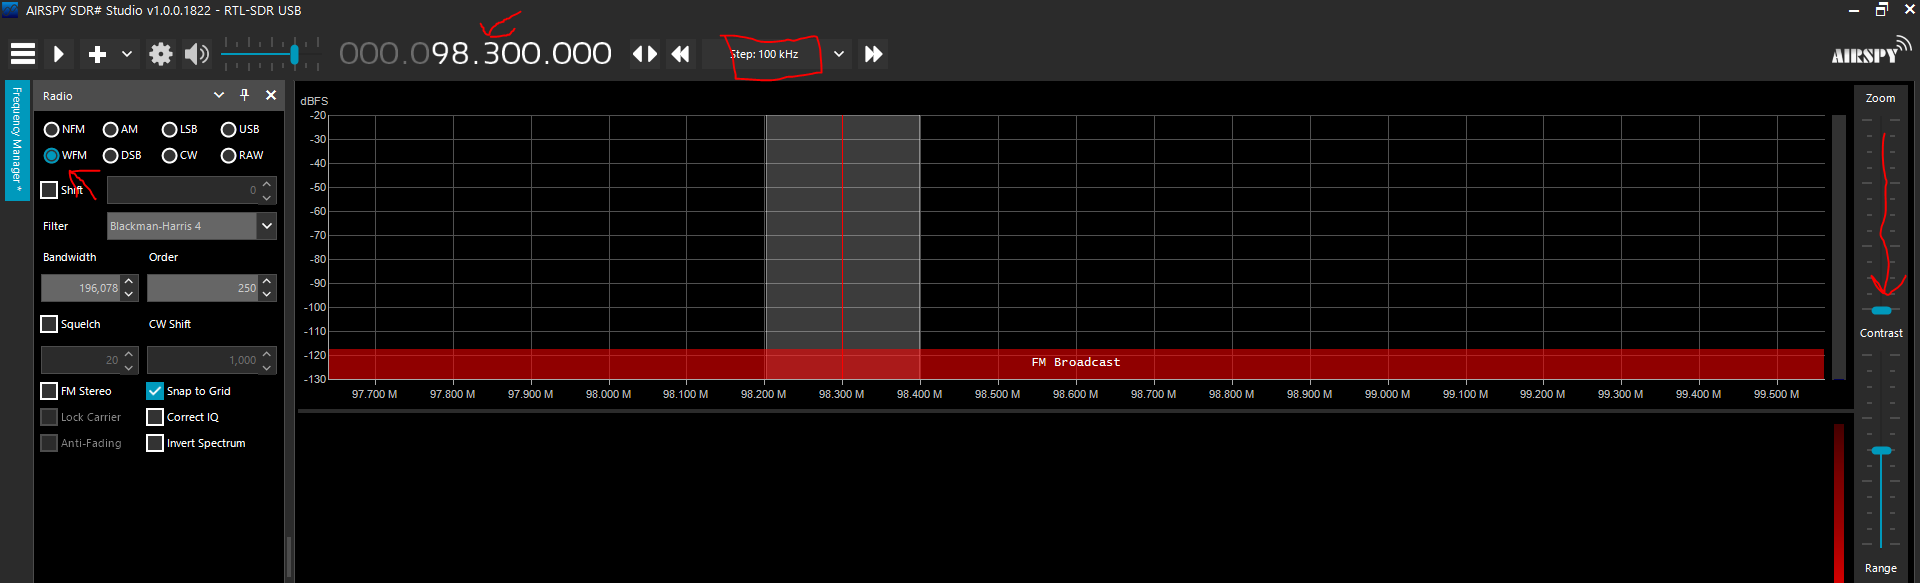
Ensure the WFM radio button is selected in the signal type, set the zoom slider all the way down, set the step to 100 kHz, then click the frequency numbers up/down to pick a known FM station. This should get everything ready to go:
Setting SDRSharp for FM radio station reception
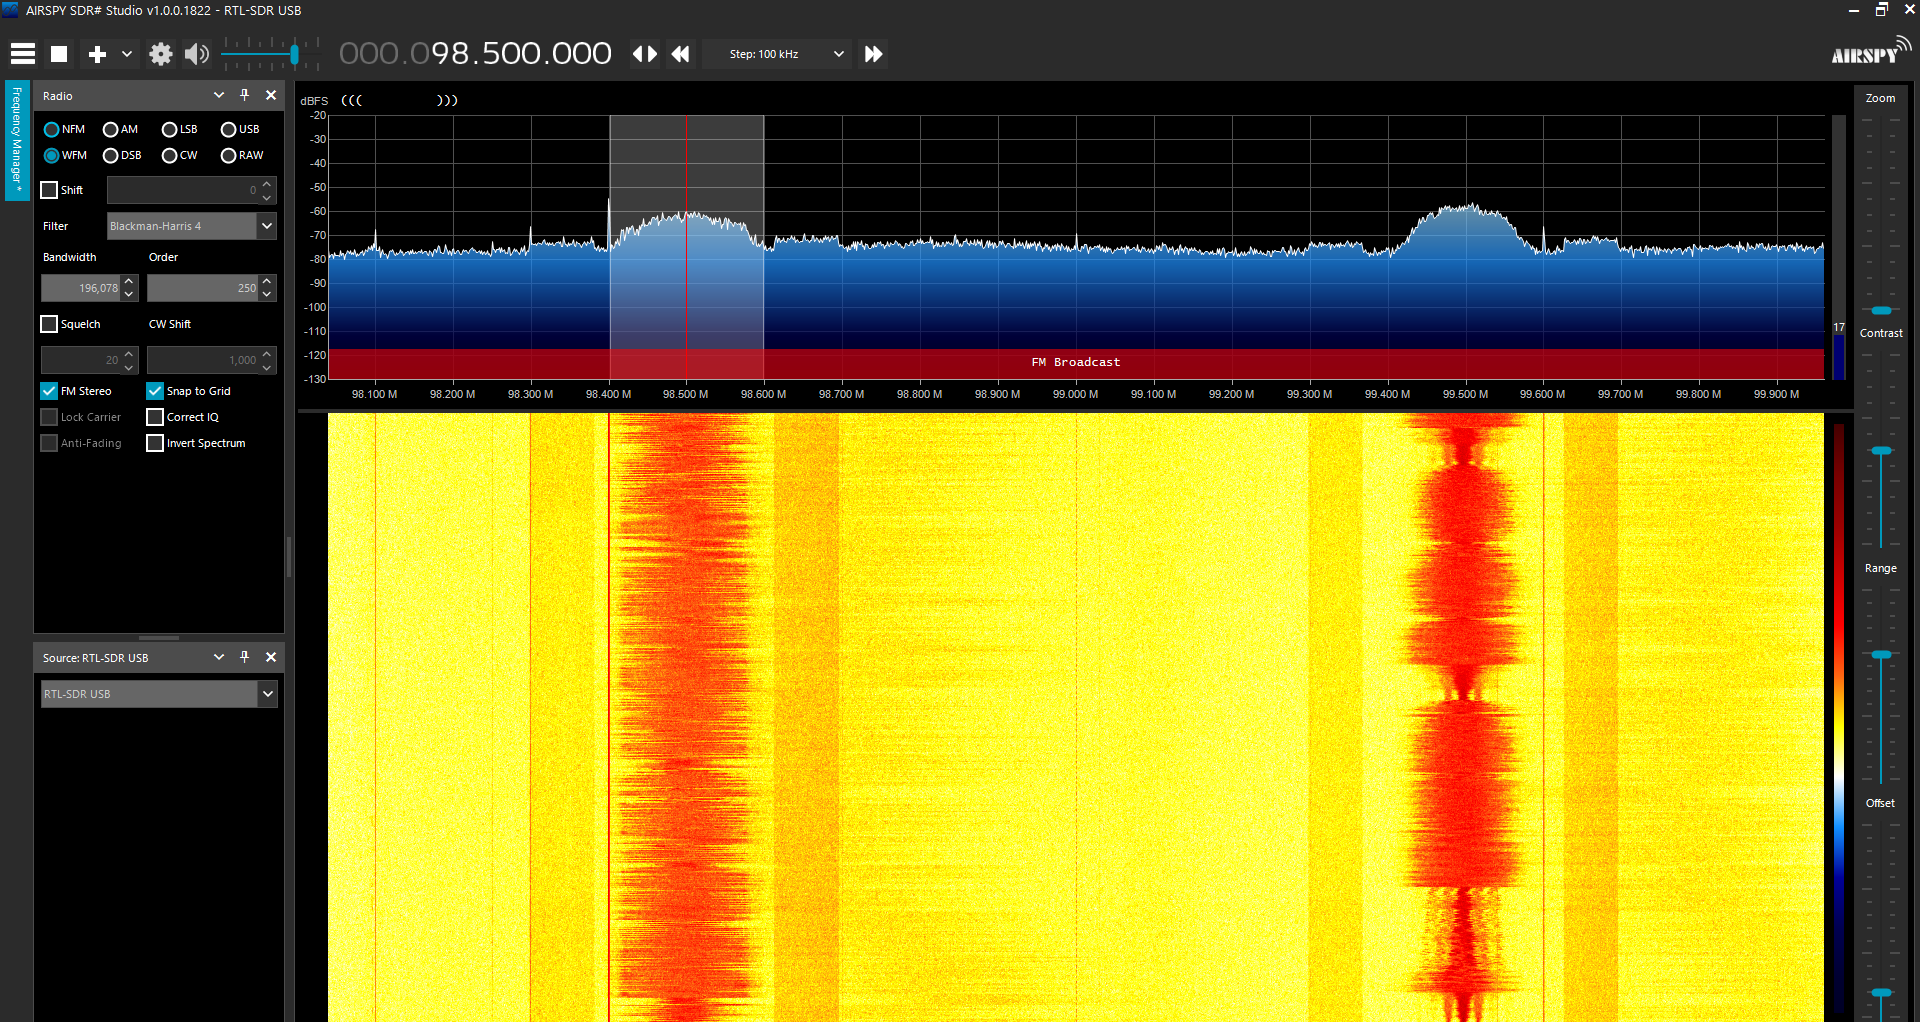
With all that setup out of the way, click the play button and watch the signals start streaming in! Assuming your speakers are set to a decent volume, you’ll hear the radio from your computer! From my 2nd story bedroom near Broomfield, CO, I can easily get 98.5 MHz and 99.5 MHz (and many others). You can also check the “FM Stereo” checkbox on the left side if you know you’ll be receiving FM stereo. Make sure you uncheck it if you start looking at other things:
SDRSharp FM radio reception for 98.5 Mhz (KYGO) and 99.5 MHz (KQMT)
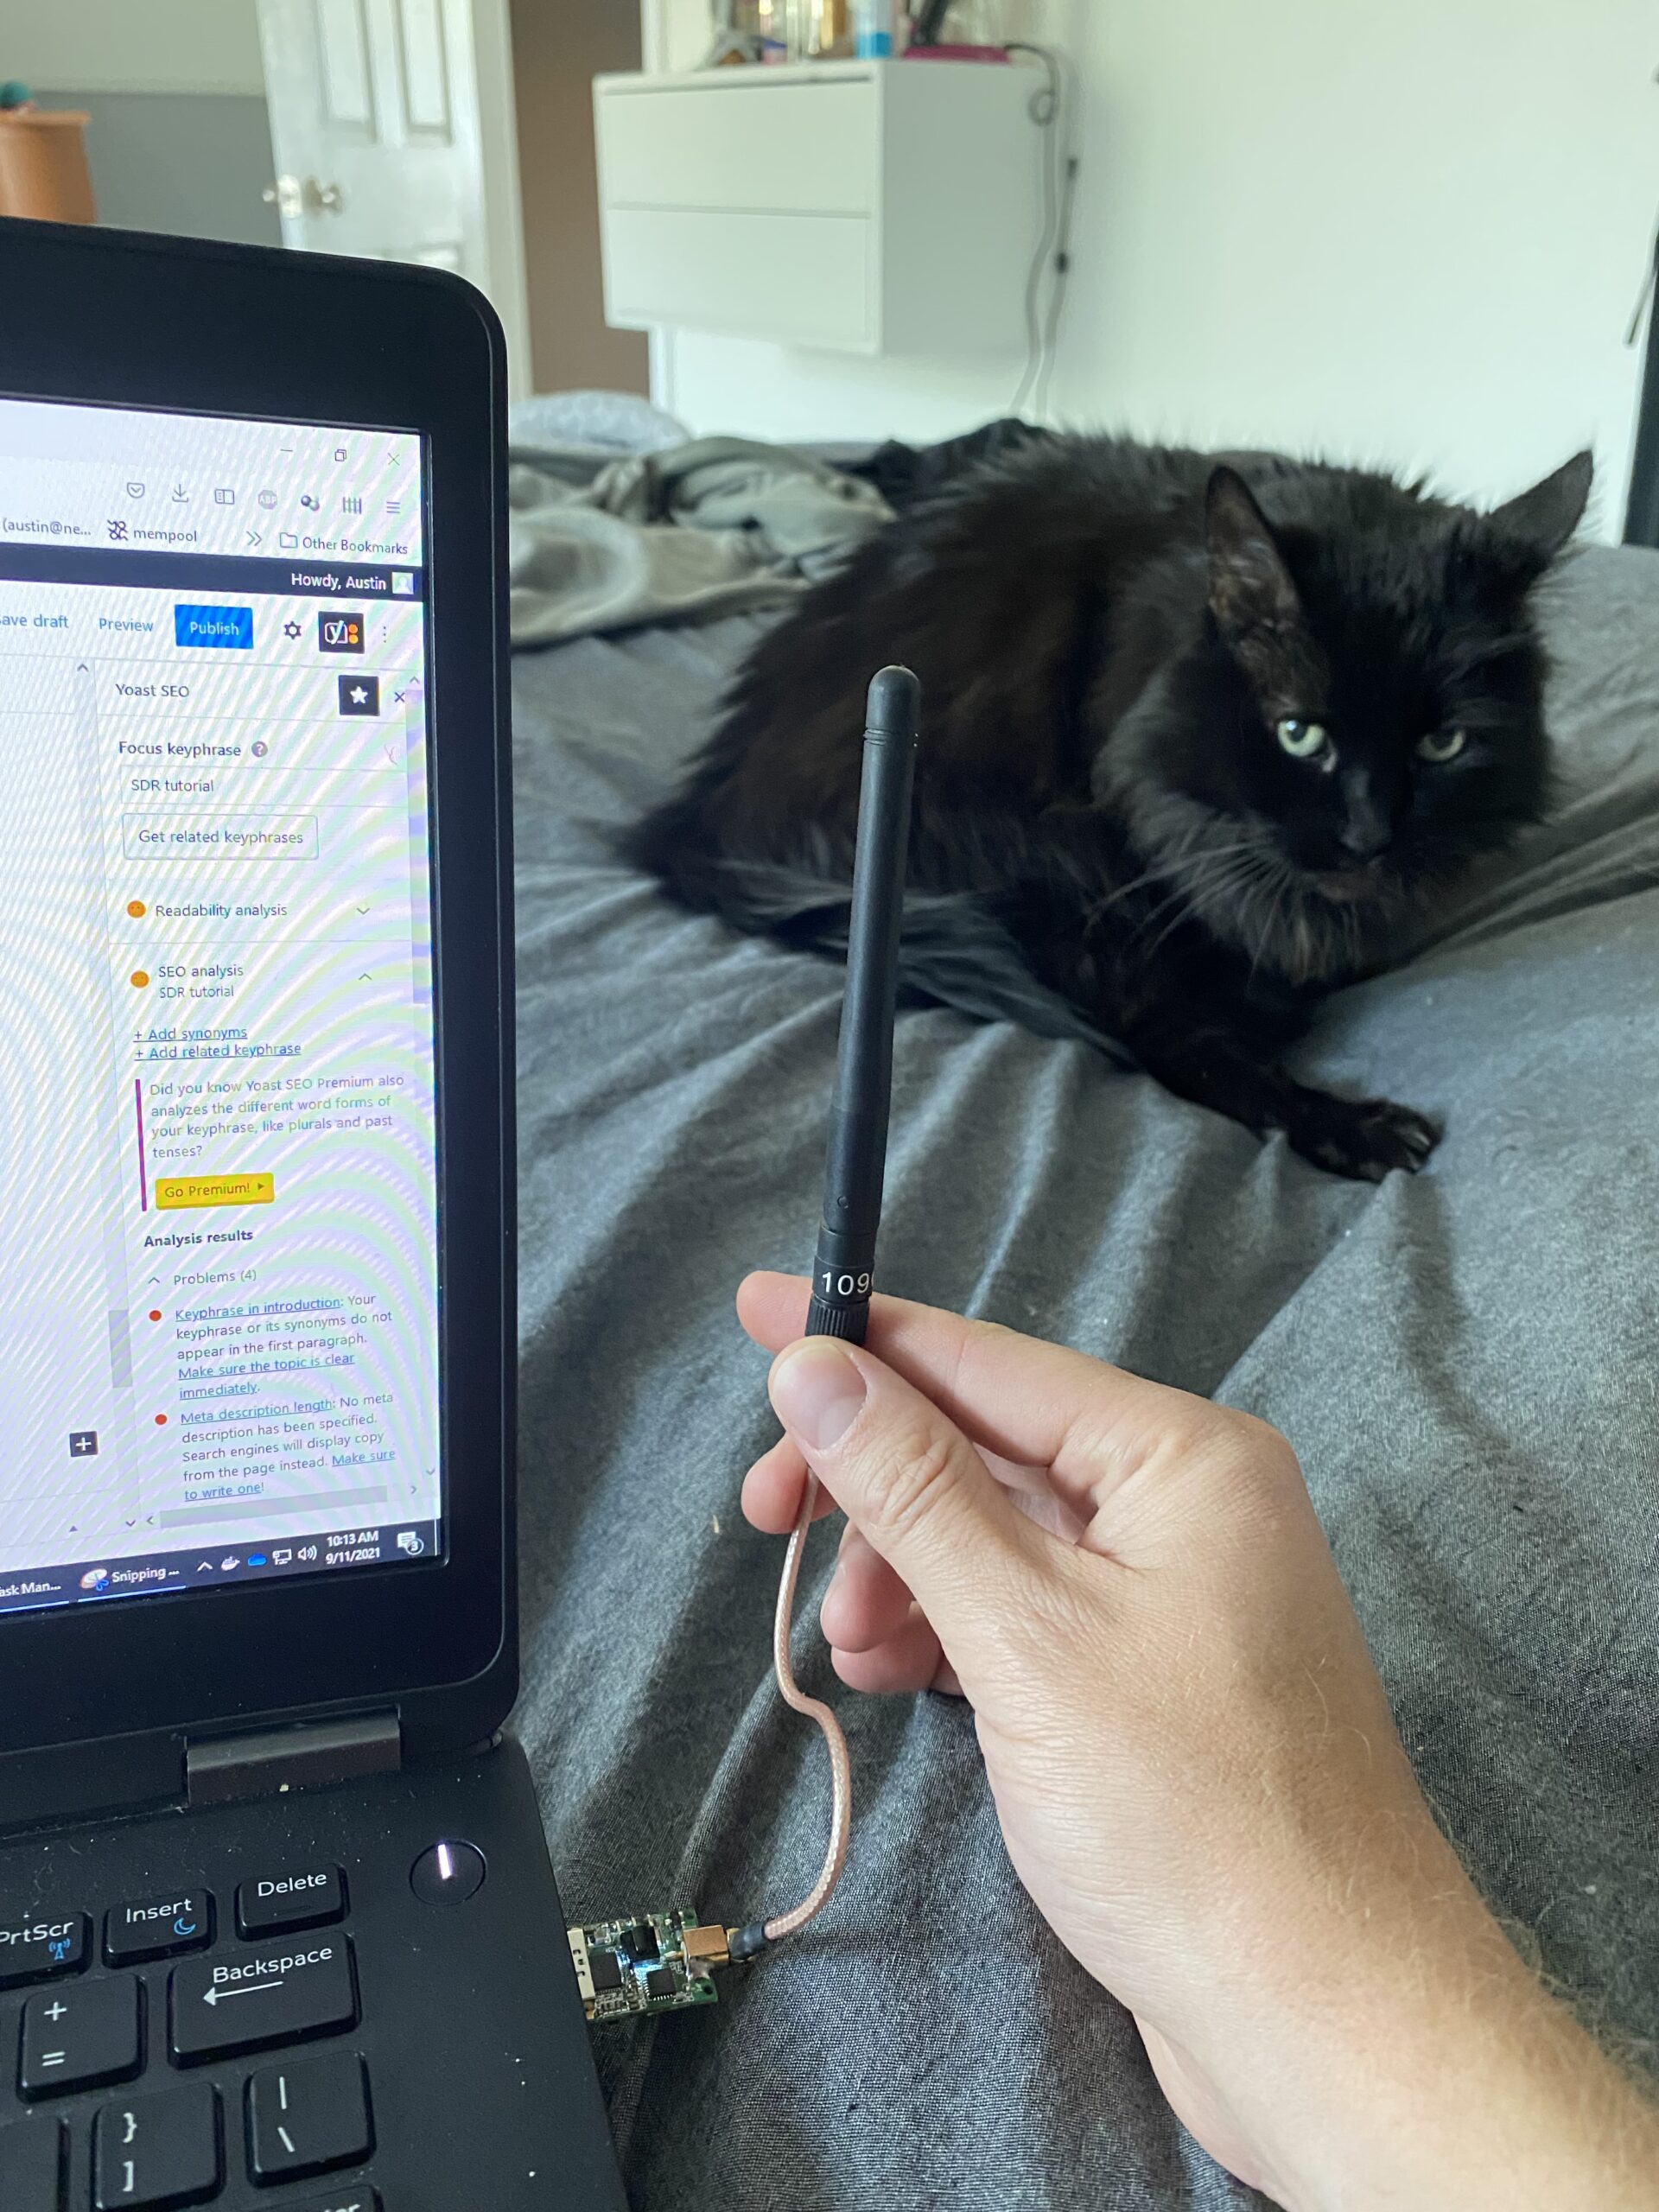
Here is a picture showing my setup for writing this blog – a simple NooElec Nano SDR I bought in 2016, a little bit of cable, and a 1090 MHz antenna (which is clearly not ideal for FM radio frequencies, but radio is so powerful it doesn’t really matter). Also say hi to Fluffy the cat:
RTL-SDR set up for writing this blog post, with an appearance from Fluffy the black cat
5 – Installing rtl_433 and listening for wireless temperature/humidity sensors
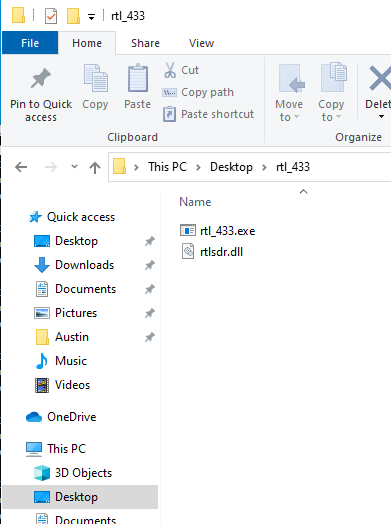
Ok so now that we know radio works, let’s see what other radio frequency signals are traveling through the air. We will start by downloading the rtl_433 Windows release from GitHub. The latest version as of this post is here (https://github.com/winterrace/rtl_433_win/releases/download/v19.8.19/rtl_433_win_2019-08-19.zip). Unzip the .zip file. There should be two files inside, rtl_433.exe and rtlsdr.dll. I put these files on my desktop in a folder called rtl_433:
rtl_433.exe in a folder called rtl_433 on my desktop
Now open a command window, and change directory (cd) to Desktop/rtl_433.
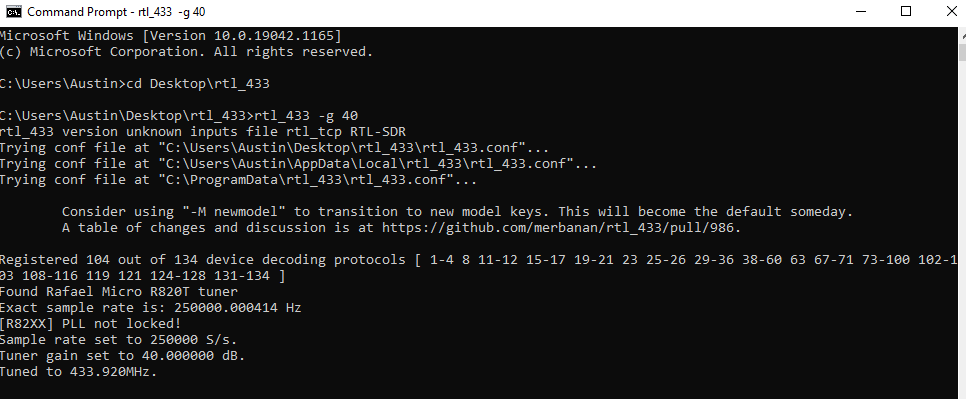
Ok now we’re in the rtl_433 directory so we can run commands now. The most basic command for this program is to run it and only specify the gain. We used 40 dB for the FM radio so let’s use 40 again by specifying it with the -g option (you can view all commands by running rtl_433 -h):
rtl_433 -g 40
The output will show the following (ending in “Tuned to 433.92 MHz”) if all went well:
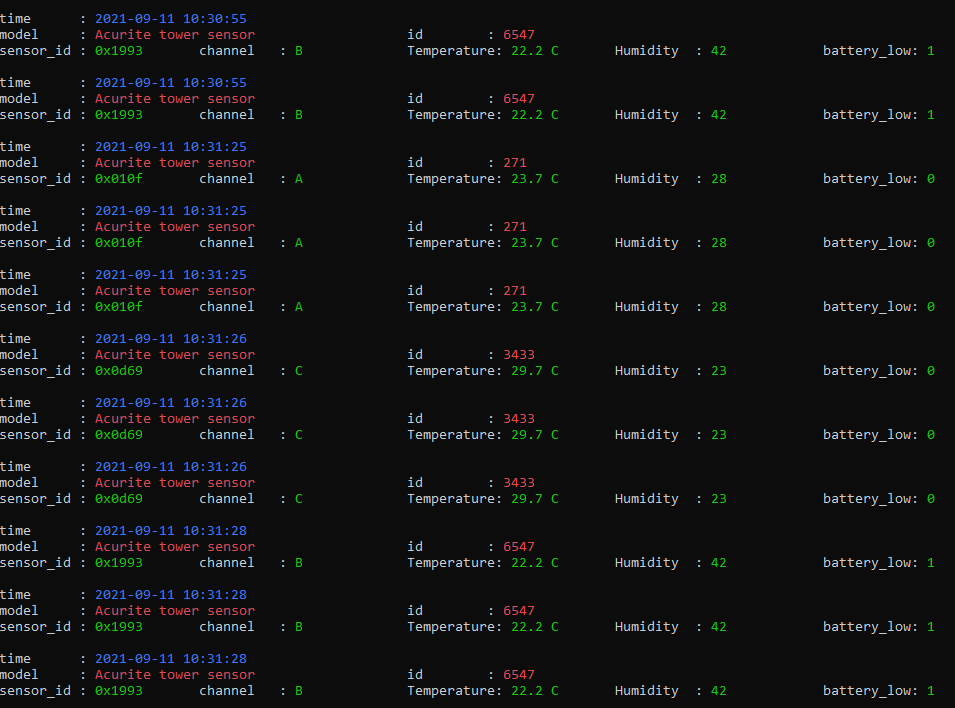
Let it run for a couple minutes. You might see some thermometers and other such devices! Here is what my output looks like after about 60 seconds:
If you look closely, you can see there are three separate devices broadcasting on 433 MHz that I can pick up with my (still not desirable) 1090 MHz antenna! One is sitting in my garage, another is next to me in the bedroom, and I don’t actually know where the 3rd is or who owns it.
With the same, tiny USB RTL-SDR, we have picked up FM radio as well as temperature/humidity readings from three separate sensors!
6 – Installing dump1090 and listening for aircraft position (ADS-B) signals
Last up for this RTL-SDR tutorial is installing dump1090 and checking to see if we can pick up any aircraft signals.
Dump1090 is a utility written many years ago that decodes aircraft ADS-B position signals. Some brave souls ported it for use in Windows a while ago. Using the directions and links from https://sonicgoose.com/using-dump1090-in-windows/ I have distilled it down for you. Download the dump1090 windows package that I’ve rehosted here –
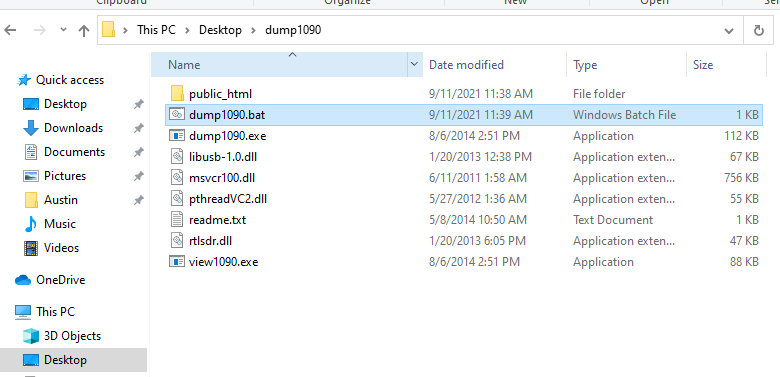
And then extract it to your desktop in a folder called dump1090.
There is a .bat file (batch file) in the folder, double-click it to run it:
dump1090 folder in Windows showing dump1090.bat highlighted
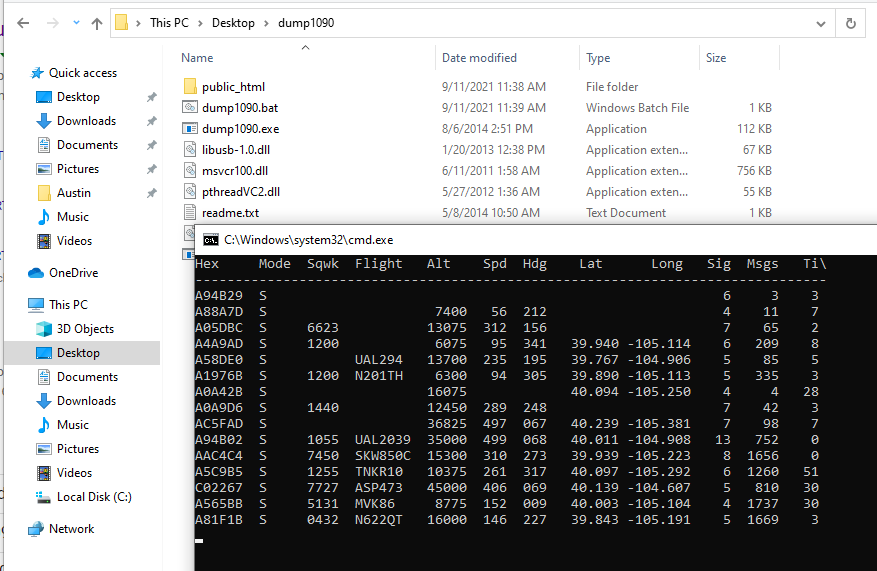
You will be presented with a screen that updates in realtime as signals come in. You are now receiving ADS-B signals with the same device that could listen to FM radio, and also temperature/humidity sensors around the house!
Windows dump1090 showing ADS-B data streaming in from the RTL-SDR
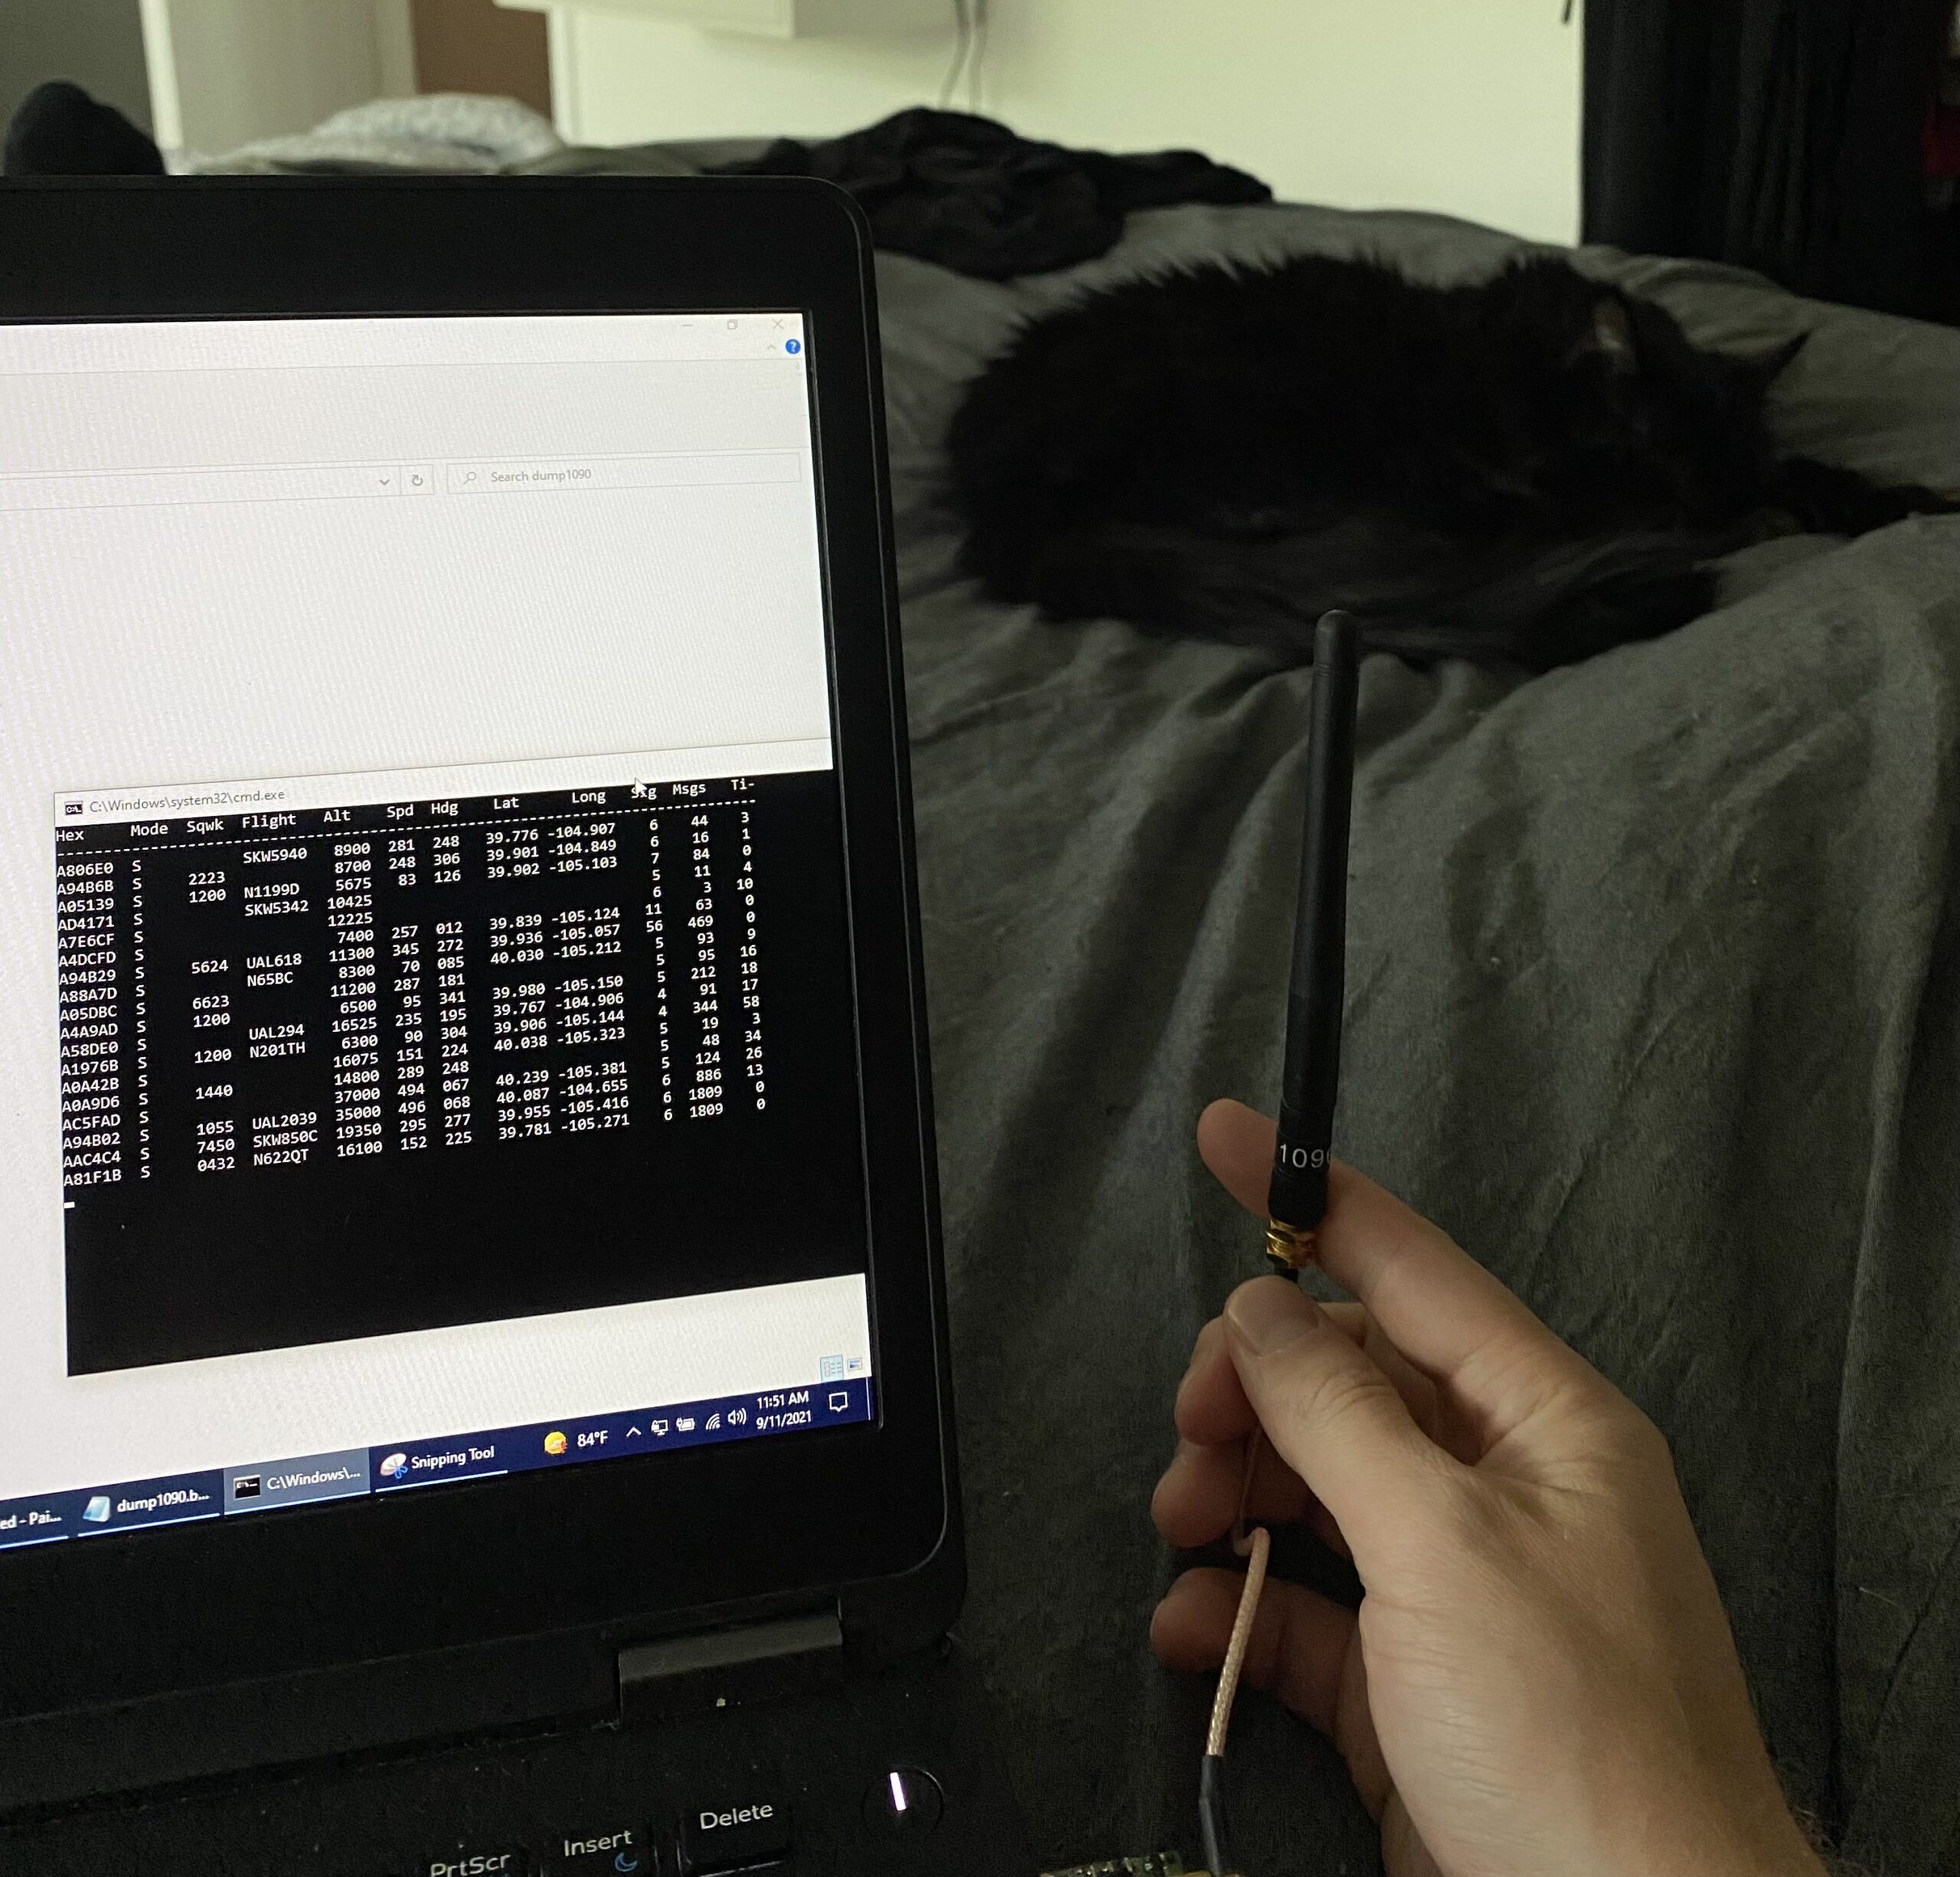
All this from a 1090 MHz antenna (which is actually finally the right frequency for the application at hand). Fluffy is still supervising:
1090 MHz antenna attached to RTL-SDR to pick up aircraft ADS-B signals. Cat is helping (and has not moved in 3 hours).
Conclusion
In this SDR tutorial, we have purchased a RTL-SDR, installed the drivers, plugged it in, listened to FM radio, checked for wireless temperature/humidity sensors and found 3, and listened for aircraft ADS-B signals (and found 15 aircraft broadcasting in the last screenshot). This is an addictive hobby. With the right antenna, you can hear people speaking and morse code coding from across the world. In my next post I’ll show how to implement some of these into automated programs to take the data and input it into Home Assistant and other databases.
One last thing – receiving RF signals is 98% about the antenna and 2% about what you’re receiving the signals with! The base antennas that come with RTL-SDRs are good for the basics but if you really want to get into receiving interesting/distant signals, be prepared to spend 2-3x the cost of a SDR on a single antenna.
Hope you learned something and enjoyed this tutorial!
Disclosure: When you click on links to various merchants in this post and make a purchase, this can result in this site earning a commission. Affiliate programs and affiliations include, but are not limited to, the eBay Partner Network.
I’d like to learn Kubernetes and DevOps. A Kubernetes cluster requires at least 3 VMs/bare metal machines. In my last post, I wrote about how to create a Ubuntu cloud-init template for Proxmox. In this post, we’ll take that template and use it to deploy a couple VMs via automation using Terraform. If you don’t have a template, you need one before proceeding.
Overview
Install Terraform
Determine authentication method for Terraform to interact with Proxmox (user/pass vs API keys)
Terraform basic initialization and provider installation
Develop Terraform plan
Terraform plan
Run Terraform plan and watch the VMs appear!
Youtube Video Link
If you prefer video versions to follow along, please head on over to https://youtu.be/UXXIl421W8g for a live-action video of me deploying virtual machines in Proxmox using Terraform and why we’re running each command.
#2 – Determine Authentication Method (use API keys)
You have two options here:
Username/password – you can use the existing default root user and root password here to make things easy… or
API keys – this involves setting up a new user, giving that new user the required permissions, and then setting up API keys so that user doesn’t have to type in a password to perform actions
I went with the API key method since it is not desirable to have your root password sitting in Terraform files (even as an environment variable isn’t a great idea). I didn’t really know what I was doing and I basically gave the new user full admin permissions anyways. Should I lock it down? Surely. Do I know what the minimum required permissions are to do so? Nope. If someone in the comments or on Reddit could enlighten me, I’d really appreciate it!
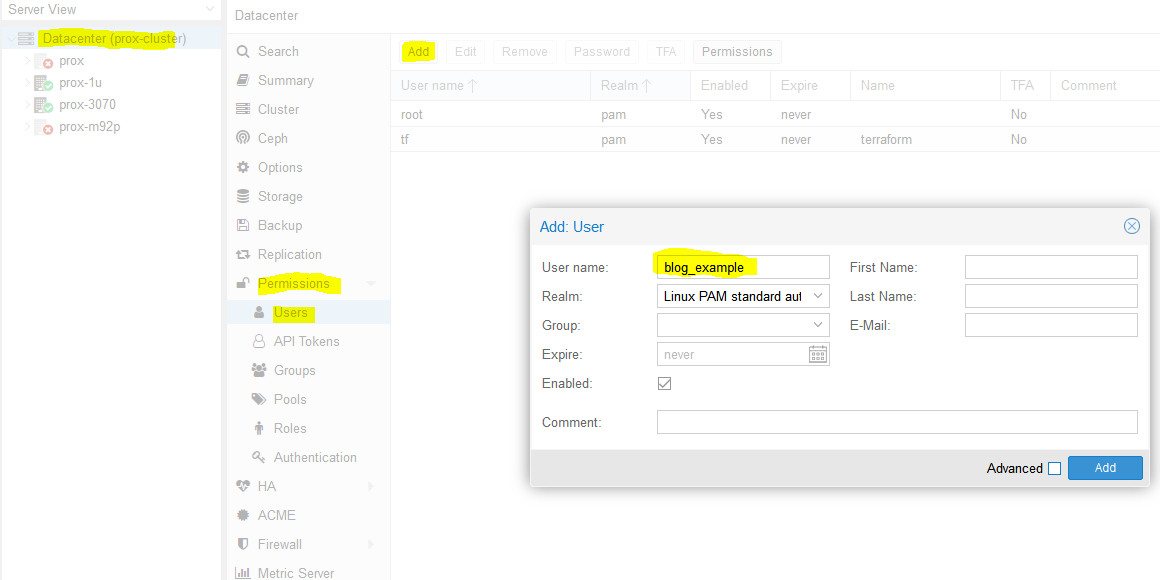
So we need to create a new user. We’ll name it ‘blog_example’. To add a new user go to Datacenter in the left tab, then Permissions -> Users -> Click add, name the user and click add.
Adding ‘blog_example’ user to my proxmox datacenter (cluster)
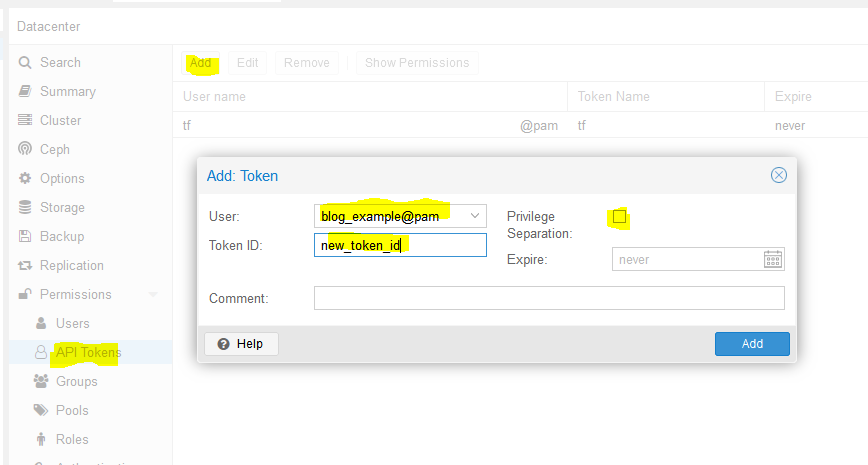
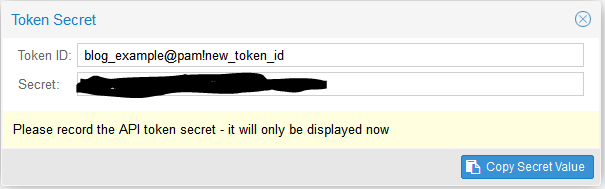
Next, we need to add API tokens. Click API tokens below users in the permissions category and click add. Select the user you just created and give the token an ID, and uncheck privilege separation (which means we want the token to have the same permissions as the user):
Adding a new API token for user ‘blog_example’
When you click Add it will show you the key. Save this key. It will never be displayed again!
Super secret API key secret
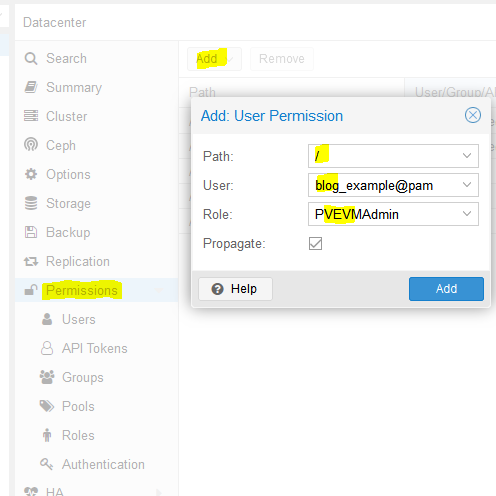
Next we need to add a role to the new user. Permissions -> Add -> Path = ‘/’, User is the one you just made, role = ‘PVEVMAdmin’. This gives the user (and associated API token!) rights to all nodes (the / for path) to do VMAdmin activities:
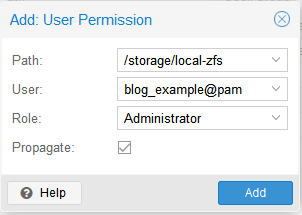
You also need to add permissions to the storage used by the VMs you want to deploy (both from and to), for me this is /storage/local-zfs (might be /storage/local-lvm for you). Add that too in the path section. Use Admin for the role here because the user also needs the ability to allocate space in the datastore (you could use PVEVMAdmin + a datastore role but I haven’t dove into which one yet):
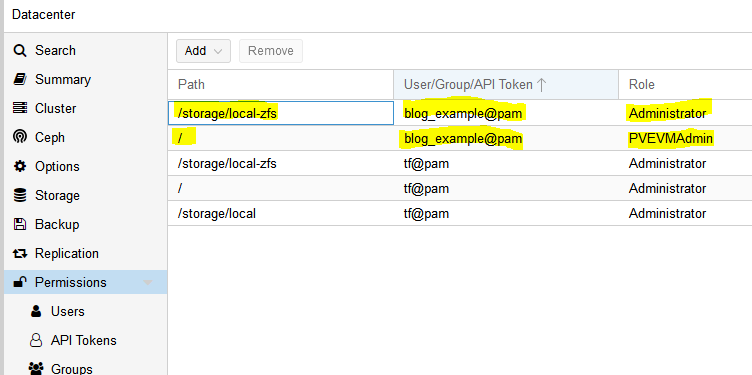
At this point we are done with the permissions:
It is time to turn to Terraform.
3 – Terraform basic information and provider installation
Terraform has three main stages: init, plan, and apply. We will start with describing the plans, which can be thought of a a type of configuration file for what you want to do. Plans are files stored in directories. Make a new directory (terraform-blog), and create two files: main.tf and vars.tf:
cd ~
mkdir terraform-blog && cd terraform-blog
touch main.tf vars.tf
The two files are hopefully reasonably named. The main content will be in main.tf and we will put a few variables in vars.tf. Everything could go in main.tf but it is a good practice to start splitting things out early. I actually don’t have as much in vars.tf as I should but we all gotta start somewhere
Ok so in main.tf let’s add the bare minimum. We need to tell Terraform to use a provider, which is the term they use for the connector to the entity Terraform will be interacting with. Since we are using Proxmox, we need to use a Proxmox provider. This is actually super easy – we just need to specify the name and version and Terraform goes out and grabs it from github and installs it. I used the Telmate Proxmox provider.
Save the file. Now we’ll initialize Terraform with our barebones plan (terraform init), which will force it to go out and grab the provider. If all goes well, we will be informed that the provider was installed and that Terraform has been initialized. Terraform is also really nice in that it tells you the next step towards the bottom of the output (“try running ‘terraform plan’ next”).
austin@EARTH:/mnt/c/Users/Austin/terraform-blog$ terraform init
Initializing the backend...
Initializing provider plugins...
- Finding telmate/proxmox versions matching "2.7.4"...
- Installing telmate/proxmox v2.7.4...
- Installed telmate/proxmox v2.7.4 (self-signed, key ID A9EBBE091B35AFCE)
Partner and community providers are signed by their developers.
If you'd like to know more about provider signing, you can read about it here:
https://www.terraform.io/docs/cli/plugins/signing.html
Terraform has created a lock file .terraform.lock.hcl to record the provider
selections it made above. Include this file in your version control repository
so that Terraform can guarantee to make the same selections by default when
you run "terraform init" in the future.
Terraform has been successfully initialized!
You may now begin working with Terraform. Try running "terraform plan" to see
any changes that are required for your infrastructure. All Terraform commands
should now work.
If you ever set or change modules or backend configuration for Terraform,
rerun this command to reinitialize your working directory. If you forget, other
commands will detect it and remind you to do so if necessary.
4 – Develop Terraform plan
Alright with the provider installed, it is time to use it to deploy a VM. We will use the template we created in the last post (How to create a Proxmox Ubuntu cloud-init image). Alter your main.tf file to be the following. I break it down inside the file with comments
terraform {
  required_providers {
    proxmox = {
      source = "telmate/proxmox"
      version = "2.7.4"
    }
  }
}
provider "proxmox" {
# url is the hostname (FQDN if you have one) for the proxmox host you'd like to connect to to issue the commands. my proxmox host is 'prox-1u'. Add /api2/json at the end for the API
pm_api_url = "https://prox-1u:8006/api2/json"
# api token id is in the form of: <username>@pam!<tokenId>
pm_api_token_id = "blog_example@pam!new_token_id"
# this is the full secret wrapped in quotes. don't worry, I've already deleted this from my proxmox cluster by the time you read this post
pm_api_token_secret = "9ec8e608-d834-4ce5-91d2-15dd59f9a8c1"
# leave tls_insecure set to true unless you have your proxmox SSL certificate situation fully sorted out (if you do, you will know)
pm_tls_insecure = true
}
# resource is formatted to be "[type]" "[entity_name]" so in this case
# we are looking to create a proxmox_vm_qemu entity named test_server
resource "proxmox_vm_qemu" "test_server" {
count = 1 # just want 1 for now, set to 0 and apply to destroy VM
name = "test-vm-${count.index + 1}" #count.index starts at 0, so + 1 means this VM will be named test-vm-1 in proxmox
# this now reaches out to the vars file. I could've also used this var above in the pm_api_url setting but wanted to spell it out up there. target_node is different than api_url. target_node is which node hosts the template and thus also which node will host the new VM. it can be different than the host you use to communicate with the API. the variable contains the contents "prox-1u"
target_node = var.proxmox_host
# another variable with contents "ubuntu-2004-cloudinit-template"
clone = var.template_name
# basic VM settings here. agent refers to guest agent
agent = 1
os_type = "cloud-init"
cores = 2
sockets = 1
cpu = "host"
memory = 2048
scsihw = "virtio-scsi-pci"
bootdisk = "scsi0"
disk {
slot = 0
# set disk size here. leave it small for testing because expanding the disk takes time.
size = "10G"
type = "scsi"
storage = "local-zfs"
iothread = 1
}
# if you want two NICs, just copy this whole network section and duplicate it
network {
model = "virtio"
bridge = "vmbr0"
}
# not sure exactly what this is for. presumably something about MAC addresses and ignore network changes during the life of the VM
lifecycle {
ignore_changes = [
network,
]
}
# the ${count.index + 1} thing appends text to the end of the ip address
# in this case, since we are only adding a single VM, the IP will
# be 10.98.1.91 since count.index starts at 0. this is how you can create
# multiple VMs and have an IP assigned to each (.91, .92, .93, etc.)
ipconfig0 = "ip=10.98.1.9${count.index + 1}/24,gw=10.98.1.1"
# sshkeys set using variables. the variable contains the text of the key.
sshkeys = <<EOF
${var.ssh_key}
EOF
}
There is a good amount going on in here. Hopefully the embedded comments explain everything. If not, let me know in the comments or on Reddit (u/Nerdy-Austin).
Now for the vars.tf file. This is a bit easier to understand. Just declare a variable, give it a name, and a default value. That’s all I know at this point and it works.
5 – Terraform plan (official term for “what will Terraform do next”)
Now with the .tf files completed, we can run the plan (terraform plan). We defined a count=1 resource, so we would expect Terraform to create a single VM. Let’s have Terraform run through the plan and tell us what it intends to do. It tells us a lot.
austin@EARTH:/mnt/c/Users/Austin/terraform-blog$ terraform plan

Terraform used the selected providers to generate the following execution plan. Resource actions
are indicated with the following symbols:
  + create

Terraform will perform the following actions:

  # proxmox_vm_qemu.test_server[0] will be created
  + resource "proxmox_vm_qemu" "test_server" {
      + additional_wait           = 15
      + agent                     = 1
      + balloon                   = 0
      + bios                      = "seabios"
      + boot                      = "cdn"
      + bootdisk                  = "scsi0"
      + clone                     = "ubuntu-2004-cloudinit-template"
      + clone_wait                = 15
      + cores                     = 2
      + cpu                       = "host"
      + default_ipv4_address      = (known after apply)
      + define_connection_info    = true
      + force_create              = false
      + full_clone                = true
      + guest_agent_ready_timeout = 600
      + hotplug                   = "network,disk,usb"
      + id                        = (known after apply)
      + ipconfig0                 = "ip=10.98.1.91/24,gw=10.98.1.1"
      + kvm                       = true
      + memory                    = 2048
      + name                      = "test-vm-1"
      + nameserver                = (known after apply)
      + numa                      = false
      + onboot                    = true
      + os_type                   = "cloud-init"
      + preprovision              = true
      + reboot_required           = (known after apply)
      + scsihw                    = "virtio-scsi-pci"
      + searchdomain              = (known after apply)
      + sockets                   = 1
      + ssh_host                  = (known after apply)
      + ssh_port                  = (known after apply)
      + sshkeys                   = <<-EOT
              ssh-rsa AAAAB3NzaC1yc2EAAAADAQABAAABAQDcwZAOfqf6E6p8IkrurF2vR3NccPbMlXFPaFe2+Eh/8QnQCJVTL6PKduXjXynuLziC9cubXIDzQA+4OpFYUV2u0fAkXLOXRIwgEmOrnsGAqJTqIsMC3XwGRhR9M84c4XPAX5sYpOsvZX/qwFE95GAdExCUkS3H39rpmSCnZG9AY4nPsVRlIIDP+/6YSy9KWp2YVYe5bDaMKRtwKSq3EOUhl3Mm8Ykzd35Z0Cysgm2hR2poN+EB7GD67fyi+6ohpdJHVhinHi7cQI4DUp+37nVZG4ofYFL9yRdULlHcFa9MocESvFVlVW0FCvwFKXDty6askpg9yf4FnM0OSbhgqXzD austin@EARTH
        EOT
      + target_node               = "prox-1u"
      + unused_disk               = (known after apply)
      + vcpus                     = 0
      + vlan                      = -1
      + vmid                      = (known after apply)

      + disk {
          + backup       = 0
          + cache        = "none"
          + file         = (known after apply)
          + format       = (known after apply)
          + iothread     = 1
          + mbps         = 0
          + mbps_rd      = 0
          + mbps_rd_max  = 0
          + mbps_wr      = 0
          + mbps_wr_max  = 0
          + media        = (known after apply)
          + replicate    = 0
          + size         = "10G"
          + slot         = 0
          + ssd          = 0
          + storage      = "local-zfs"
          + storage_type = (known after apply)
          + type         = "scsi"
          + volume       = (known after apply)
        }

      + network {
          + bridge    = "vmbr0"
          + firewall  = false
          + link_down = false
          + macaddr   = (known after apply)
          + model     = "virtio"
          + queues    = (known after apply)
          + rate      = (known after apply)
          + tag       = -1
        }
    }

Plan: 1 to add, 0 to change, 0 to destroy.

────────────────────────────────────────────────────────────────────────────────────────────────

Note: You didn't use the -out option to save this plan, so Terraform can't guarantee to take
exactly these actions if you run "terraform apply" now.
You can see the output of the planning phase of Terraform. It is telling us it will create proxmox_vm_qemu.test_server[0] with a list of parameters. You can double-check the IP address here, as well as the rest of the basic settings. At the bottom is the summary – “Plan: 1 to add, 0 to change, 0 to destroy.” Also note that it tells us again what step to run next – “terraform apply”.
6 – Execute the Terraform plan and watch the VMs appear!
With the summary stating what we want, we can now apply the plan (terraform apply). Note that it prompts you to type in ‘yes’ to apply the changes after it determines what the changes are. It typically takes 1m15s +/- 15s for my VMs to get created.
If all goes well, you will be informed that 1 resource was added!
Command and full output:
austin@EARTH:/mnt/c/Users/Austin/terraform-blog$ terraform apply
Terraform used the selected providers to generate the following execution plan. Resource actions are indicated with the following symbols:
+ create
Terraform will perform the following actions:
# proxmox_vm_qemu.test_server[0] will be created
+ resource "proxmox_vm_qemu" "test_server" {
+ additional_wait = 15
+ agent = 1
+ balloon = 0
+ bios = "seabios"
+ boot = "cdn"
+ bootdisk = "scsi0"
+ clone = "ubuntu-2004-cloudinit-template"
+ clone_wait = 15
+ cores = 2
+ cpu = "host"
+ default_ipv4_address = (known after apply)
+ define_connection_info = true
+ force_create = false
+ full_clone = true
+ guest_agent_ready_timeout = 600
+ hotplug = "network,disk,usb"
+ id = (known after apply)
+ ipconfig0 = "ip=10.98.1.91/24,gw=10.98.1.1"
+ kvm = true
+ memory = 2048
+ name = "test-vm-1"
+ nameserver = (known after apply)
+ numa = false
+ onboot = true
+ os_type = "cloud-init"
+ preprovision = true
+ reboot_required = (known after apply)
+ scsihw = "virtio-scsi-pci"
+ searchdomain = (known after apply)
+ sockets = 1
+ ssh_host = (known after apply)
+ ssh_port = (known after apply)
+ sshkeys = <<-EOT
ssh-rsa AAAAB3NzaC1yc2EAAAADAQABAAABAQDcwZAOfqf6E6p8IkrurF2vR3NccPbMlXFPaFe2+Eh/8QnQCJVTL6PKduXjXynuLziC9cubXIDzQA+4OpFYUV2u0fAkXLOXRIwgEmOrnsGAqJTqIsMC3XwGRhR9M84c4XPAX5sYpOsvZX/qwFE95GAdExCUkS3H39rpmSCnZG9AY4nPsVRlIIDP+/6YSy9KWp2YVYe5bDaMKRtwKSq3EOUhl3Mm8Ykzd35Z0Cysgm2hR2poN+EB7GD67fyi+6ohpdJHVhinHi7cQI4DUp+37nVZG4ofYFL9yRdULlHcFa9MocESvFVlVW0FCvwFKXDty6askpg9yf4FnM0OSbhgqXzD austin@EARTH
EOT
+ target_node = "prox-1u"
+ unused_disk = (known after apply)
+ vcpus = 0
+ vlan = -1
+ vmid = (known after apply)
+ disk {
+ backup = 0
+ cache = "none"
+ file = (known after apply)
+ format = (known after apply)
+ iothread = 1
+ mbps = 0
+ mbps_rd = 0
+ mbps_rd_max = 0
+ mbps_wr = 0
+ mbps_wr_max = 0
+ media = (known after apply)
+ replicate = 0
+ size = "10G"
+ slot = 0
+ ssd = 0
+ storage = "local-zfs"
+ storage_type = (known after apply)
+ type = "scsi"
+ volume = (known after apply)
}
+ network {
+ bridge = "vmbr0"
+ firewall = false
+ link_down = false
+ macaddr = (known after apply)
+ model = "virtio"
+ queues = (known after apply)
+ rate = (known after apply)
+ tag = -1
}
}
Plan: 1 to add, 0 to change, 0 to destroy.
Do you want to perform these actions?
Terraform will perform the actions described above.
Only 'yes' will be accepted to approve.
Enter a value: yes
proxmox_vm_qemu.test_server[0]: Creating...
proxmox_vm_qemu.test_server[0]: Still creating... [10s elapsed]
proxmox_vm_qemu.test_server[0]: Still creating... [20s elapsed]
proxmox_vm_qemu.test_server[0]: Still creating... [30s elapsed]
proxmox_vm_qemu.test_server[0]: Still creating... [40s elapsed]
proxmox_vm_qemu.test_server[0]: Still creating... [50s elapsed]
proxmox_vm_qemu.test_server[0]: Still creating... [1m0s elapsed]
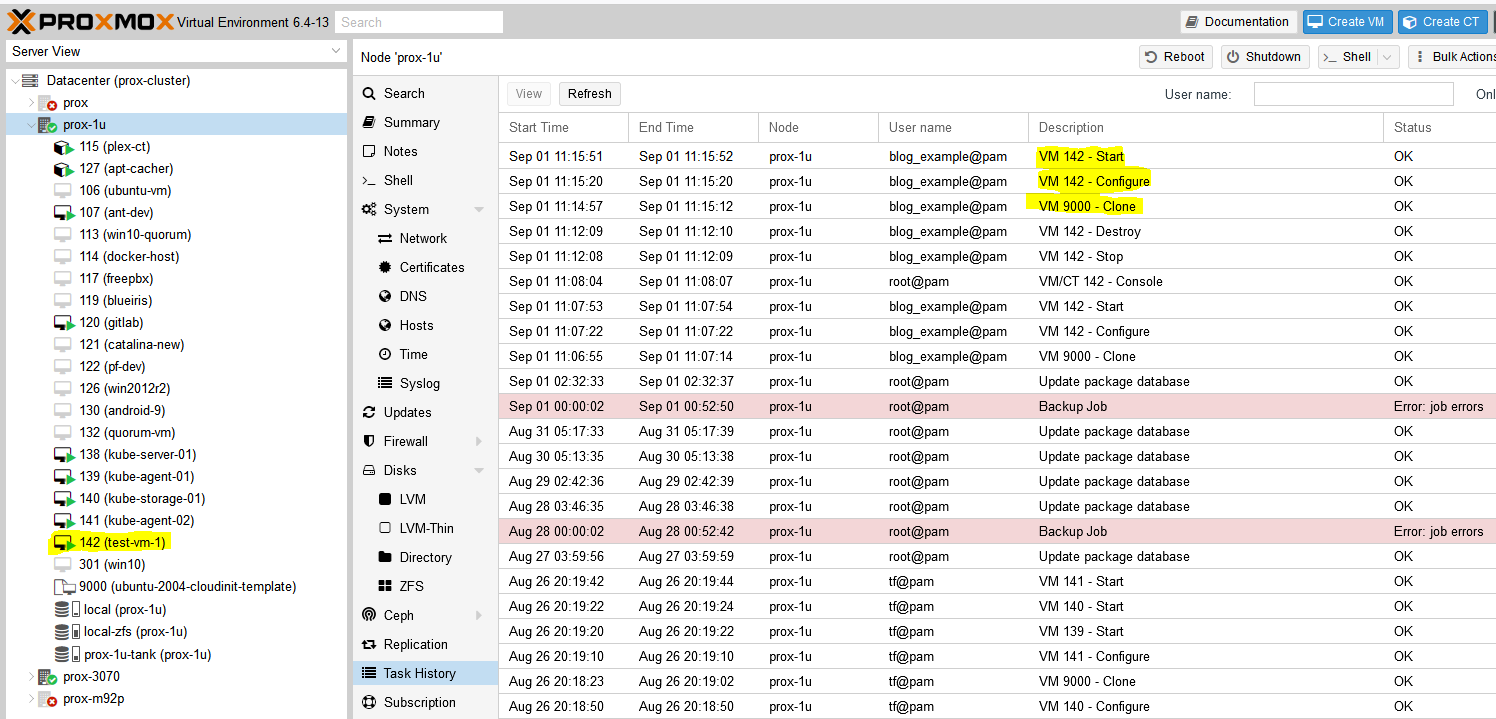
proxmox_vm_qemu.test_server[0]: Creation complete after 1m9s [id=prox-1u/qemu/142]
Apply complete! Resources: 1 added, 0 changed, 0 destroyed.
Now go check Proxmox and see if your VM was created:
Successfully added a virtual machine (VM) to Proxmox with Terraform
Success! You should now be able to SSH into the new VM with the key you already provided (note: the username will be ‘ubuntu’, not whatever you had set in your key).
Last – Removing the test VM
I just set the count to 0 for the resource in the main.tf file and apply and the VM is stopped and destroyed.
Conclusion
This felt like a quick-n-dirty tutorial for how to use Terraform to deploy virtual machines in Proxmox but looking back, there is a decent amount of detail. It took me quite a while to work through permission issues, hostnames being invalid (turns out you can’t have underscores (_) in hostnames, duh, that took an hour to find), assigning roles to users vs the associated API keys, etc. but I’m glad I worked through everything and can pass it along. Check back soon for my next post on using Terraform to deploy a full set of Kubernetes machines to a Proxmox cluster (and thrilling sequel to that post, Using Ansible to bootstrap a Kubernetes Cluster)!
Background for why I wanted to make a Proxmox Ubuntu cloud-init image
I have recently ventured down the path of attempting to learn CI/CD concepts. I have tried docker multiple times and haven’t really enjoyed the nuances any of the times. To me, LXC/LXD containers are far easier to understand than Docker when coming from a ‘one VM per service’ background. LXC/LXD containers can be assigned IP addresses (or get them from DHCP) and otherwise behave basically exactly like a VM from a networking perspective. Docker’s networking model is quite a bit more nuanced. Lots of people say it’s easier, but having everything run on ‘localhost:[high number port]’ doesn’t work well when you’ve got lots of services, unless you do some reverse proxying, like with Traefik or similar. Which is another configuration step.
It is so much easier to just have a LXC get an IP via DHCP and then it’s accessible from hostname right off the bat (I use pfSense for DHCP/DNS – all DHCP leases are entered right into DNS). Regardless, I know Kubernetes is the new hotness so I figured I need to learn it. Every tutorial says you need a master and at least two worker nodes. No sense making three separate virtual machines – let’s use the magic of virtualization and clone some images! I plan on using Terraform to deploy the virtual machines for my Kubernetes cluster (as in, I’ve already used this Proxmox Ubuntu cloud-init image to make my own Kubernetes nodes but haven’t documented it yet).
Overview
The quick summary for this tutorial is:
Download a base Ubuntu cloud image
Install some packages into the image
Create a Proxmox VM using the image
Convert it to a template
Clone the template into a full VM and set some parameters
Automate it so it runs on a regular basis (extra credit)?
???
Profit!
Youtube Video Link
If you prefer video versions to follow along, please head on over to https://youtu.be/1sPG3mFVafE for a live action video of me creating the Proxmox Ubuntu cloud-init image and why we’re running each command.
#1 – Downloading the base Ubuntu image
Luckily, Ubuntu (my preferred distro, guessing others do the same) provides base images that are updated on a regular basis – https://cloud-images.ubuntu.com/. We are interested in the “current” release of Ubuntu 20.04 Focal, which is the current Long Term Support version. Further, since Proxmox uses KVM, we will be pulling that image:
It took me quite a while into my Terraform debugging process to determine that qemu-guest-agent wasn’t included in the cloud-init image. Why it isn’t, I have no idea. Luckily there is a very cool tool that I just learned about that enables installing packages directly into a image. The tool is called virt-customize and it comes in the libguestfs-tools package (“libguestfs is a set of tools for accessing and modifying virtual machine (VM) disk images” – https://www.libguestfs.org/).
Then install qemu-guest-agent into the newly downloaded image:
sudo virt-customize -a focal-server-cloudimg-amd64.img --install qemu-guest-agent
At this point you can presumably install whatever else you want into the image but I haven’t tested installing other packages. qemu-guest-agent was what I needed to get the VM recognized by Terraform and accessible.
Update 2021-12-30 – it is possible to inject the SSH keys into the cloud image itself before turning it into a template and VM. You need to create a user first and the necessary folders:
# not quite working yet. skip this and continue
#sudo virt-customize -a focal-server-cloudimg-amd64.img --run-command 'useradd austin'
#sudo virt-customize -a focal-server-cloudimg-amd64.img --run-command 'mkdir -p /home/austin/.ssh'
#sudo virt-customize -a focal-server-cloudimg-amd64.img --ssh-inject austin:file:/home/austin/.ssh/id_rsa.pub
#sudo virt-customize -a focal-server-cloudimg-amd64.img --run-command 'chown -R austin:austin /home/austin'
#3 – Create a Proxmox virtual machine using the newly modified image
The commands here should be relatively self explanatory but in general we are creating a VM (VMID=9000, basically every other resource I saw used this ID so we will too) with basic resources (2 cores, 2048MB), assigning networking to a virtio adapter on vmbr0, importing the image to storage (your storage here will be different if you’re not using ZFS, probably either ‘local’ or ‘local-lvm’), setting disk 0 to use the image, setting boot drive to disk, setting the cloud init stuff to ide2 (which is apparently appears as a CD-ROM to the VM, at least upon inital boot), and adding a virtual serial port. I had only used qm to force stop VMs before this but it’s pretty useful.
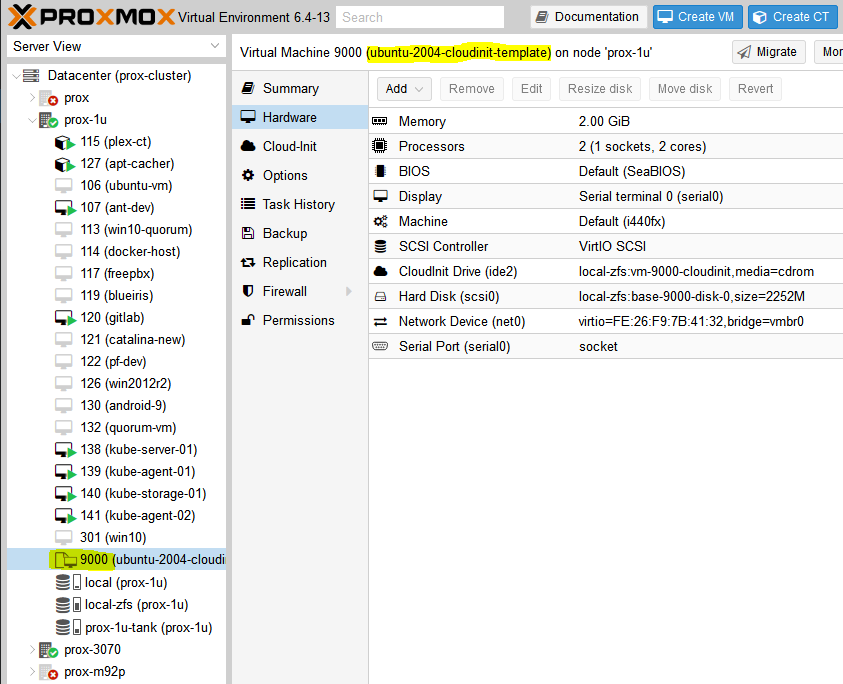
sudo qm create 9000 --name "ubuntu-2004-cloudinit-template" --memory 2048 --cores 2 --net0 virtio,bridge=vmbr0
sudo qm importdisk 9000 focal-server-cloudimg-amd64.img local-zfs
sudo qm set 9000 --scsihw virtio-scsi-pci --scsi0 local-zfs:vm-9000-disk-0
sudo qm set 9000 --boot c --bootdisk scsi0
sudo qm set 9000 --ide2 local-zfs:cloudinit
sudo qm set 9000 --serial0 socket --vga serial0
sudo qm set 9000 --agent enabled=1
You can start the VM up at this point if you’d like and make any other changes you want because the next step is converting it to a template. If you do boot it, I will be completely honest I have no idea how to log into it. I actually just googled this because I don’t want to leave you without an answer – looks like you can use the same virt-customize we used before to set a root password according to stackoverflow (https://stackoverflow.com/questions/29137679/login-credentials-of-ubuntu-cloud-server-image). Not going to put that into a command window here because cloud-init is really meant for public/private key authentication (see post here for a quick SSH tutorial).
#4 – Convert VM to a template
Ok if you made any changes, shut down the VM. If you didn’t boot the VM, that’s perfectly fine also. We need to convert it to a template:
sudo qm template 9000
And now we have a functioning template!
#5 – Clone the template into a full VM and set some parameters
From this point you can clone the template as much as you want. But, each time you do so it makes sense to set some parameters, namely the SSH keys present in the VM as well as the IP address for the main interface. You could also add the SSH keys with virt-customize but I like doing it here.
First, clone the VM (here we are cloning the template with ID 9000 to a new VM with ID 999):
sudo qm set 999 --sshkey ~/.ssh/id_rsa.pub
sudo qm set 999 --ipconfig0 ip=10.98.1.96/24,gw=10.98.1.1
It’s now ready to start up!
sudo qm start 999
You should be able to log in without any problems (after trusting the SSH fingerprint). Note that the username is ‘ubuntu’, not whatever the username is for the key you provided.
I have not done so yet, but if you create VMs on a somewhat regular basis, it wouldn’t be hard to stick all of the above into a simple shell script (update 2022-04-19: simple shell script below) and run it via cron on a weekly basis or whatever frequency you prefer. I can’t tell you how many times I make a new VM from whatever .iso I downloaded and the first task is apt upgrade taking forever to run (‘sudo apt update’ –> “176 packages can be upgraded”). Having a nice template always ready to go would solve that issue and would frankly save me a ton of time.
#6.5 – Shell script to create template
# installing libguestfs-tools only required once, prior to first run
sudo apt update -y
sudo apt install libguestfs-tools -y

# remove existing image in case last execution did not complete successfully
rm focal-server-cloudimg-amd64.img
wget https://cloud-images.ubuntu.com/focal/current/focal-server-cloudimg-amd64.img
sudo virt-customize -a focal-server-cloudimg-amd64.img --install qemu-guest-agent
sudo qm create 9000 --name "ubuntu-2004-cloudinit-template" --memory 2048 --cores 2 --net0 virtio,bridge=vmbr0
sudo qm importdisk 9000 focal-server-cloudimg-amd64.img local-zfs
sudo qm set 9000 --scsihw virtio-scsi-pci --scsi0 local-zfs:vm-9000-disk-0
sudo qm set 9000 --boot c --bootdisk scsi0
sudo qm set 9000 --ide2 local-zfs:cloudinit
sudo qm set 9000 --serial0 socket --vga serial0
sudo qm set 9000 --agent enabled=1
sudo qm template 9000
rm focal-server-cloudimg-amd64.img
echo "next up, clone VM, then expand the disk"
echo "you also still need to copy ssh keys to the newly cloned VM"
#7-8 – Using this template with Terraform to automate VM creation
Hey there, welcome back to Austin’s Nerdy Things. It’s been a while since my last post – life happens. I haven’t lost sight of the blog. Just needed to do some other things and finish up some projects before documenting stuff.
The MPP LV2424 inverter I’m using puts out a lot of data. Some of it is quite useful, some of it not so much. Regardless, I am capturing all of it in my InfluxDB database with Python. This allows me to chart it in Grafana, which I use for basic monitoring stuff around the house. This post will document getting data from the MPP inverter to Grafana.
Jumping ahead
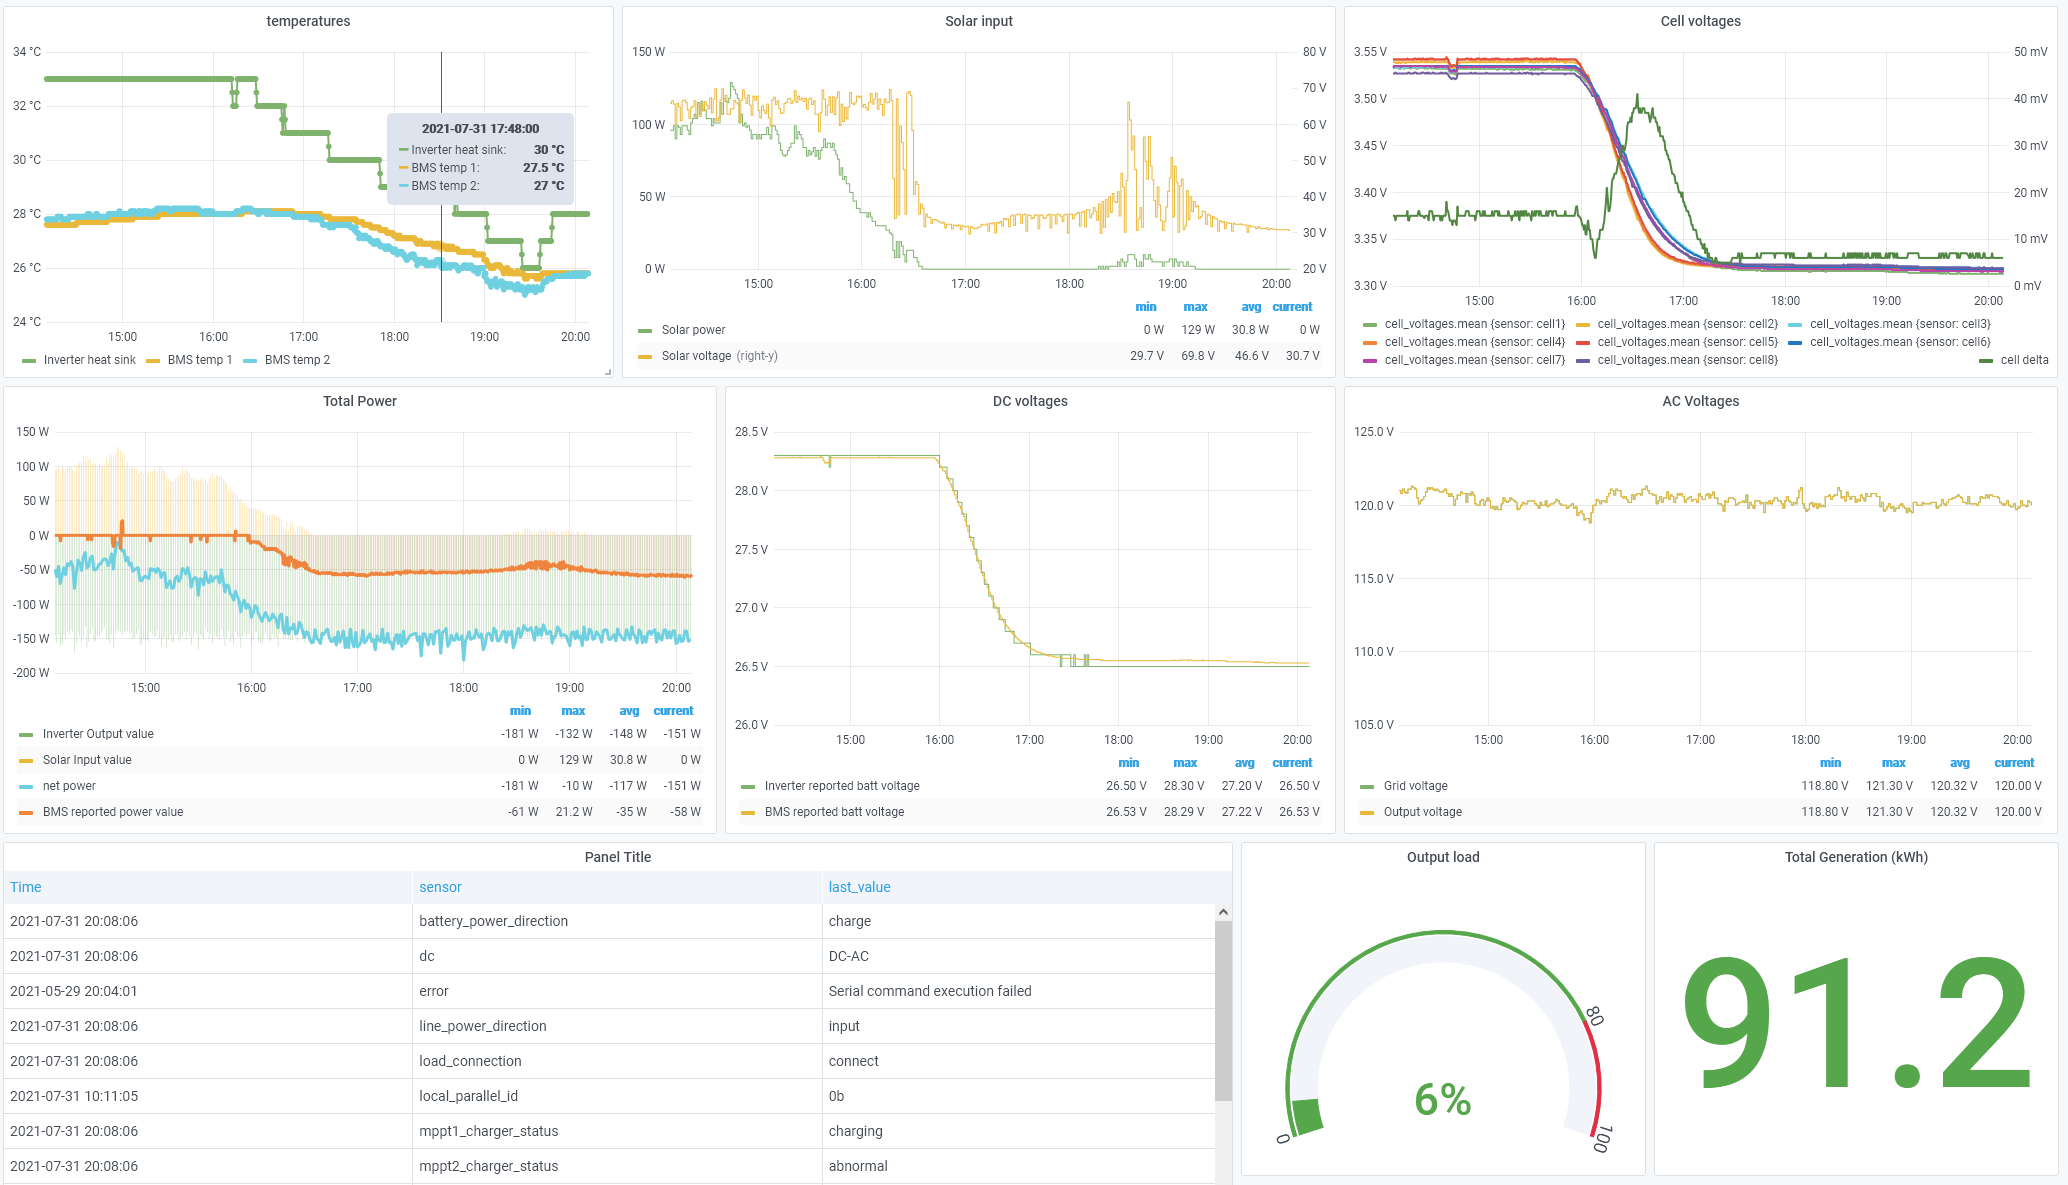
Final product first. This is a screenshot showing my complete (work-in-progress) Grafana dashboard for my DIY hybrid solar setup.
Solar dashboard as seen in Grafana pulling data from InfluxDB
The screenshot shows the last 6 hours worth of data from my system. It was a cloudy and then stormy afternoon/evening here in Denver (we got 0.89 inches of rain since midnight as of typing this post!), so the solar production wasn’t great. The panels are as follows:
Temperatures – showing temperatures from 3 sources: the MPP LV2424 inverter heat sink, and both BMS temperature probes (one is on the BMS board itself, the other is a probe on the battery bank). The inverter has at least 2 temperature readings, maybe 3. They all basically show the same thing.
Solar input – shows solar voltage as seen by the solar charge controller as well as solar power (in watts) going through the charge controller.
Cell voltages – the voltage reading of each of my 8 battery bank cells as reported by the BMS. The green graph also shows the delta between max and min cells. They are still pretty balanced in the flat part of the discharge curve.
Total power – a mashup of what the inverter is putting out, what the solar is putting in, the difference between the two, and what the BMS is reporting. I’m still trying to figure out all the nuances here. There is definitely a discrepancy between what the inverter is putting out and what the solar is putting in when the batteries are fully charged. I believe the difference is the power required to keep the transformer energized (typically ranges from 30-60W).
DC voltages – as reported by the inverter and the BMS. The inverter is accurate to 0.1V, the BMS goes to 0.01V.
AC voltages – shows the input voltage from the grid and the output voltage from the inverter. These will match unless the inverter is disconnected from the grid.
Data table – miscellaneous information from the inverter that isn’t graphable
Output load – how much output I’m using compared to the inverter’s limit
Total Generation – how much total energy has been captured by the inverter/solar panels. This is limited because I’m not back feeding the grid.
Getting data out of the MPP Solar LV2424 inverter with Python to MQTT
I am using two cables to plug the inverter into a computer. The first is the serial cable that came with the inverter. The second is a simple USB to RS232 serial adapter plugged into a Dell Micro 3070.
The computer is running Proxmox, which is a virtual machine hypervisor. That doesn’t matter for this post, we can ignore it. Just pretend the USB cable is plugged directly into a computer running Ubuntu 20.04 Linux.
The main bit of software I’m using is published on GitHub by jblance under the name ‘mpp-solar’ – https://github.com/jblance/mpp-solar. This is a utility written in Python to communicate with MPP inverters.
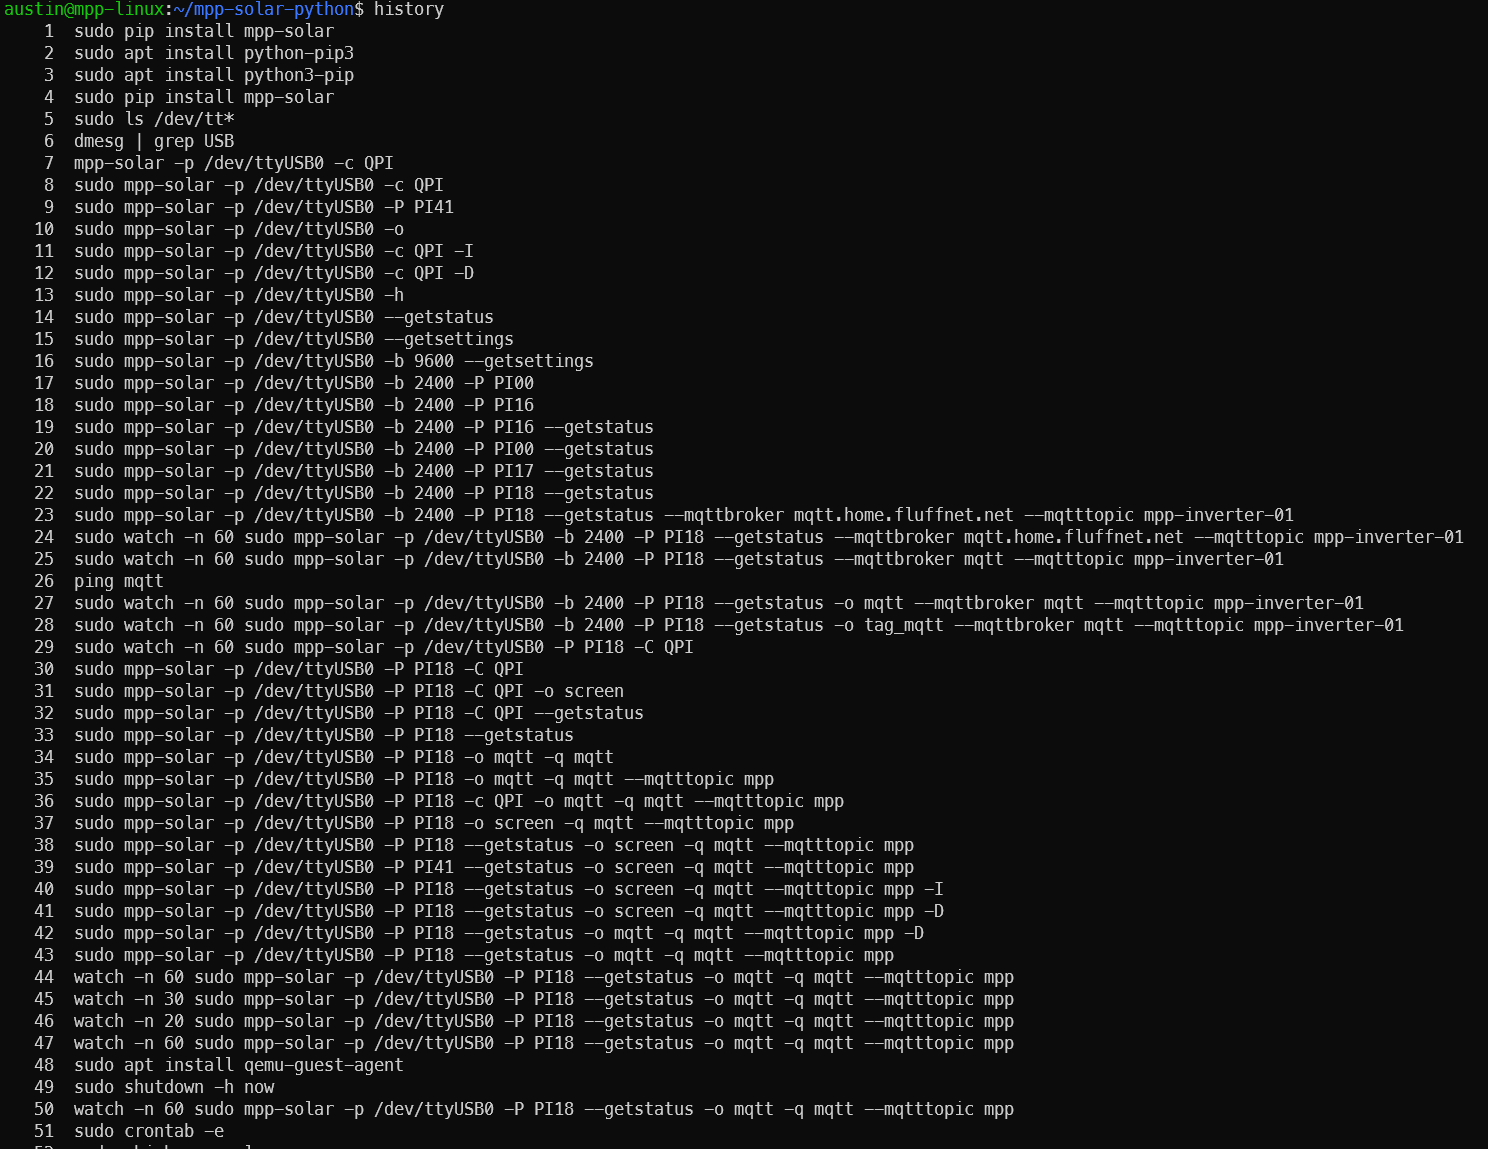
There was a good bit of fun trying to figure out exactly what command I needed to run to get data out of the inverter as evidenced by the history command:
Trying to figure out the usage of the Python mpp-solar utility
In the end, what worked for me to get the data is the following. I believe the protocol (-P) will be different for different MPP Solar inverters:
And the results are below. The grid voltage reported is a bit low because the battery started charging from the grid a few minutes before this was run.
austin@mpp-linux:~/mpp-solar-python$ sudo mpp-solar -p /dev/ttyUSB0 -b 2400 -P PI18 --getstatus
Command: ET - Total Generated Energy query
------------------------------------------------------------
Parameter                       Value           Unit
working_mode                    Hybrid mode(Line mode, Grid mode)
grid_voltage                    111.2           V
grid_frequency                  59.9            Hz
ac_output_voltage               111.2           V
ac_output_frequency             59.9            Hz
ac_output_apparent_power        155             VA
ac_output_active_power          139             W
output_load_percent             5               %
battery_voltage                 27.1            V
battery_voltage_from_scc        0.0             V
battery_voltage_from_scc2       0.0             V
battery_discharge_current       0               A
battery_charging_current        19              A
battery_capacity                76              %
inverter_heat_sink_temperature  30              °C
mppt1_charger_temperature       0               °C
mppt2_charger_temperature       0               °C
pv1_input_power                 0               W
pv2_input_power                 0               W
pv1_input_voltage               0.0             V
pv2_input_voltage               0.0             V
setting_value_configuration_state       Something changed
mppt1_charger_status            abnormal
mppt2_charger_status            abnormal
load_connection                 connect
battery_power_direction         charge
dc/ac_power_direction           AC-DC
line_power_direction            input
local_parallel_id               0
total_generated_energy          91190           Wh
And to get the same data right into MQTT I am using the following:
The above command is being run as a cron job once a minute. The default baud rate for the inverter is 2400 bps (yes, bits per second), which is super slow so a full poll takes ~6 seconds. Kind of annoying in 2021 but not a huge problem. The cron entry for the command is this:
# this program feeds a systemd service to convert the outputted mqtt to influx points
* * * * * /usr/local/bin/mpp-solar -p /dev/ttyUSB0 -P PI18 --getstatus -o mqtt -q mqtt --mqtttopic mpp
So with that we have MPP inverter data going to MQTT.
Putting MPP data into InfluxDB from MQTT
Here we need another script written in… take a guess… Python! This Python basically just opens a connection to a MQTT broker and transmits any updates to InfluxDB. The full script is a bit more complicated and I actually stripped a lot out because my MQTT topic names didn’t fit the template the original author used. I have started using this framework in other places to do the MQTT to InfluxDB translation. I like things going to the intermediate MQTT so they can be picked up for easy viewing in Home Assistant. Original code from https://github.com/KHoos/mqtt-to-influxdb-forwarder. The original code seems like it was built to be more robust than what I’m using it for (read: I have no idea what half of it does) but it worked for my purposes.
You’ll need a simple text file with your InfluxDB password and then reference it in the arguments. If your password is ‘password’, the only contents of the file should be ‘password’. I added the isFloat() function to basically make sure that strings weren’t getting added to the numeric tables in InfluxDB. I honestly find the structure/layout of storing stuff in Influx quite confusing so I’m sure there’s a better way to do this.
#!/usr/bin/env python
# -*- coding: utf-8 -*-
####################################
# originally found at/modified from https://github.com/KHoos/mqtt-to-influxdb-forwarder
####################################

# forwarder.py - forwards IoT sensor data from MQTT to InfluxDB
#
# Copyright (C) 2016 Michael Haas <[email protected]>
#
# This program is free software; you can redistribute it and/or modify
# it under the terms of the GNU General Public License as published by
# the Free Software Foundation; either version 3 of the License, or
# (at your option) any later version.
#
# This program is distributed in the hope that it will be useful,
# but WITHOUT ANY WARRANTY; without even the implied warranty of
# MERCHANTABILITY or FITNESS FOR A PARTICULAR PURPOSE.  See the
# GNU General Public License for more details.
#
# You should have received a copy of the GNU General Public License
# along with this program; if not, write to the Free Software Foundation,
# Inc., 51 Franklin Street, Fifth Floor, Boston, MA 02110-1301  USA

import argparse
import paho.mqtt.client as mqtt
from influxdb import InfluxDBClient
import json
import re
import logging
import sys
import requests.exceptions


class MessageStore(object):

        def store_msg(self, node_name, measurement_name, value):
                raise NotImplementedError()

class InfluxStore(MessageStore):

        logger = logging.getLogger("forwarder.InfluxStore")

        def __init__(self, host, port, username, password_file, database):
                password = open(password_file).read().strip()
                self.influx_client = InfluxDBClient(
                        host=host, port=port, username=username, password=password, database=database)

        def store_msg(self, database, sensor, value):
                influx_msg = {
                        'measurement': database,
                        'tags': {'sensor': sensor},
                        'fields': {'value' : value}
                }
                self.logger.debug("Writing InfluxDB point: %s", influx_msg)
                try:
                        self.influx_client.write_points([influx_msg])
                except requests.exceptions.ConnectionError as e:
                        self.logger.exception(e)

class MessageSource(object):

        def register_store(self, store):
                if not hasattr(self, '_stores'):
                        self._stores = []
                self._stores.append(store)

        @property
        def stores(self):
                # return copy
                return list(self._stores)

def isFloat(str_val):
  try:
    float(str_val)
    return True
  except ValueError:
    return False

def convertToFloat(str_val):
    if isFloat(str_val):
        fl_result = float(str_val)
        return fl_result
    else:
        return str_val

class MQTTSource(MessageSource):

        logger = logging.getLogger("forwarder.MQTTSource")

        def __init__(self, host, port, node_names, stringify_values_for_measurements):
                self.host = host
                self.port = port
                self.node_names = node_names
                self.stringify = stringify_values_for_measurements
                self._setup_handlers()

        def _setup_handlers(self):
                self.client = mqtt.Client()

                def on_connect(client, userdata, flags, rc):
                        self.logger.info("Connected with result code  %s", rc)
                        # subscribe to /node_name/wildcard
                        #for node_name in self.node_names:
                        # topic = "{node_name}/#".format(node_name=node_name)
                        topic = "get_status/status/#"
                        self.logger.info("Subscribing to topic %s", topic)
                        client.subscribe(topic)

                def on_message(client, userdata, msg):
                        self.logger.debug("Received MQTT message for topic %s with payload %s", msg.topic, msg.payload)
                        list_of_topics = msg.topic.split('/')
                        measurement = list_of_topics[2]
                        if list_of_topics[len(list_of_topics)-1] == 'unit':
                                value = None
                        else:
                                value = msg.payload
                                decoded_value = value.decode('UTF-8')
                                if isFloat(decoded_value):
                                        str_value = convertToFloat(decoded_value)
                                        for store in self.stores:
                                                store.store_msg("power_measurement",measurement,str_value)
                                else:
                                        for store in self.stores:
                                                store.store_msg("power_measurement_strings",measurement,decoded_value)


                self.client.on_connect = on_connect
                self.client.on_message = on_message

        def start(self):
                print(f"starting mqtt on host: {self.host} and port: {self.port}")
                self.client.connect(self.host, self.port)
                # Blocking call that processes network traffic, dispatches callbacks and
                # handles reconnecting.
                # Other loop*() functions are available that give a threaded interface and a
                # manual interface.
                self.client.loop_forever()


def main():
        parser = argparse.ArgumentParser(
                description='MQTT to InfluxDB bridge for IOT data.')
        parser.add_argument('--mqtt-host', default="mqtt", help='MQTT host')
        parser.add_argument('--mqtt-port', default=1883, help='MQTT port')
        parser.add_argument('--influx-host', default="dashboard", help='InfluxDB host')
        parser.add_argument('--influx-port', default=8086, help='InfluxDB port')
        parser.add_argument('--influx-user', default="power", help='InfluxDB username')
        parser.add_argument('--influx-pass', default="<I have a password here, unclear if the pass-file takes precedence>", help='InfluxDB password')
        parser.add_argument('--influx-pass-file', default="/home/austin/mpp-solar-python/pass.file", help='InfluxDB password file')
        parser.add_argument('--influx-db', default="power", help='InfluxDB database')
        parser.add_argument('--node-name', default='get_status', help='Sensor node name', action="append")
        parser.add_argument('--stringify-values-for-measurements', required=False,      help='Force str() on measurements of the given name', action="append")
        parser.add_argument('--verbose', help='Enable verbose output to stdout', default=False, action='store_true')
        args = parser.parse_args()

        if args.verbose:
                logging.basicConfig(stream=sys.stdout, level=logging.DEBUG)
        else:
                logging.basicConfig(stream=sys.stdout, level=logging.WARNING)

        print("creating influxstore")
        store = InfluxStore(host=args.influx_host, port=args.influx_port, username=args.influx_user, password_file=args.influx_pass_file, database=args.influx_db)
        print("creating mqttsource")
        source = MQTTSource(host=args.mqtt_host,
                                                port=args.mqtt_port, node_names=args.node_name,
                                                stringify_values_for_measurements=args.stringify_values_for_measurements)
        print("registering store")
        source.register_store(store)
        print("start")
        source.start()

if __name__ == '__main__':
        main()
Running the MQTT to InfluxDB script as a system daemon
Next up, we need to run the MQTT to InfluxDB Python script as a daemon so it starts with the machine and runs in the background. If you haven’t noticed by now, this is the standard pattern for most of the stuff I do – either a cron job or daemon to get data and another daemon to put it where I want it. Sometimes they’re the same.
austin@mpp-linux:~$ cat /etc/systemd/system/mpp-solar.service
[Unit]
Description=MPP inverter data - MQTT to influx
After=multi-user.target

[Service]
User=austin
Type=simple
Restart=always
RestartSec=10
# data feeds this script from a root cronjob running every 60s
ExecStart=/usr/bin/python3 /home/austin/mpp-solar-python/main.py

[Install]
WantedBy=multi-user.target
Then activate it:
austin@mpp-linux:~$ sudo systemctl daemon-reload
austin@mpp-linux:~$ sudo systemctl enable mpp-solar.service
austin@mpp-linux:~$ sudo systemctl start mpp-solar.service
austin@mpp-linux:~$ sudo systemctl status mpp-solar.service
● mpp-solar.service - MPP inverter data - MQTT to influx
     Loaded: loaded (/etc/systemd/system/mpp-solar.service; enabled; vendor preset: enabled)
     Active: active (running) since Sat 2021-07-31 02:21:32 UTC; 1 day 13h ago
   Main PID: 462825 (python3)
      Tasks: 1 (limit: 1072)
     Memory: 19.2M
     CGroup: /system.slice/mpp-solar.service
             └─462825 /usr/bin/python3 /home/austin/mpp-solar-python/main.py

Jul 31 02:21:32 mpp-linux systemd[1]: Started MPP inverter data - MQTT to influx.
All done
With that, you should now have data flowing into your InfluxDB instance from your MPP inverter via this Python script. This is exactly what I’m using for my LV2424 but it should work with others like the PIP LV2424 MSD, PIP-4048MS, IPS stuff, LV5048, and probably a lot of others.
Next Steps
Next post will cover designing the Grafana dashboard to show this data.
Disclosure: When you click on links to various merchants in this post and make a purchase, this can result in this site earning a commission. Affiliate programs and affiliations include, but are not limited to, the eBay Partner Network.