Categories
Programming

Learning Swift – Confusion on Conciseness

Is Swift too concise for beginners?

This is not the first time I’ve tried to learn Swift. The first go took place maybe October/November 2020. I followed the official Apple Landmarks tutorial (called Creating and Combining Views) and things just did not click. I looked elsewhere for tutorials as well. My wife and I also had our first 3 month old around so my brain wasn’t functioning 100%. Regardless, I could follow the Landmarks tutorial, but not really step out on my own. The words I used to describe Swift to myself were “too cute” and “nuanced” and other things like that. After watching the Stanford CS193p Spring 2021 Lecture 3 video, there was a 2 minute section that really cleared things up for me. My background is mostly C# with some Python so that’s where I’m coming from.

Shortening things up

At 1:33:43 in the lecture, Professor Hegarty is finished taking two completely reasonable functions and chopping out more than half the characters. The resulting combination functions exactly the same as the two larger functions.

Before:

func makeCardContent(index: Int) -> String {
    return "A"
}
private var model: MemoryGame<String> =
    MemoryGame<String>(numberOfPairsOfCards: 4, createCardContent: makeCardContent)

Middle:

private var model: MemoryGame<String> =
    MemoryGame<String>(numberOfPairsOfCards: 4, createCardContent: {(index: Int) -> String in
        return "A"
    })

After:

private var model: MemoryGame<String> =
    MemoryGame<String>(numberOfPairsOfCards: 4) { _ in "A" }

The theme of the code reduction is ‘taking out things that Swift already knows’ as well as the ‘if this is the last argument of a function, plop the function in its place’. Let’s examine that for a minute.

The last argument of a function thing is really an if-then that you need perform mentally while writing code. When learning a language, it isn’t particularly easy to figure out what’s going on when all the code snippets are already fully reduced. Maybe I missed a key page in the documentation, but this wasn’t made clear to me in any of the learning I attempted to do. It could also just be that I don’t understand how functional programming is supposed to work.

That same code in C# (at least for the versions I use) would be a lot more clear to read. Everything would be specified, unless you precede a variable with var, which indicates that you want the compiler to infer the type. Being able to decide is nice.

When does concise become confusing?

All that said, I still think “cute” and “nuanced” are appropriate for describing Swift (at least SwiftUI). It tries to be cute by cutting out thing where other languages just leave them in. The underbar (_) when you don’t need to specify an argument is another example of this. Why not just make every argument label optional unless specifically called out as necessary?

The other thing is the mix between Swift being a strongly-typed language as well as type inferencing. If it is strongly-typed, we should need to specify the type basically everywhere. Leaving out the types and letting the compiler inference them seems to work really well (I know the compilers are all much smarter than me) but it doesn’t help readability.

Conclusion

Are these valid criticisms? I don’t know. If a Swift expert wants to watch me (via screensharing) work on some basic cryptocurrency tracking app I have going for 30-60 minutes to answer my questions and help me learn Swift (I would pay $$$!), I would love that. Swift will make more sense the more I write it, I know that, but I’m left wondering if I’ll always have these thoughts. Beautiful Swift is indeed beautiful. I just need to figure out how to get there.

Categories
Programming

Learning Swift – CS193p Spring 2021 Assignment 1

Coming from Learning Swift (the programming language), I have completed Assignment 1 (including extra credit #1, but not #2). Most of the tasks were relatively straight-forward. I did not do any of the reading.

The last post had a fully functional game working as described in lectures 1 & 2. This assignment built from that.

Some brief notes on the required tasks:

  1. Easy. Done on the last post.
  2. Also easy.
  3. Not too hard, just added a new struct called TitleView and plopped it before the ScrollView in the VStack
  4. I tried to figure out a way to have the emojis var populated with the contents of a different emoji list (e.g. vehicleEmojis, as in var emojis = vehicleEmojis), but wasn’t successful. This will probably be covered in lecture 3. I ended up just hardcoding the initial list to be the same values as the vehicleEmoji string array. The buttons themselves were pretty straightforward.
  5. The hardest part about this was figuring out how to use the emoji browser so I didn’t have to close and re-open it for every new emoji. I did vehicles, animals, and fruit.
  6. array.shuffled(), easy
  7. VStack the system images with text
  8. Okay, I suppose I can do that. I picked the fruit emojis before realizing there weren’t specific fruit symbols. In SF 2, there is a leaf, which is close enough. This seems a bit nit-picky.
  9. font(.body)
  10. ok

Extra credit:

  1. set emojiCount to be a random value from 4 (minimum specified in the task) up to yourEmojiListVar.count. easy. do this after shuffling though
  2. this seems like a lot of work for something I don’t really need to do yet

Code

//
//  ContentView.swift
//  Memorize - Stanford CS193p, Spring 2021
//  After assignment 1
//
//  Created by Austin from austinsnerdythings.com on 5/27/21.
//

import SwiftUI

struct ContentView: View {
    var vehicleEmojis = ["?","?","?","?","?","?","?","?","?","?","?","?","?","✈️","?","?","?","?","?","?","?","?","?","?"]
    var animalEmojis = ["?","?","?","?","?","?","?","?","?","?","?","?"]
    var fruitEmojis = ["?","?","?","?","?","?","?","?","?","?","?","?"]
    
    @State var emojis = ["?","?","?","?","?","?","?","?","?","?","?","?","?","✈️","?","?","?","?","?","?","?","?","?","?"]
    @State var emojiCount: Int = 8

    var body: some View {
        VStack {
            TitleView()
            ScrollView {
                LazyVGrid(columns: [GridItem(.adaptive(minimum: 80))]){
                    ForEach(emojis[0..<emojiCount], id: \.self) { emoji in
                        CardView(content: emoji)
                            .aspectRatio(2/3, contentMode: .fit)
                    }
                }
            }
            .foregroundColor(.red)
            Spacer()
            HStack {
                vehicleTheme
                Spacer()
                animalTheme
                Spacer()
                fruitTheme
            }
            .font(.largeTitle)
            .padding(.horizontal)
        }
        .padding()

    }
    
    var remove: some View {
        Button {
            if emojiCount > 1 {
                emojiCount -= 1
            }
        } label: {
            Image(systemName: "minus.circle")
        }
    }
    
    var add: some View {
        Button {
            if emojiCount < vehicleEmojis.count {
                emojiCount += 1
            }
        } label: {
            Image(systemName: "plus.circle")
        }
    }
    
    var vehicleTheme: some View {
        Button(action: {
            emojis = vehicleEmojis.shuffled()
            emojiCount = Int.random(in: 4..<vehicleEmojis.count)
        }, label: {
            VStack{
                Image(systemName: "car").font(.largeTitle)
                Text("Vehicles").font(.body)
            }
        })
    }
    var animalTheme: some View {
        Button(action: {
            emojis = animalEmojis.shuffled()
            emojiCount = Int.random(in: 4..<animalEmojis.count)
        }, label: {
            VStack{
                Image(systemName: "hare").font(.largeTitle)
                Text("Animals").font(.body)
            }
        })
    }
    var fruitTheme: some View {
        Button(action: {
            emojis = fruitEmojis.shuffled()
            emojiCount = Int.random(in: 4..<fruitEmojis.count)
        }, label: {
            VStack{
                Image(systemName: "leaf").font(.largeTitle)
                Text("Fruits").font(.body)
            }
        })
    }
}

struct CardView: View {
    var content: String
    @State var isFaceUp: Bool = true
    
    var body: some View {
        ZStack {
            let shape = RoundedRectangle(cornerRadius: 20)
            if isFaceUp {
                shape.fill().foregroundColor(.white)
                shape.strokeBorder(lineWidth: 3)
                Text(content).font(.largeTitle)
            } else {
                shape.fill()
            }
        }
        .onTapGesture {
            if isFaceUp == true {
                isFaceUp = false
            } else {
                isFaceUp = true
            }
        }
    }
}

struct TitleView: View {
    var body: some View {
        HStack {
            Spacer()
            Text("Memorize!").font(.largeTitle)
            Spacer()
        }
    }
}

struct ContentView_Previews: PreviewProvider {
    static var previews: some View {
        ContentView()
            .preferredColorScheme(.light)
        ContentView()
            .preferredColorScheme(.dark)
    }
}

Screenshots

Next up – lecture 3

Link to post about lecture 3 here.

Categories
Trading

The Wheel Options Trading Strategy

Introduction to the Wheel Options Trading Strategy

More to come here later. Getting this post up so I can put links to the Wheel Options Trading Strategy tracker itself as requested by r/ThetaGang as well as the ThinkOrSwim reference.

I put together a YouTube video going over this tracker and how it works – https://youtu.be/aSnyv3jbtuA. Watch the video then come back here to download the tracker itself (download link at the bottom of the post).

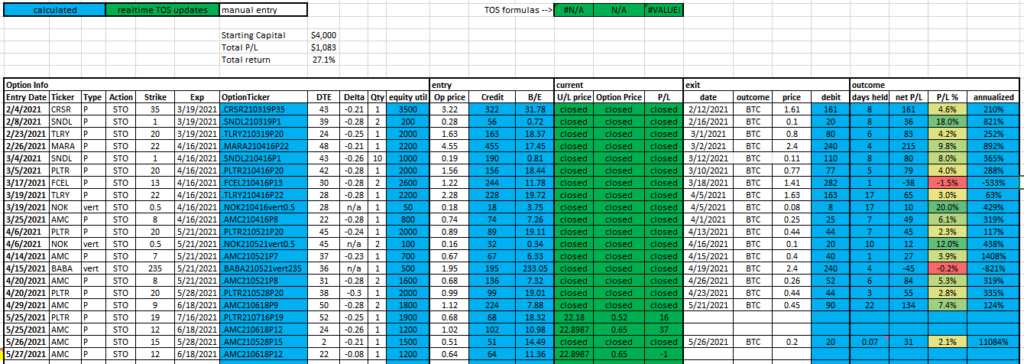
This image shows a screenshot of my Excel-based wheel option trading strategy tracker
My Excel based ThetaGang tracking spreadsheet

In short, this trading strategy to to sell cash secured puts on tickers you wouldn’t mind owning. As theta (time) goes on, the options price decreases (with everything else held constant) so you can buy back the put at a lower price. This is a neutral to bullish options strategy. It should not be used if you are bearish on a ticker.

Links

Categories
Programming

Learning Swift (the programming language)

The next big thing

I’ve been trying to come up with “the next big thing” in terms of apps for quite some time. I may finally have an idea worth coding. To do so requires that I actually know how to code it (duh). For smartphones, I started with Android like any self-respecting nerd would. But after some time, I realized I loved the Apple design, features, and overall “feel” and all the Android hacks and ads and reliance on Google made me want to switch. My first iPhone was the iPhone 5S and I was hooked. I now have an iPhone 11. This means I need to learn Swift, which is the newest Apple iOS programming language.

Stanford CS193p

Someone on the Swift sub-Reddit posted a link to some YouTube lecture videos by Paul Hegarty, a Stanford Computer Science professor. He speaks really well. I know how to program reasonably well in a few other languages but Swift never “clicked” for me. He is straightening things out for me so I can finally learn Swift. The lectures are for CS193p Spring 2021 and should be released twice a week, which is a perfect speed for me to pick things up. I’m already caught up through the 2nd lecture, with the code to match.

Documenting “Memorize”

The app we’re developing in the lectures is called “Memorize” and it basically the card flipping/matching game that many of us played in childhood. I plan to document my version here on austinsnerdythings.com. I was thinking of turning this into a game for Poppy at some point.

Progress after Lecture 2

After lecture 2, I have an app that generates “cards” on demand (using vehicle emojis), puts them in a decent layout, and you can add/subtract cards as desired. Learning Swift via this method will be super nice.

Without further ado (I realized this is becoming like recipe blogs, where there is an unnecessarily long intro before the content), here is the code after the end of lecture 2 (including the 24 vehicles snippet), but before any of the assignment stuff:

//
//  ContentView.swift
//  Memorize
//
//  Created by Austin from austinsnerdythings.com on 5/25/21.
//
import SwiftUI
struct ContentView: View {
    var emojis = ["?","?","?","?","?","?","?","?","?","?","?","?","?","✈️","?","?","?","?","?","?","?","?","?","?"]
    @State var emojiCount: Int = 4
    var body: some View {
        VStack {
            ScrollView {
                LazyVGrid(columns: [GridItem(.adaptive(minimum: 80))]){
                    ForEach(emojis[0..<emojiCount], id: \.self) { emoji in
                        CardView(content: emoji)
                            .aspectRatio(2/3, contentMode: .fit)
                    }
                }
            }
            .foregroundColor(.red)
            Spacer()
            HStack {
                add
                Spacer()
                remove
            }
            .font(.largeTitle)
            .padding(.horizontal)
        }
        .padding()
    }
    
    var remove: some View {
        Button {
            if emojiCount > 1 {
                emojiCount -= 1
            }
        } label: {
            Image(systemName: "minus.circle")
        }
    }
    
    var add: some View {
        Button {
            if emojiCount < emojis.count {
                emojiCount += 1
            }
        } label: {
            Image(systemName: "plus.circle")
        }
    }
}
struct CardView: View {
    var content: String
    @State var isFaceUp: Bool = true
    
    var body: some View {
        ZStack {
            let shape = RoundedRectangle(cornerRadius: 20)
            if isFaceUp {
                shape.fill().foregroundColor(.white)
                shape.strokeBorder(lineWidth: 3)
                Text(content).font(.largeTitle)
            } else {
                shape.fill()
            }
        }
        .onTapGesture {
            if isFaceUp == true {
                isFaceUp = false
            } else {
                isFaceUp = true
            }
        }
    }
}
struct ContentView_Previews: PreviewProvider {
    static var previews: some View {
        ContentView()
            .preferredColorScheme(.light)
        ContentView()
            .preferredColorScheme(.dark)
    }
}

Screenshots

XCode preview of light and dark themes
Preview in the iPhone 11 simulator

What’s next

There is an assignment after lecture 2. I need to do that next. I wonder if Professor Hegarty will grade it for me?

Update 5/27/2021 – I have completed assignment 1 – post here: Learning Swift – CS193p Spring 2021 Assignment 1.

A Brief Side Note – Hackintosh

I am doing all this coding from a Hackintosh. I converted a Dell Latitude E7450 to run macOS, which was not easy. It is currently running macOS 10.15.7 (Catalina). Apple computer hardware is outrageously expensive for what it is (the “Apple Tax”). When I decide to publish my first app, I do intend on getting an actual Mac to comply with the rules. Pics or it didn’t happen:

Dell Latitude E7450 running macOS Catalina 10.15.7
Categories
Home Assistant Weather

Viewing Ambient Weather WS-2902C data in Home Assistant

Background

If you are coming from the Handling data from Ambient Weather WS-2902C API to MQTT post, you are ready to proceed! If not, you’ll need to follow the steps in that post to get your Ambient Weather WS-2902C data into MQTT.

In short, we set up a Python script that listens on port 80 for data coming from the Ambient Weather base station. It then takes the data and publishes it to various MQTT topics. We can subscribe to those topics to receive new data as soon as it arrives.

Available Data

I’ll re-post the list of available data/topics from my last post:

TopicValueComment
weather/ws-2902c/PASSKEYaa:bb:cc:dd:ee:ffMAC address
weather/ws-2902c/dateutc5/15/2021date
weather/ws-2902c/tempinf70.7temp at the base station
weather/ws-2902c/humidityin36humidity at the base station
weather/ws-2902c/baromrelin29.675adjusted barometric pressure (in Hg)
weather/ws-2902c/baromabsin24.531absolute barometric pressure (in Hg)
weather/ws-2902c/tempf66.2temp at the weather station
weather/ws-2902c/battout1battery status at the weather station?
weather/ws-2902c/humidity26humidity at the weather station
weather/ws-2902c/winddir207wind direction in degrees azimuth
weather/ws-2902c/windspeedmph0.2wind speed
weather/ws-2902c/windgustmph1.1wind gust (shows peaks between updates)
weather/ws-2902c/maxdailygust3.4max daily wind gust
weather/ws-2902c/hourlyrainin0hourly rain fall
weather/ws-2902c/eventrainin0event rain fall (resets after 24 hours of no rain)
weather/ws-2902c/dailyrainin0daily rain fall
weather/ws-2902c/weeklyrainin0weekly rain fall
weather/ws-2902c/monthlyrainin0monthly rain fall
weather/ws-2902c/totalrainin0total rain fall since power on?
weather/ws-2902c/solarradiation697.92solar radiation in watts per square meter
weather/ws-2902c/uv6UV intensity index
weather/ws-2902c/batt_co21?
table showing available data topics from our Ambient Weather WS-2902C weather station

This is a lot of data. How much/little you want to use is up to you! I believe I added every topic to my Home Assistant so they’d would be available if I ever wanted to use them.

Adding the MQTT topics to Home Assistant

If you don’t have the MQTT line in your base configuration, make sure you add it. I also am using secrets here so it goes and grabs the broker IP address from my secrets file.

For my configuration.yaml file, showing the relevant lines (MQTT sensors and the sensor file)

homeassistant@ha-new:~/.homeassistant$ cat configuration.yaml

mqtt:
  broker: !secret mqtt_broker

sensor: !include sensor.yaml

For the secrets.yaml file:

homeassistant@ha-new:~/.homeassistant$ cat secrets.yaml
mqtt_broker: mqtt.home.fluffnet.net

The way the secrets file works means it looks like this in configuration.yaml:

mqtt:
  broker: mqtt.home.fluffnet.net

If you haven’t worked with .yaml in Home Assistant before, it is very picky about spacing. Ensure the spacing is correct (usually 2 spaces per indentation).

With the MQTT line added, we can turn to the sensors file (sensors.yaml). This is where the magic happens! I’ve only added a subset of the topics:

homeassistant@ha-new:~/.homeassistant$ cat sensor.yaml
[snip non-ambient weather sensors]
- platform: mqtt
  state_topic: "weather/ws-2902c/tempinf"
  name: "real kitchen temp"
  unit_of_measurement: "F"
- platform: mqtt
  state_topic: "weather/ws-2902c/tempf"
  name: "real outside temp"
  unit_of_measurement: "F"
- platform: mqtt
  state_topic: "weather/ws-2902c/humidityin"
  name: "real kitchen hum"
  unit_of_measurement: "%"
- platform: mqtt
  state_topic: "weather/ws-2902c/humidity"
  name: "real outside hum"
  unit_of_measurement: "%"
- platform: mqtt
  state_topic: "weather/ws-2902c/solarradiation"
  name: "solar radiation"
  unit_of_measurement: "W/m2"
- platform: mqtt
  state_topic: "weather/ws-2902c/dailyrainin"
  name: "daily rain"
  unit_of_measurement: "in"
- platform: mqtt
  state_topic: "weather/ws-2902c/windspeedmph"
  name: "wind speed"
  unit_of_measurement: "mph"
- platform: mqtt
  state_topic: "weather/ws-2902c/windgustmph"
  name: "wind gust"
  unit_of_measurement: "mph"

Restarting Home Assistant

With those lines added to the sensor.yaml file, restart Home Assistant. I love Home Assistant but needing to restart it for basically any configuration change is a huge pain.

sudo systemctl restart [email protected]

Adding the new Ambient Weather WS-2902C sensors to your Home Assistant screens

With the new sensors activated, you can add them to any of your Home Assistant pages!

First click the edit button then Add Card:

home assistant screenshot to add card

Next up we need to select what kind of card we want to add. For most of these, they’re time series, so History Graph will be the best choice. I do not know why Home Assistant is recommending the sun position in this screenshot.

select History Graph

Now that the History Graph is selected, we can pick any of the new sensors we added in the entity drop down. In this screenshot we see most of what I added. The others are sorted elsewhere (there are 100+ entities available in my entities drop down).

New sensors available to add so we can view data from the WS-2902C
60 means it will refresh every minute (60 seconds)

With sensor.real_outside_temp selected, I added 60 for the refresh interval, which means the graph will refresh itself every 60 seconds.

Now the graph is added to the page! You can repeat with all the other sensors you want to view. In the below screenshot, we have successfully added the outside temperature from the Ambient Weather WS-2902C to Home Assistant.

My full weather tab

I’ve added a number of sensors from my Ambient Weather WS-2902C to my Home Assistant. Below you can see I have solar radiation, daily rain, real outside humidity, real outside temp (I have another sensor labeled “outdoor temp” that is a floating sensor that is no longer outdoors), and the wind data. I also have the badges up top with just the current numeric value. You can add more or less, it’s totally up to you!

Conclusion

With this series, we have connected the Ambient Weather WS-2902C to our own Linux container to read the data, publish it to MQTT, and then view it in Home Assistant. I hope you’ve found this helpful!