Categories
Linux

SSH Key Tutorial

SSH Key Tutorial

This post will be a basic SSH key tutorial. In my Securing this WordPress blog from evil hackers! post, I recommended turning off password based SSH authentication and moving exclusively to SSH key based authentication. This post will go over the steps to set up SSH key authentication. The outline is:

  1. Generate SSH public/private key pair
  2. Transfer the public key to the host in question
    1. manual method (Windows)
    2. automatic method (Linux/Mac)
  3. Verify the SSH key authentication is functional.

At the end of this post is my user creation script which does all of this automatically.

I do go over this in a good amount of detail in my first ever YouTube video which you can view here if you’d prefer a video instead of text.

I will be generating keys on my new laptop and transferring them to the Raspberry Pi I set up in my second YouTube video (Austin’s Nerdy Things Ep 2 – Setting up a Raspberry Pi) – https://youtu.be/u5dHvEYwr9M.

Step 1 – Generate the SSH key pair

The first thing we need to do is generate the SSH key pair. On all major OSes these days, this command is included (Windows finally joined the other “real” OSes in 2018 with full SSH support out of the box). We will be using ED25519, which is advised for basically anything build/updated since 2014.

ssh-keygen -t ed25519

This will start the generation process. I hit enter when it prompts for the location (it defaults to C:/Users/<user>/.ssh/id_<type> which is fine). I also hit enter again at the passphrase prompt twice because I don’t want to use a passphrase. Using a passphrase increase security but it can’t be used for any automated processes because it’ll prompt every time for the passphrase. This is the full output from the process:

C:\Users\Austin>ssh-keygen -t ed25519
Generating public/private ed25519 key pair.
Enter file in which to save the key (C:\Users\Austin/.ssh/id_ed25519): [press enter here]
Enter passphrase (empty for no passphrase): [press enter here]
Enter same passphrase again: [press enter here]
Your identification has been saved in C:\Users\Austin/.ssh/id_ed25519.
Your public key has been saved in C:\Users\Austin/.ssh/id_ed25519.pub.
The key fingerprint is:
SHA256:t0FIIk<snip.......................snip>6Rx4 austin@DESKTOP-3IPSAN3
The key's randomart image is:
+--[ED25519 256]--+
|o++++++ .        |
|*  + * o .       |
|o.o o   . .      |
| . .     .       |
|..... o S o      |
| . + .  .o.o..   |
|  = . o.+.+=o..  |
|   +.o.  +a..o   |
|  ..ooo o+...    |
+----[SHA256]-----+

Step 2 – Transfer the SSH public key

For Windows, they included all the useful SSH utilities except one: ssh-copy-id. This is the easy way to transfer SSH keys. It is possible to transfer the key without using this utility. For this SSH key tutorial, I will show both.

Step 2a – Transfer SSH key (Windows)

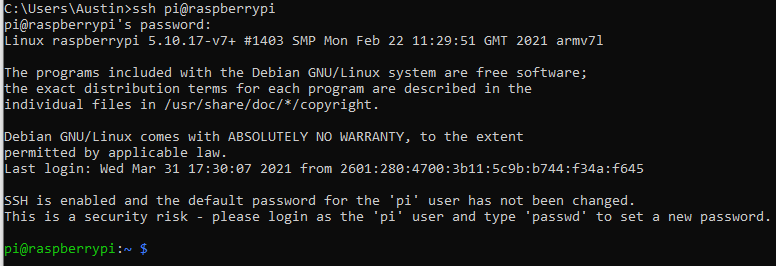
First we need to get the contents of the SSH public key. This will be done with the little-known type command of Windows. In Step 1, the file was placed at C:\Users\Austin\.ssh\id_ed25519 so that’s where we will read:

C:\Users\Austin>type C:\Users\Austin\.ssh\id_ed25519.pub
ssh-ed25519 AAAAC3NzaC1lZD2PT/VIK3KyYRliA0jgqmn7yzkVjuDiFK67Cio austin@DESKTOP-3IPSAN3

The contents of the file are the single line of the SSH public key (starting with the type of key “ssh-ed25519” and then continuing with the key contents “AAAAC3” and ending with the username and host the key was generated on “austin@DESKTOP-3IPSAN3”). This is the data we need to transfer to the new host.

I will first log onto the Raspberry Pi with the username/password combo from the default installation:

ssh pi@raspberrypi

I am now logged into the Pi:

Raspberry Pi Log In Prompt
Logged into the Raspberry Pi

Now on the target machine we need to create the user account and set up some initial things. We use sudo on all of these since root level permissions are required.

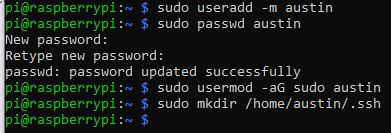
# create user austin with home directory (-m means create the home directory)
sudo useradd -m austin

# set the password for user austin
sudo passwd austin

# add user austin to sudo group
sudo usermod -aG sudo austin

# make the .ssh directory for user austin
sudo mkdir /home/austin/.ssh
sudo useradd
User created, password set, sudo added, and directory created

With those four commands run, the user is created, has a password, can run sudo, and has an empty .ssh directory ready for the keys.

Now we need to create the authorized_keys file:

sudo nano /home/austin/.ssh/authorized_keys

In this file, paste (by right-clicking) the single line from the id_ed25519 file:

nano authorized_keys
line pasted and ready to save

To save the file, press CTRL+O and a prompt will appear. Press enter again to save. Now to exit, press CTRL+X. There should be no “are you sure” prompt because the contents are saved.

Lastly, we need to change the owner of the .ssh directory and all of it’s contents to the new user (sudo means they were created as root):

sudo chown -R austin:austin /home/austin/.ssh

Now we can test. From the machine that generated the SSH key, SSH to the target with the new user specified:
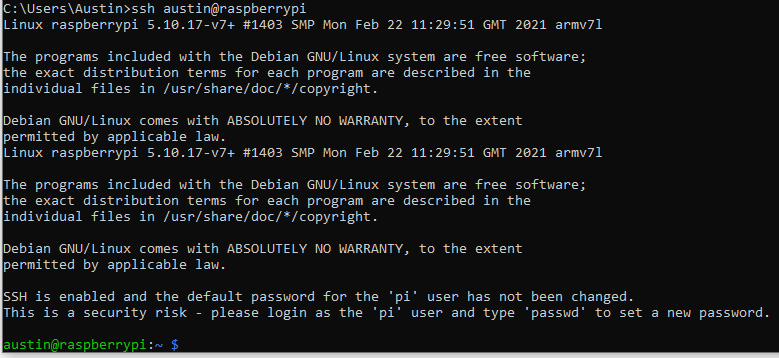
ssh austin@raspberrypi

You should get in without having to type a password!

logged in with SSH key
Successfully logged in without typing a password (the SSH key worked)
Step 2b – Transfer SSH key (Linux)

This is much easier. The ssh-copy-id utility does what we just did in a single command.

# make sure you've already generated keys on your Linux/Mac machine
ssh-copy-id austin@raspberrypi
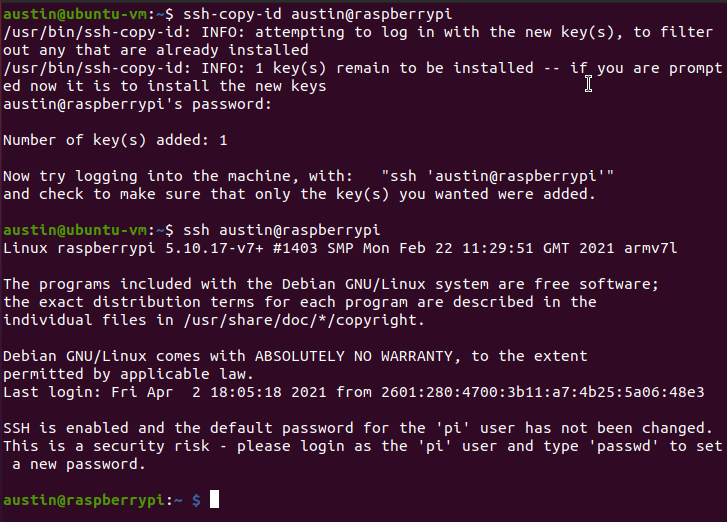
linux ssh-copy-id command
ssh-copy-id copied the keys and did everything for us in a single command

Microsoft – will you please add ssh-copy-id to default Windows installations?

Step 3 – Verify

We did this at the end of each of the other methods.

User creation script

This is the script I use on any new Linux virtual machine or container I spin up. It updates packages, installs a few things, sets the timezone, does all the user creation stuff and sets the SSH key. Lastly, it changes the shell to bash. Feel free to modify this for your own use. It is possible to copy the data from /etc/shadow so you don’t have to type in the password. I haven’t got that far yet.

apt update
apt upgrade -y 
apt install -y net-tools sudo htop sysstat git curl wget zsh
timedatectl set-timezone America/Denver
useradd -m austin
passwd austin
adduser austin sudo
usermod -aG sudo austin
usermod -aG adm austin
groups austin
mkdir /home/austin/.ssh
touch /home/austin/.ssh/authorized_keys
echo 'ssh-rsa AAAAB  <snip>  bhgqXzD austin@EARTH' >> /home/austin/.ssh/authorized_keys
chown -R austin:austin /home/austin/.ssh
usermod -s /bin/bash austin
Categories
Linux Python Weather

Python service to consume Ambient Weather API data

Python service to consume Ambient Weather API data

Continuing from the last post (Handling data from Ambient Weather WS-2902C to MQTT), we have a working script that reads the data coming from the Ambient Weather WS-2902 base station (Ambient Weather API) and sends it to a MQTT broker. In this post, we will turn that script into a Linux service that starts at boot and runs forever. This type of thing is perfect for Linux. Non-server Windows versions aren’t really appropriate for this since they reboot often with updates and such. If you want to run Windows Server, more power to you, you probably don’t need this guide. We will thus be focusing on Linux for consuming the Ambient Weather API. A Raspberry Pi is a perfect device for this (plenty of power, as big as a credit card, and less than $100).

Linux Services

Linux is made up of many individual components. Each component is designed to handle a single task (more or less). This differs from Windows where there are large executables/processes that handle many tasks. We will be taking advantage of Linux’s single task theory to add a new service that will run the Python script for ingesting and consuming the Ambient Weather API. In this instance for Austin’s Nerdy Things, the weather data is being provided by the Ambient Weather WS-2902C weather station.

Creating the service

For Ubuntu/Debian based distributions, service files live under /etc/systemd/system. Here is a list of services on the container I’m utilizing.

List command:

ls -1 /etc/systemd/system
dbus-org.freedesktop.resolve1.service
dbus-org.freedesktop.timesync1.service
default.target.wants
getty.target.wants
graphical.target.wants
multi-user.target.wants
socket.target.wants
sockets.target.wants
sshd.service
sys-kernel-debug.mount
sysinit.target.wants
syslog.service
timers.target.wants

Since this is a LXC container, there aren’t many services. On a standard Raspbian or Ubuntu full install, there will be 100+.

We will be creating a new service file using the nano text editor:

nano /etc/systemd/system/ambient-weather-api.service

In this file we need to define our service. The After lines mean don’t start this up until the listed services are running. The rest is pretty straight forward. I’m not 100% sure what the WantedBy line is for but it’s present in most of my service files. The contents of ambient-weather-api.service are as follows:

[Unit]
Description=Python script to ingest Ambient Weather API data
After=syslog.target
After=network.target

[Service]
Type=simple
User=root
Group=root
ExecStart=/usr/bin/python3 /srv/ambient-weather-api/main.py
ExecStartPre=/bin/sleep 5
Restart=always
RestartSec=5s
# Give the script some time to startup
TimeoutSec=10

[Install]
WantedBy=multi-user.target

Save the file. The service definition is looking for Python at /usr/bin/python3 and the python script at /srv/ambient-weather-api/main.py. You will probably be fine with the Python executable, but be sure to mv or cp the main.py file to /srv/ambient-weather-api/main.py.

We will need to reload the service definitions:

systemctl daemon-reload

Now we can start the service:

systemctl start ambient-weather-api.service

And verify it is running:

systemctl status ambient-weather-api.service
Ambient Weather API service status

The above screenshot shows it is indeed running and active. It is still showing the print messages in the log as well, which we should disable by commenting out the lines by adding a # in front of the print line. In this case, it is coming from line 56 (the status check in the publish function).

#print(f"Sent {msg} to topic {topic}")