Categories
Chrony DIY homelab Linux NTP PTP Raspberry Pi

From Milliseconds to 26 Nanoseconds: How a $20 eBay SFP Module Beat My Entire NTP Setup

Welcome to Austin’s Nerdy Things, where we spend years chasing nanoseconds that nobody asked us to chase.

Five years ago, I started this blog by building a microsecond-accurate NTP server with a Raspberry Pi and PPS GPS. Then I went simpler – a $12 USB GPS for millisecond-accurate NTP because ease of use matters too. Then I spent months doing thermal management on the CPU to squeeze out another 81% improvement. My beloved Raspberry Pi 3B has been sitting at around +/- 200 nanoseconds for over a year now, and I figured that was about as good as it gets for consumer hardware.

A $20 eBay purchase from two years ago just demolished all of that.

The Hardware: Telecom Surplus for Pocket Change

The key piece is an Oscilloquartz OSA-5401 – a GPS-disciplined PTP grandmaster clock in an SFP form factor. These things were designed to plug into telecom switches and provide IEEE 1588 Precision Time Protocol timing for cellular networks. They have a built-in GPS receiver, an OCXO (oven-controlled crystal oscillator), and an FPGA that handles hardware PTP timestamping. New, they cost thousands of dollars. On eBay, a handful of decommissioned units went for $20. Now they’re unavailable. If they do appear (rarely), they’re $300-500.

I first spotted these on a ServeTheHome forum thread back in 2024. Someone found a batch on eBay for $20 each and I jumped on one. The firmware doesn’t include the NTP server feature from the spec sheet (that requires a license), but it spews PTP multicast frames on power-up – and that turns out to be all you need. I posted the first working PTP+chrony config in that thread, which others used as a starting point.

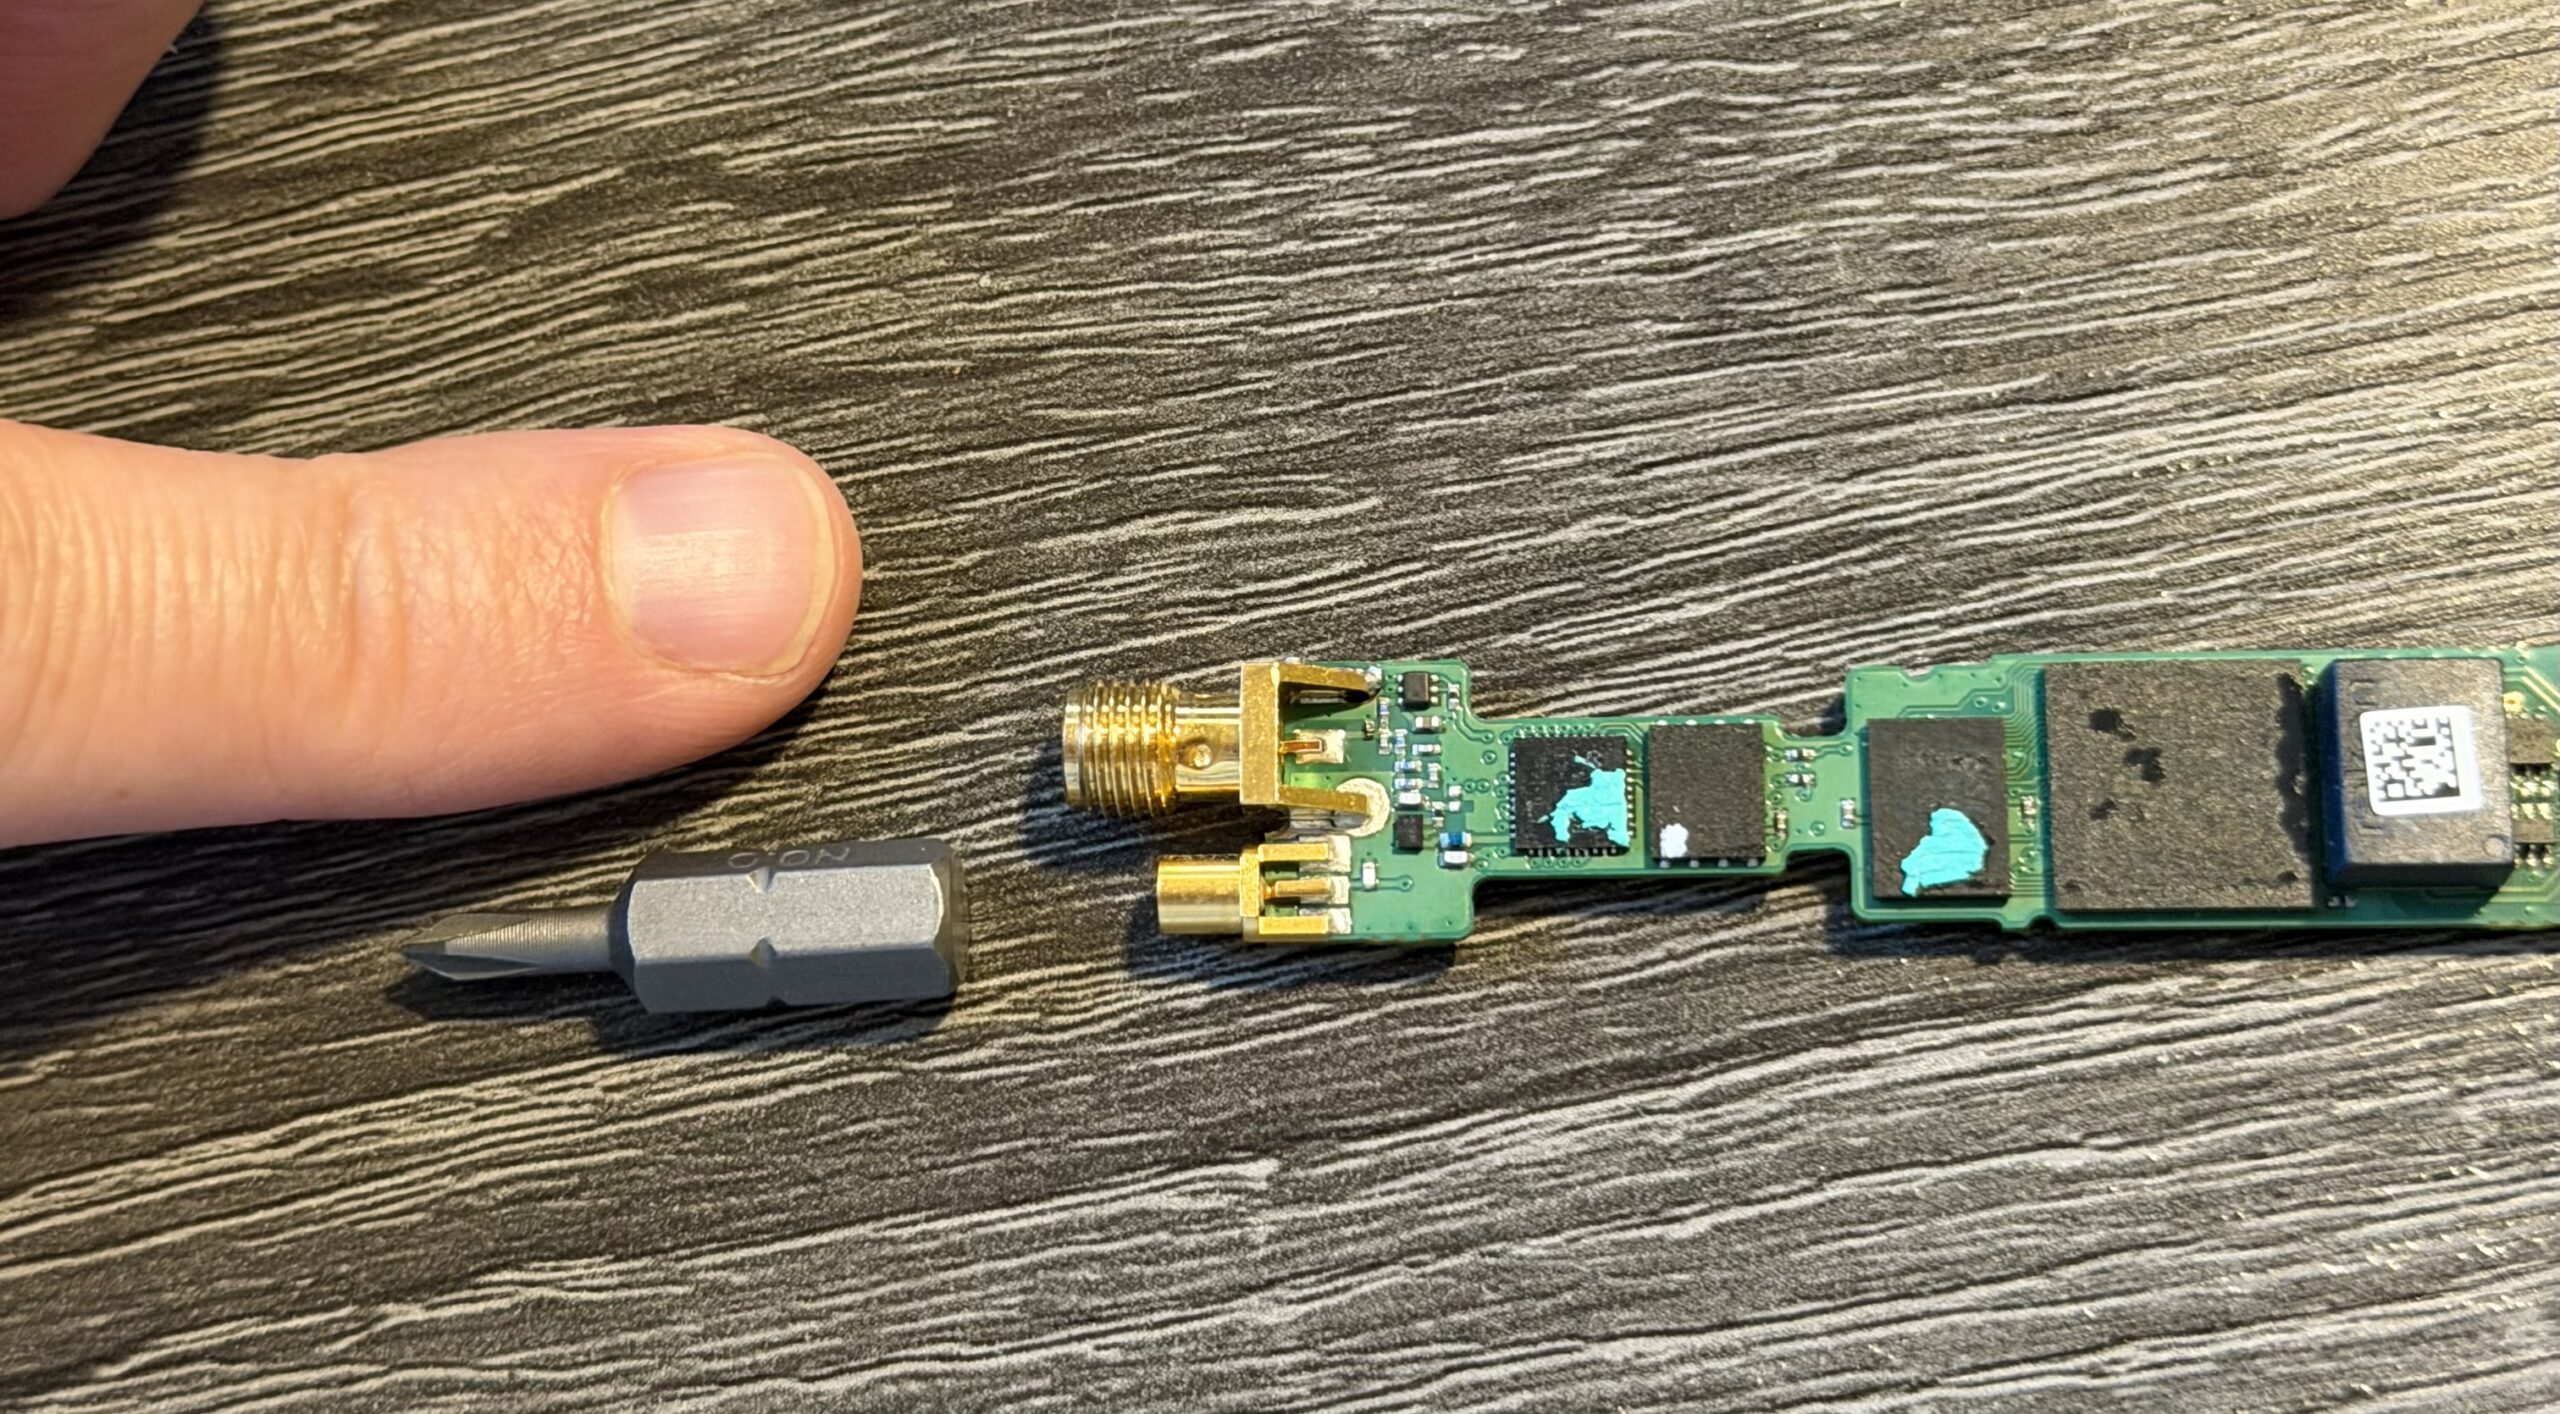
Mine was flaky from the start – the antenna would intermittently disconnect. I reported in the thread that “wiggling the module helped,” which in retrospect should have been a bigger clue. When I finally pulled the board out of the SFP housing, I found the GNSS SMA connector had broken loose from the PCB – probably cracked during decommissioning. A few minutes with a soldering iron fixed that, and it’s been rock solid since. Here’s the board with the resoldered connector, screwdriver bit for scale:

OSA-5401 PCB with resoldered GNSS SMA connector, screwdriver bit for scale

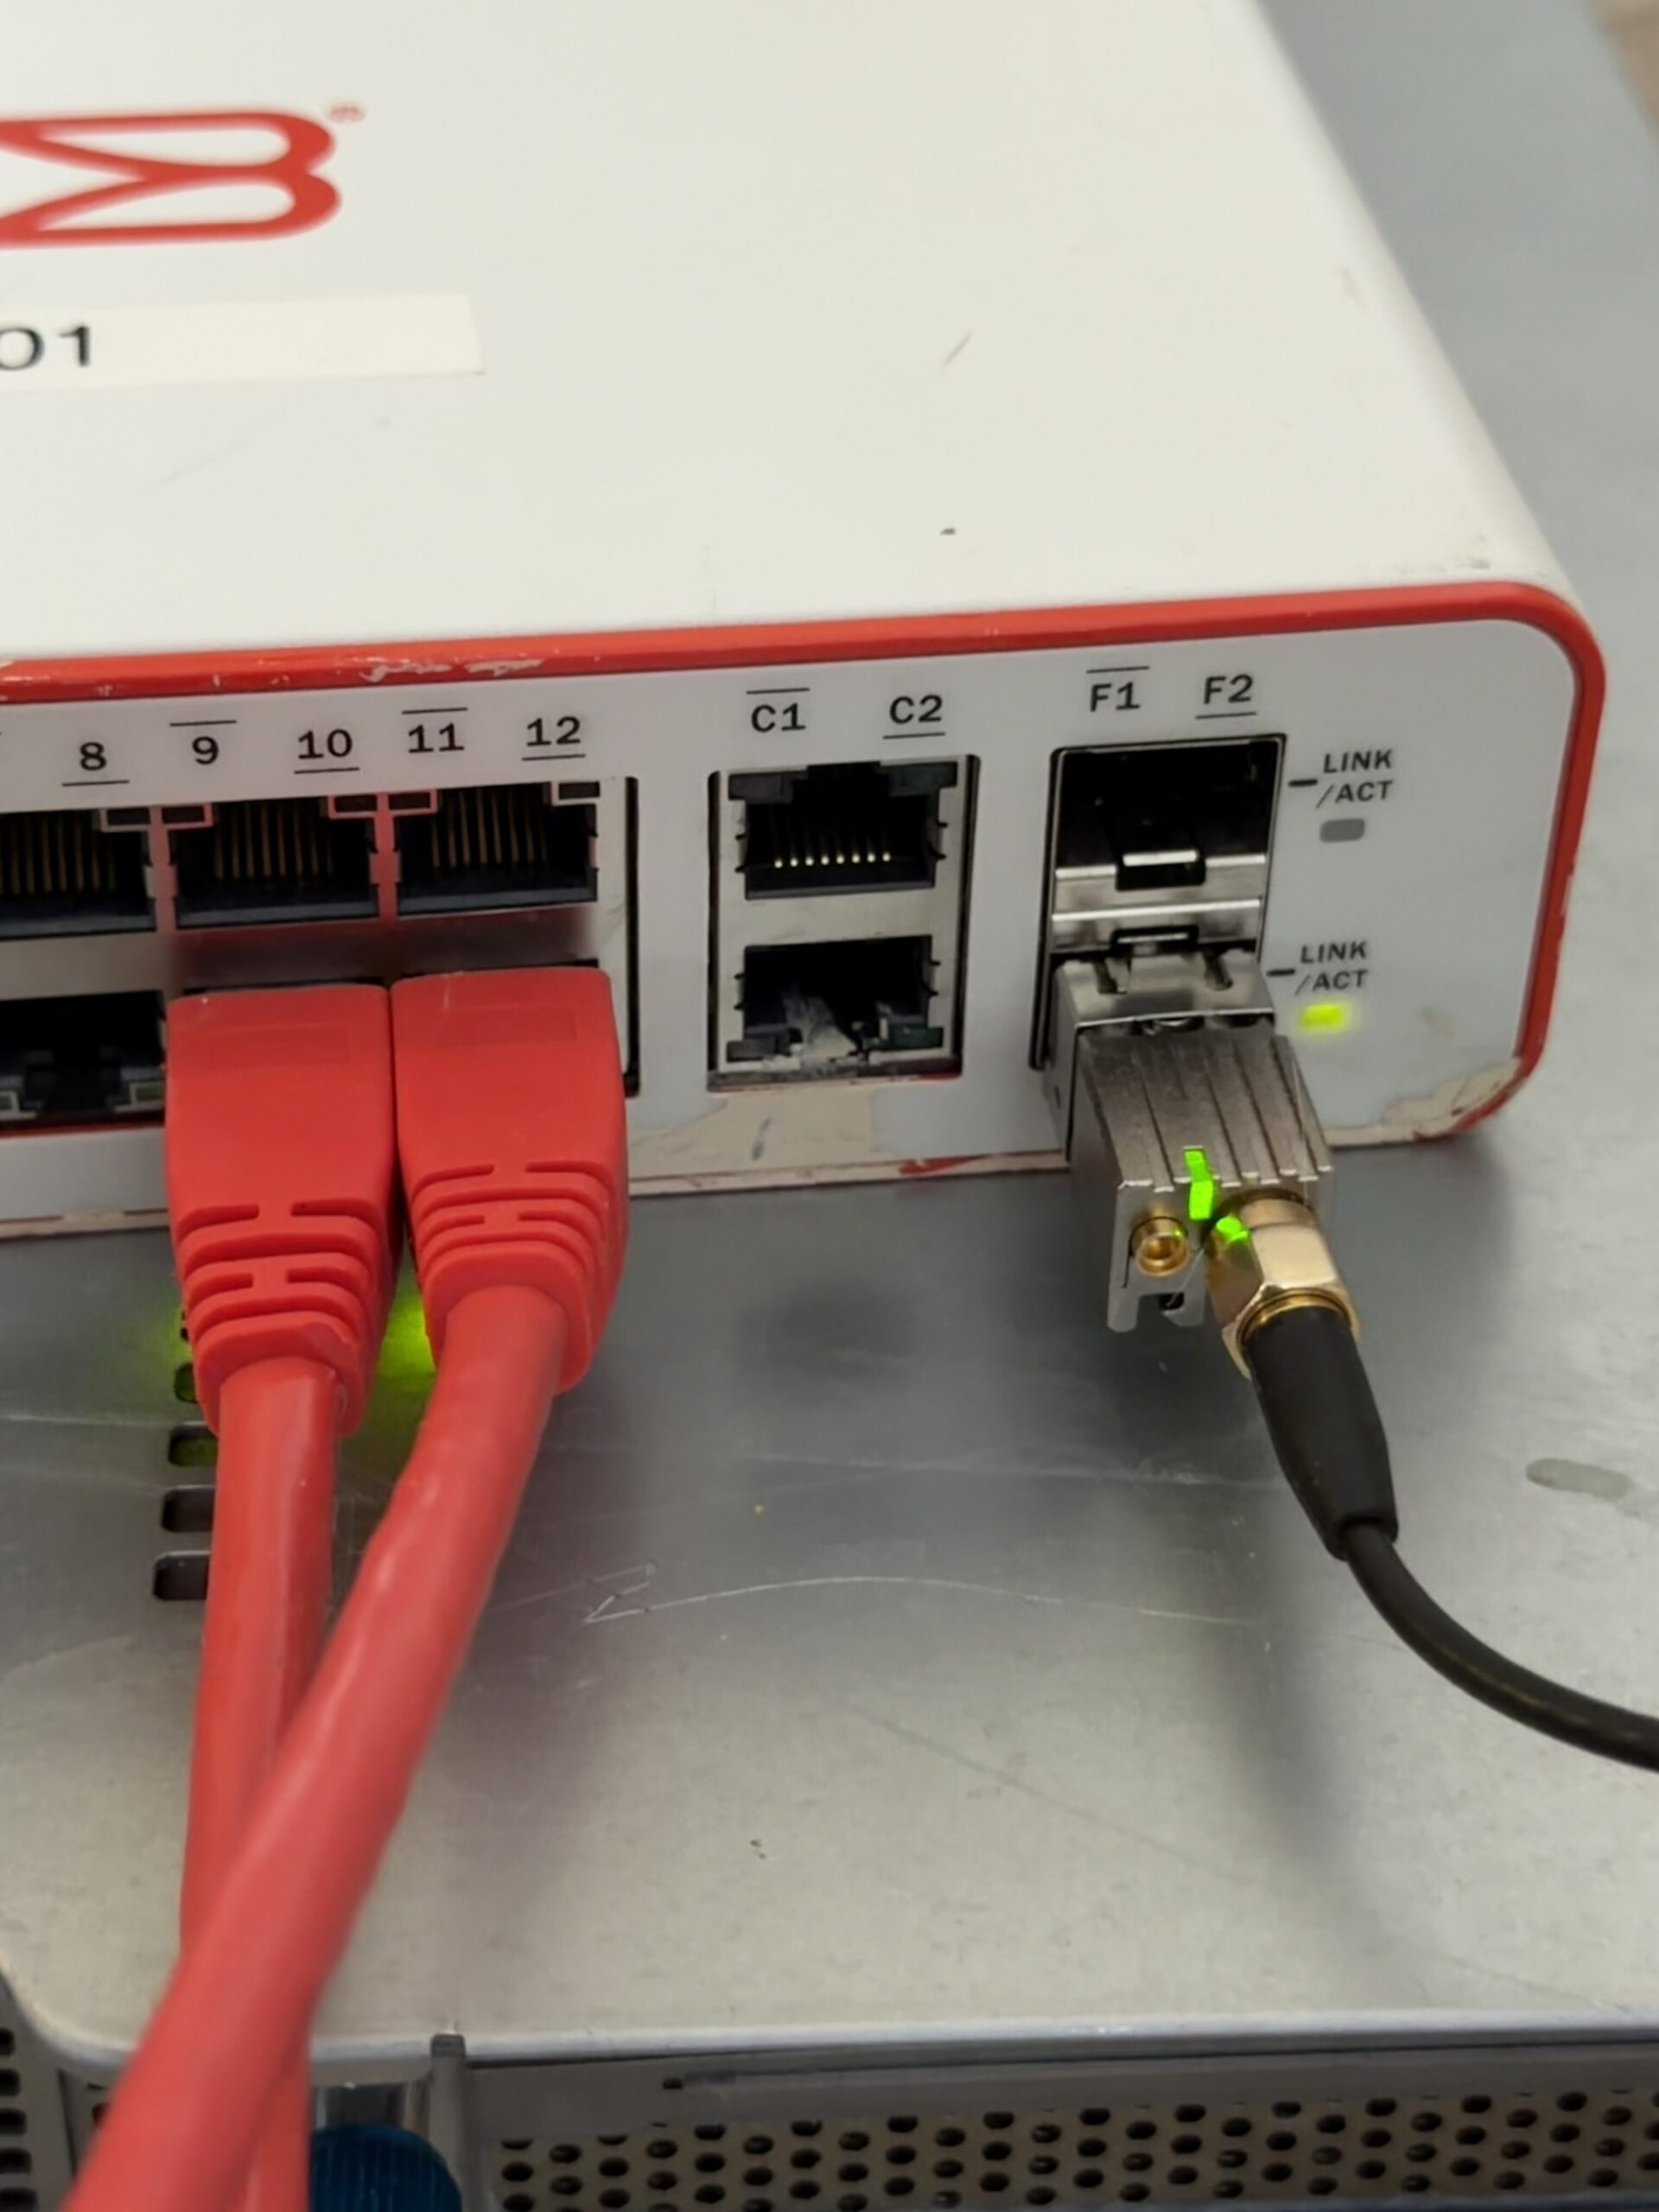
And installed in port F2 of a Brocade ICX6430-C12 switch, GPS antenna connected:

OSA-5401 installed in a Brocade ICX6430-C12 SFP port with GPS antenna

I also have a BH3SAP GPSDO that I picked up for about $70 on eBay – one of those Chinese units with an OX256B OCXO and an STM32 Blue Pill microcontroller. There’s a great thread on EEVBlog about these. I soldered some jumper wires to the MCU PPS output and connected it to GPIO 18 on my Raspberry Pi 5. I’ve been running custom firmware on it (based on fredzo’s gpsdo-fw) with some modifications for telemetry and flywheel display.

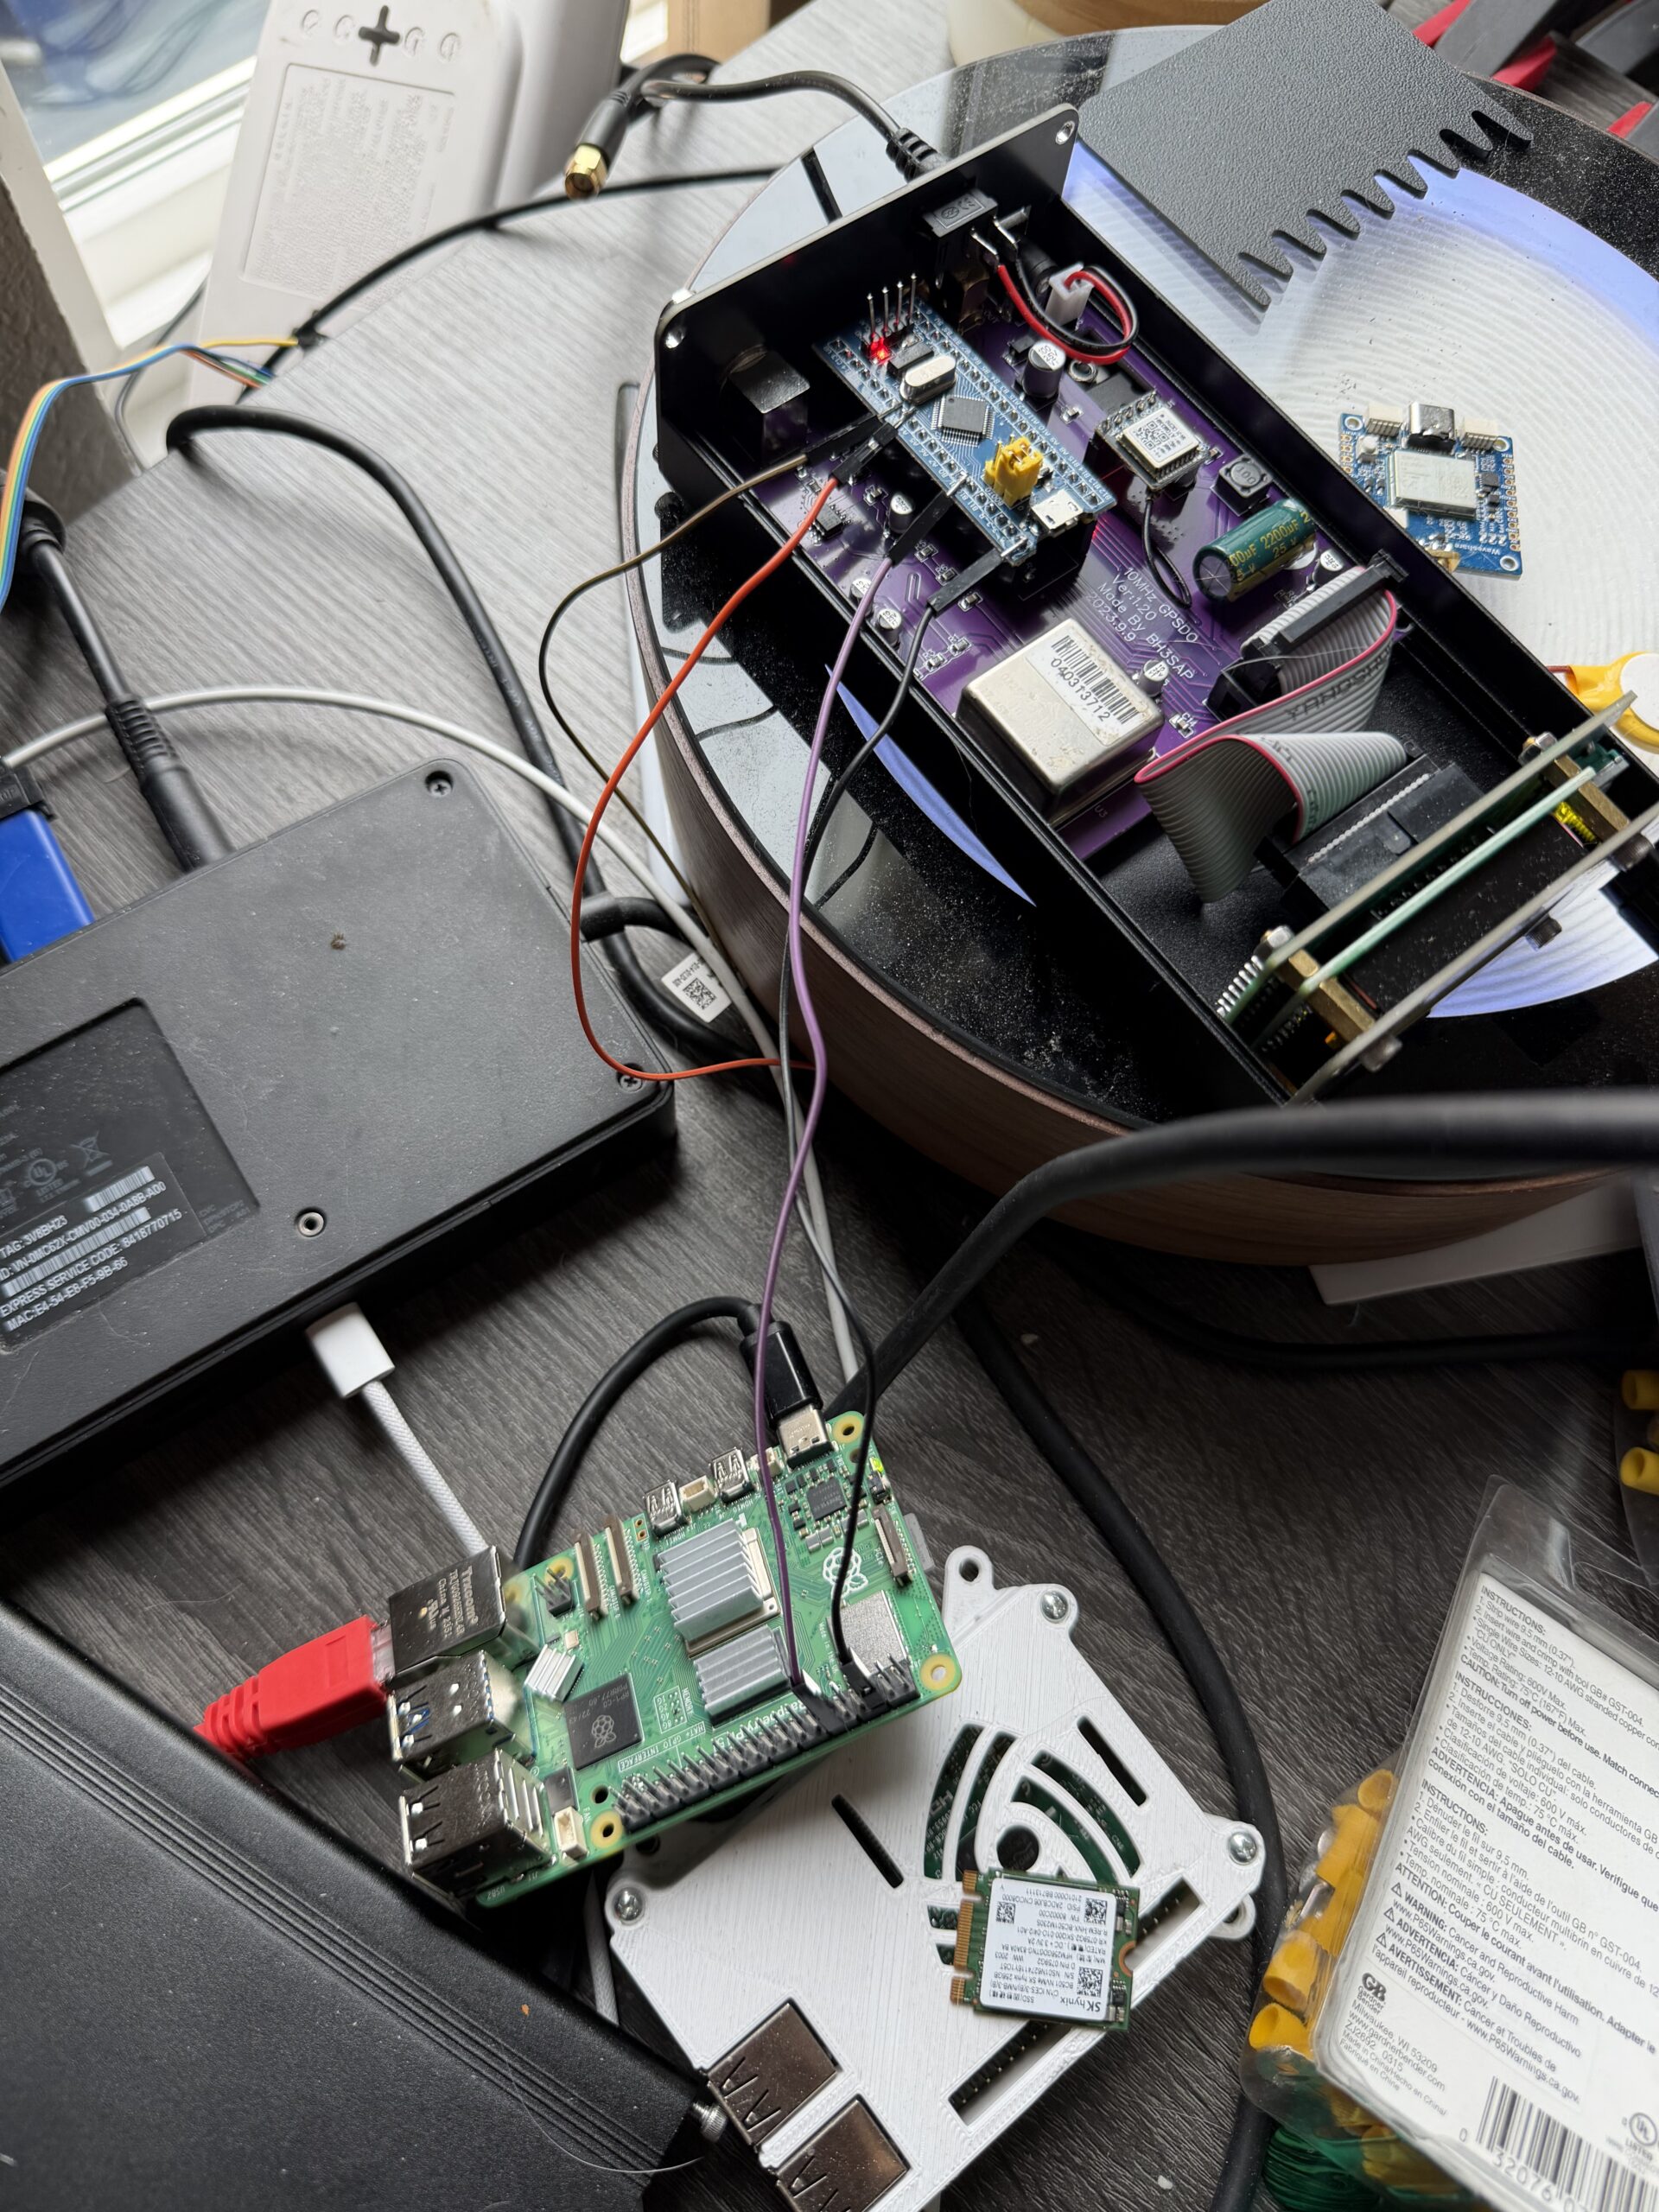
The whole mess wired together – GPSDO PPS jumper wires running to the Pi 5’s GPIO header:

GPSDO connected to Raspberry Pi 5 via PPS jumper wires

The Raspberry Pi 5 has hardware timestamping on its Ethernet NIC, which gives it a /dev/ptp0 PTP hardware clock (PHC). This is critical – without hardware timestamping, PTP is no better than NTP. The Pi 5’s Ethernet controller supports it natively.

Here’s the setup:

  • OSA-5401 ($29) – GPS-disciplined PTP grandmaster, plugged into an SFP port on my network switch
  • BH3SAP GPSDO (~$70) – GPS-disciplined OCXO, PPS output wired to Pi 5 GPIO
  • Raspberry Pi 5 – running ptp4l (for PTP) and chronyd (for everything else)
  • Total cost of timing hardware: ~$100

The Software Stack

The timing chain has two hops:

  1. ptp4l receives PTP sync messages from the OSA-5401 over Ethernet and disciplines the Pi’s PTP hardware clock (/dev/ptp0)
  2. chrony reads the hardware clock as a refclock and disciplines the system clock

ptp4l configuration (/etc/linuxptp/ptp4l-osa.conf):

[global]
slaveOnly		1
domainNumber		24
network_transport	L2
time_stamping		hardware
delay_mechanism		E2E
clock_servo		pi
logging_level		6
summary_interval	0

twoStepFlag		1
first_step_threshold	0.00002
step_threshold		0.0
max_frequency		900000000
sanity_freq_limit	200000000

ptp_dst_mac		01:1B:19:00:00:00
p2p_dst_mac		01:80:C2:00:00:0E

[eth0]

The chrony refclock configuration for PTP (/etc/chrony/conf.d/ptp-osa.conf):

# OSA-5401 via ptp4l -> PHC0
# ptp4l disciplines /dev/ptp0 to PTP timescale (TAI)
# tai lets chrony apply the current TAI-UTC offset from its leap second table
refclock PHC /dev/ptp0 refid PTP dpoll -4 poll 0 filter 5 precision 1e-9 tai

A few things worth noting:

  • tai tells chrony the PHC is on TAI timescale and to automatically apply the current TAI-UTC offset (currently 37 seconds). This is better than hardcoding offset -37 because it auto-updates if a leap second is ever announced again.
  • dpoll -4 means chrony reads the PHC 16 times per second. I initially had this at dpoll 0 (once per second), but a tcpdump revealed the OSA-5401 is actually sending PTP sync messages at 16 Hz, not 1 Hz. So there’s fresh data to read.
  • filter 5 takes the median of 5 consecutive reads, rejecting outliers.
  • precision 1e-9 tells chrony the refclock is accurate to 1 nanosecond, which tightens the error bounds that chrony uses in source selection.

The Bug: Why Chrony Refused to Use the Better Source

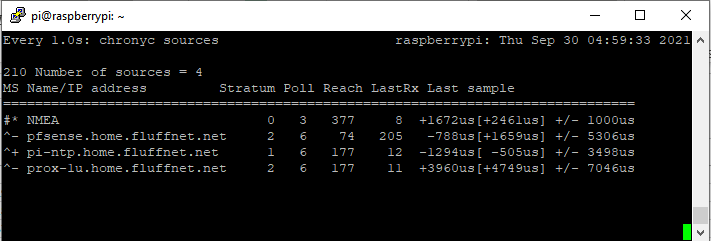
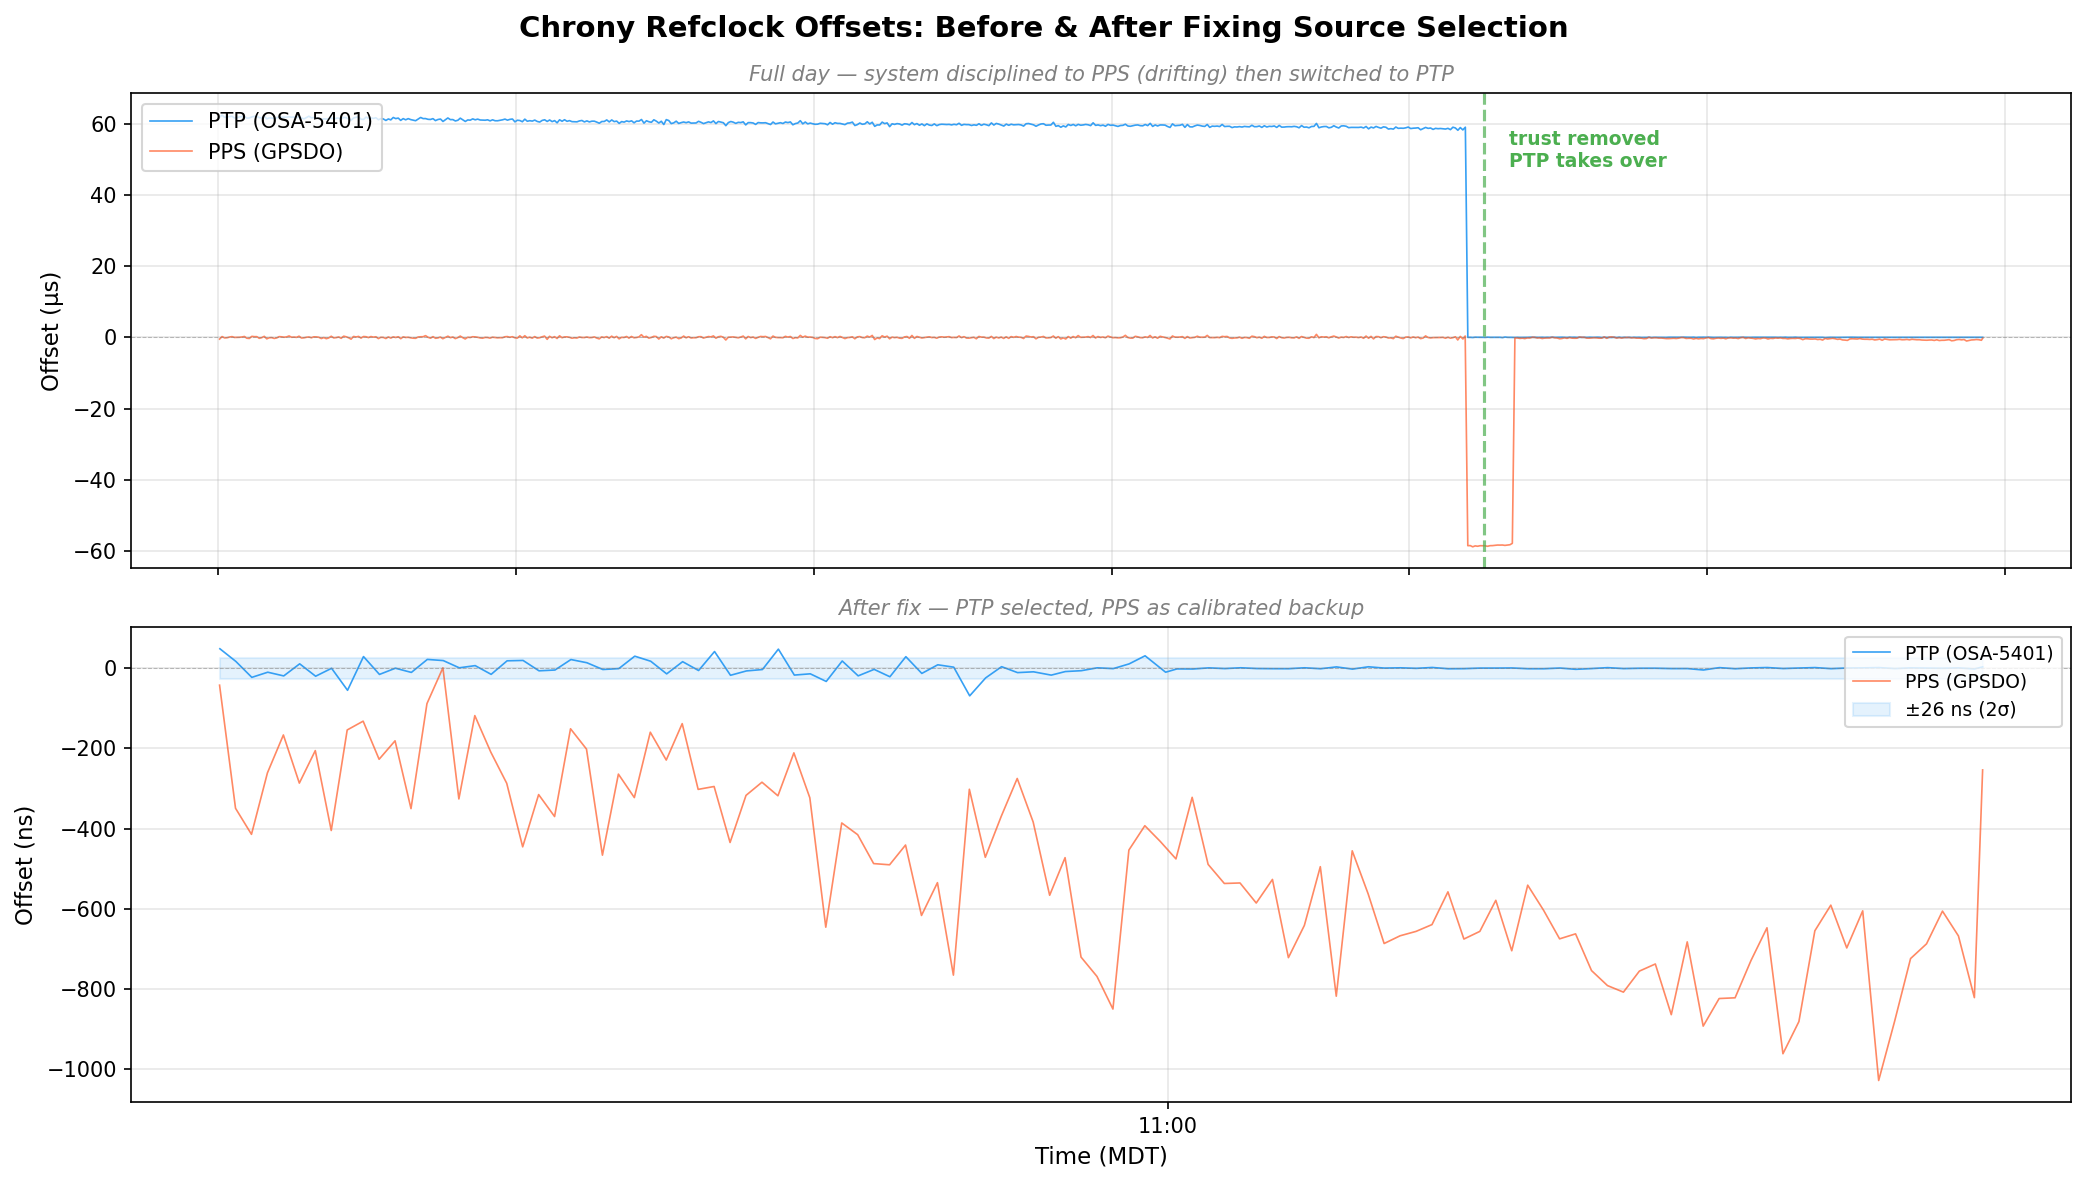
When I first got this all running, I had both PPS (from the GPSDO) and PTP (from the OSA-5401) configured as refclocks. The GPSDO had lost GPS lock overnight and had been flywheeling for about 12 hours. PTP was clearly the better source – lower jitter, independent GPS reference. But chrony stubbornly stayed on PPS.

Here’s what chronyc sources showed:

MS Name/IP address         Stratum Poll Reach LastRx Last sample
===============================================================================
#* PPS                           0   2   377     5   -114ns[ -132ns] +/-  101ns
#x PTP                           0   2   377     3    -59us[  -59us] +/-  101ns

PPS was selected (*) and PTP was marked x – “may be in error.” But PTP wasn’t in error. The GPSDO had drifted 59 microseconds during 12 hours of flywheel, and chrony was faithfully following it off a cliff.

The culprit was in the PPS refclock config:

refclock PPS /dev/pps0 refid PPS dpoll 0 poll 2 filter 3 precision 1e-7 prefer trust

That trust flag is nuclear. It tells chrony: “this source is always correct – never classify it as a falseticker.” Combined with prefer, chrony would choose PPS no matter how much every other source disagreed with it. Three sources (PTP, pi-ntp, pfsense) all agreed the system clock was off by ~59 μs, but chrony trusted PPS absolutely and marked PTP as suspicious instead.

The fix was simple: remove trust. And after some more testing, remove prefer too. Let chrony’s selection algorithm do its job. As soon as I did that:

MS Name/IP address         Stratum Poll Reach LastRx Last sample
===============================================================================
#- PPS                           0   2    17     1    +59us[  +59us] +/-  101ns
#* PTP                           0   2    37     2    +22ns[  -83ns] +/-   18ns

PTP immediately took over. PPS correctly demoted to - (valid but not selected), showing +59 μs offset – the accumulated GPSDO flywheel drift.

Here’s the full day of refclock data. The top panel is in microseconds – you can see PTP sitting at +60 μs the whole morning because the system clock was following the drifting GPSDO. Then the fix lands around 08:30 MDT and everything snaps into place. The bottom panel zooms into the post-fix period in nanoseconds:

Chrony refclock offsets before and after fixing source selection - PTP drops from 60μs to near-zero
Chrony refclock offsets before and after fixing source selection – PTP drops from 60μs to near-zero

Discovering the 58.3 Microsecond MCU Bias

Once the GPSDO regained GPS lock, I expected PPS to converge back toward PTP. It didn’t. It settled at a rock-solid +58 μs offset with 474 ns standard deviation. Locked, stable, just… late.

The BH3SAP GPSDO doesn’t pass the GPS module’s PPS signal directly to the output. It goes through the STM32 microcontroller – GPIO interrupt, some processing, then the MCU asserts the output pin. And traverses a jumper wire with questionable soldering. That path adds latency (and a not very clean edge). With PTP as ground truth, I could now measure exactly how much.

I pulled 500 samples from chrony’s refclock log and crunched the numbers:

StatValue
Mean-58.319 μs
Median-58.372 μs
Std Dev787 ns
P5–P95-59.2 to -57.4 μs
Range9.8 μs peak-to-peak

A consistent 58.3 microsecond delay. Sub-microsecond jitter – the MCU interrupt path is deterministic, just slow. The fix is a static offset in the chrony config:

refclock PPS /dev/pps0 refid PPS dpoll 0 poll 2 filter 3 precision 1e-7 offset 0.0000583

After applying the offset and restarting chrony:

MS Name/IP address         Stratum Poll Reach LastRx Last sample
===============================================================================
#- PPS                           0   2    37     4   +425ns[ +423ns] +/-  101ns
#* PTP                           0   2    77     4    -24ns[  -26ns] +/-   18ns

PPS went from +58 μs to +425 ns. The two sources now agree to within a microsecond, and PPS is a legitimate backup if PTP ever drops.

The Results: ±26 Nanoseconds

After tuning the PTP refclock parameters (dpoll -4, poll 0, filter 5), here are the final numbers:

But first, here’s the big picture. This is 36 hours of chrony’s tracking offset – the actual error between the system clock and whatever reference chrony was using at the time:

System clock offset over 36 hours - PPS scattered at ±200 ns, then PTP collapses it to a thin line
System clock offset over 36 hours – PPS scattered at ±200 ns, then PTP collapses it to a thin line

The orange scatter is the GPSDO’s PPS running chrony for a day and a half – ±200 ns on a good minute, ±400 ns on a bad one. The green dashed line is the moment I removed trust and PTP took over. The purple line is when I cranked the polling rate to 16 Hz. After that, the data is a flat line at zero on this scale.

ptp4l (OSA-5401 → Pi hardware clock):

MetricValue
RMS offset11.8 ns
Max offset17 ns
Path delay3,160 ns

chrony (Pi hardware clock → system clock):

MetricValue
Std Dev5 ns
RMS offset4 ns
Frequency skew0.002 ppm

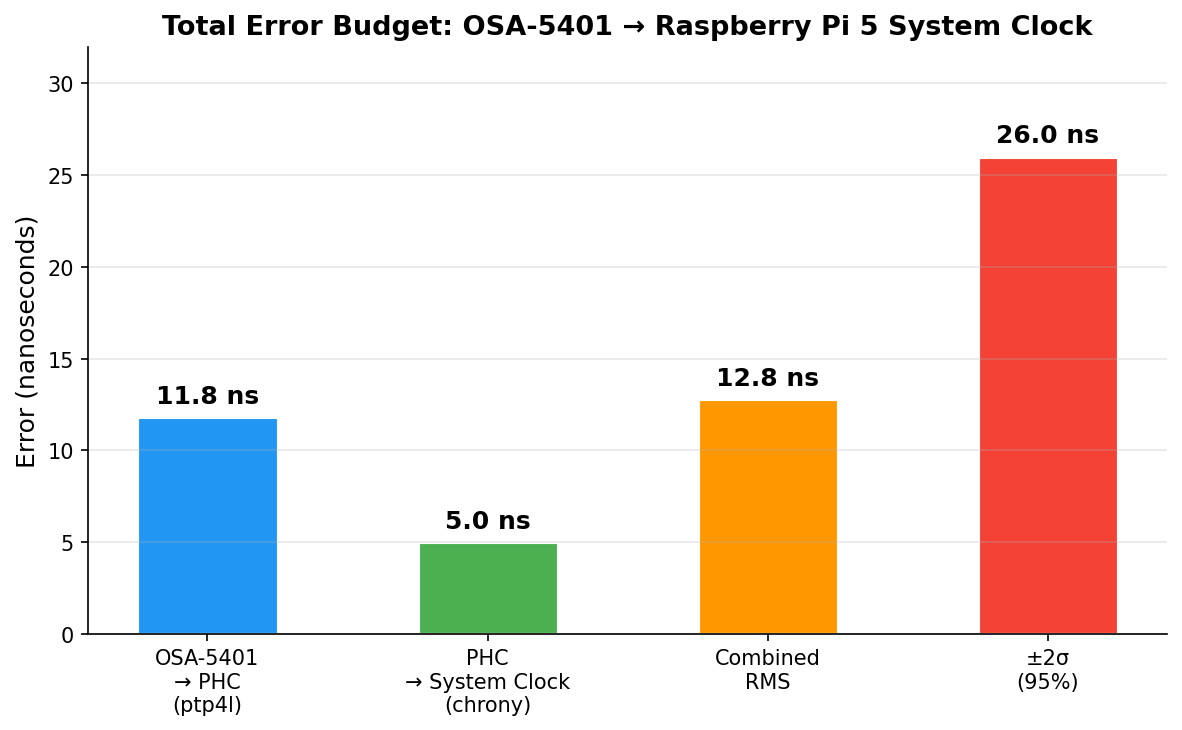
Combined error budget (root sum of squares):

LayerError
OSA-5401 → PHC (ptp4l)11.8 ns
PHC → system clock (chrony)5.0 ns
Combined RMS12.8 ns
±2σ (95% confidence)±26 ns

For comparison, my Pi 3B NTP server that’s been running for years:

MetricPi 3B (GPS PPS + NTP)Pi 5 (PTP + OSA-5401)
RMS offset182 ns4 ns
Std Dev312 ns5 ns
2σ bound~±600 ns±26 ns
Improvementbaseline~45x better
Error budget breakdown - ptp4l dominates at 11.8 ns, chrony adds 5 ns, combined 12.8 ns RMS
Error budget breakdown – ptp4l dominates at 11.8 ns, chrony adds 5 ns, combined 12.8 ns RMS

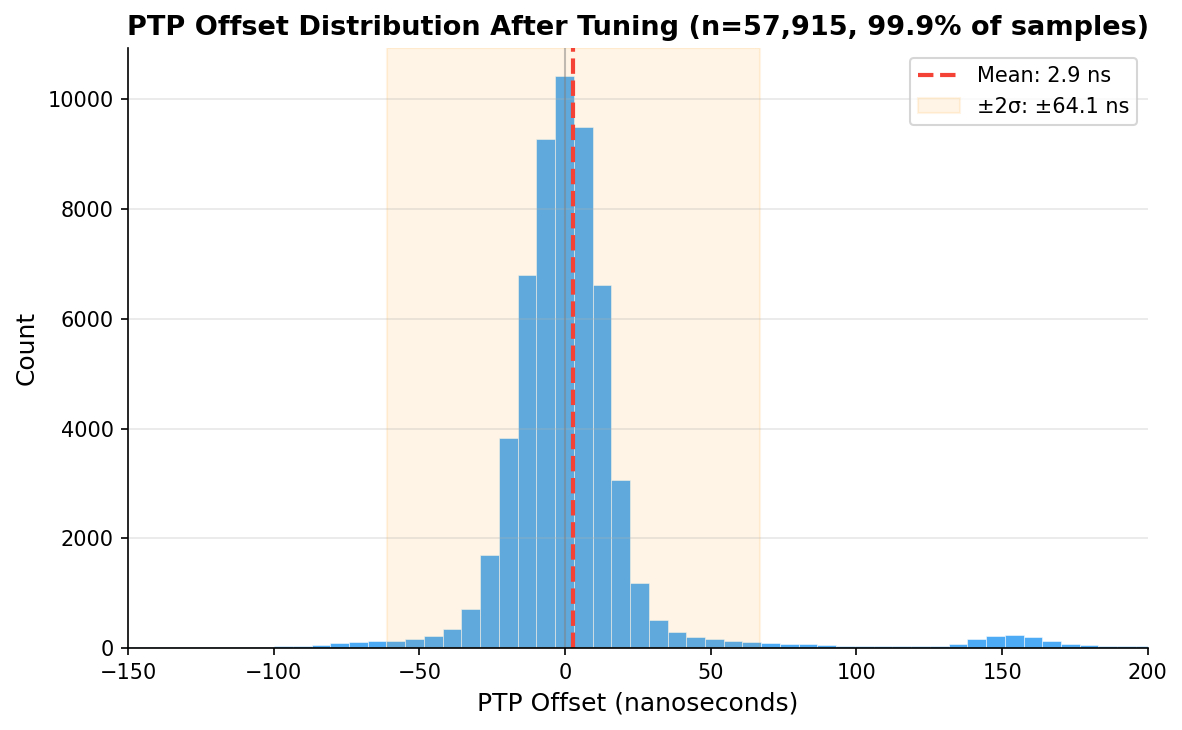
And here’s the distribution of 57,915 PTP offset samples after tuning. Mean of 2.9 ns, tight Gaussian centered right on zero:

PTP offset histogram after tuning - 57,915 samples, mean 2.9 ns
PTP offset histogram after tuning – 57,915 samples, mean 2.9 ns

Checking Our Work: What Does the Raw Data Actually Say?

Those numbers above come from what the servos report. ptp4l prints a 1 Hz RMS summary. chrony’s sourcestats shows the standard deviation of its filtered, averaged output. Both are honest numbers, but they’re the numbers after each servo has done its best to smooth things out. What does the raw measurement data look like?

I pulled 110 minutes of overlapping data – ptp4l’s 1 Hz journal summaries and chrony’s 16 Hz raw refclock offset log – and computed 1-minute rolling statistics for each layer, then combined them as root sum of squares:

End-to-end timing error analysis - ptp4l at 12 ns, chrony raw jitter at 39 ns, combined RSS at 41 ns
End-to-end timing error analysis – ptp4l at 12 ns, chrony raw jitter at 39 ns, combined RSS at 41 ns

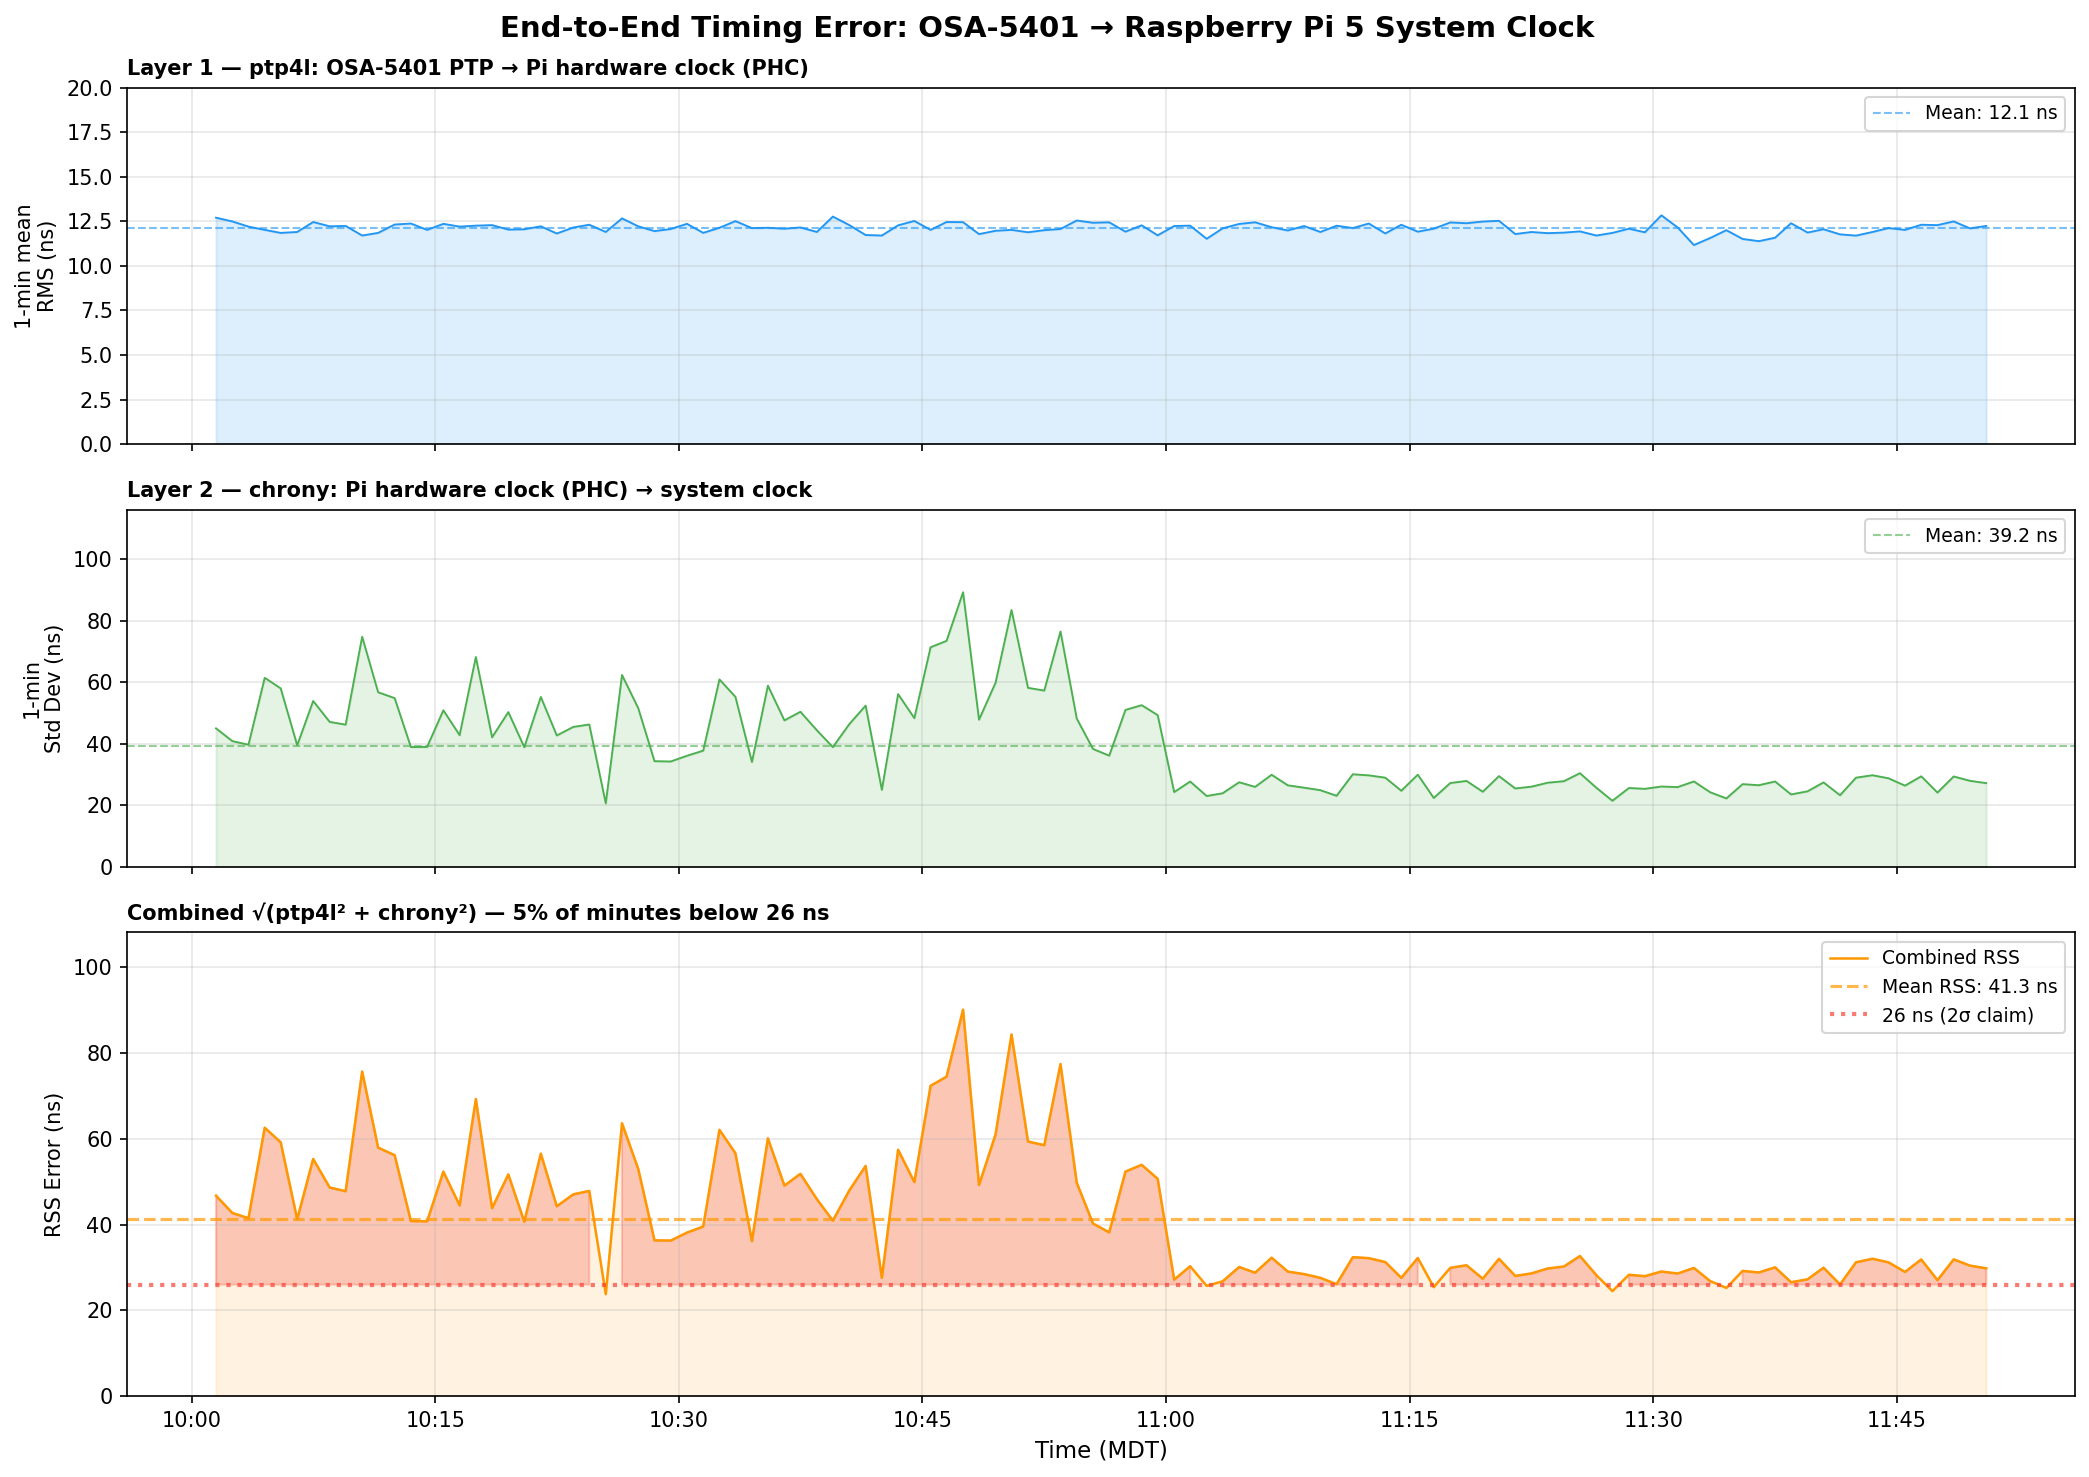
Three things jump out:

ptp4l is the stable one. Layer 1 (OSA-5401 → PHC) sits at 12.1 ns mean RMS and barely moves. The FPGA doing the hardware timestamping in the OSA-5401 earns its keep here – there’s just not much noise to begin with.

chrony’s raw readings are noisier than its filtered output suggests. The 16 Hz PHC reads have a 39 ns mean standard deviation per minute, with spikes up to 90 ns. But chrony’s sourcestats reports 5 ns – because the median-of-5 filter and the PI servo smooth that out before it touches the system clock. Both numbers are real; they measure different things.

The honest combined number is ±40–50 ns typical, not ±26 ns. The ±26 ns figure from chrony’s tracking output reflects the post-filter error – what the system clock actually experiences after chrony has done its smoothing. The raw measurement chain has more jitter than that. You can see the combined RSS settling toward 27–30 ns in the last hour as the servo tightened, but 40 ns is a fairer typical value.

Even at ±50 ns, that’s still 4× better than the Pi 3B’s ±200 ns. And the trend in the last hour suggests it keeps improving as chrony accumulates more data and tightens its frequency estimate.

GPSDO Flywheel Testing

With the PTP source providing a known-good reference, I can now characterize the GPSDO’s holdover performance. I unplugged the GPSDO’s GPS antenna and let it flywheel on its OCXO. Early results after the first hour showed drift still buried in the noise floor – under 100 ns/hr. The OX256B OCXO in this $70 unit might actually be decent. I’m collecting data for a longer run and will update this post (or write a follow-up) with the full holdover curve.

The dream setup is adding a DS18B20 temperature sensor directly to the OCXO case so I can correlate thermal drift with the oscillator’s frequency offset. That would let me separate temperature-driven drift from aging – but that’s a project for another weekend.

The Journey: Five Years, Six Orders of Magnitude

YearPostMethodAccuracy
2021USB GPS NTPNTP over USB serial~1 ms
2021GPS PPS NTPGPIO PPS + chrony~1 μs
2025Revisiting in 2025Tuned chrony + Pi 3B~200 ns
2025Thermal managementCPU temp stabilization~86→16 ns RMS
2026This postPTP + OSA-5401±26 ns

From a $12 USB GPS dongle to a $29 telecom SFP module. From milliseconds to nanoseconds. The total cost of the timing hardware in my current setup is about $100, and it’s achieving accuracy that used to require five-figure test equipment.

The next step down would be sub-nanosecond, and that requires White Rabbit – dedicated hardware, specialized SFP transceivers, and budgets measured in tens of thousands. For commodity Ethernet and general-purpose Linux, ±26 nanoseconds is pretty much the floor.

I think I’m done. (For now.) At least, that’s what I told my wife.

Configs for Reference

PTP refclock (/etc/chrony/conf.d/ptp-osa.conf)

# OSA-5401 via ptp4l -> PHC0
# ptp4l disciplines /dev/ptp0 to PTP timescale (TAI)
# tai lets chrony apply the current TAI-UTC offset from its leap second table
refclock PHC /dev/ptp0 refid PTP dpoll -4 poll 0 filter 5 precision 1e-9 tai

PPS refclock (/etc/chrony/conf.d/pps-gpsdo.conf)

# GPSDO 1 Hz PPS on GPIO 18
# dpoll 0 = read every pulse (1 Hz)
# filter 3 = median of 3 samples (odd count for true median)
# poll 2 = 4s loop update (2^2=4 >= filter 3)
# offset = MCU PPS delay compensation (58.3us measured against PTP)
refclock PPS /dev/pps0 refid PPS dpoll 0 poll 2 filter 3 precision 1e-7 offset 0.0000583

# Accurate LAN NTP server - coarse time for PPS second identification
server 10.98.1.198 iburst minpoll 4 maxpoll 6

ptp4l service

/usr/sbin/ptp4l -f /etc/linuxptp/ptp4l-osa.conf -i eth0

chrony main config highlights

log tracking measurements statistics refclocks
maxupdateskew 0.1
rtcsync
makestep 1 -1
leapsectz right/UTC
hwtimestamp *

The hwtimestamp * line enables hardware timestamping on all interfaces, and leapsectz right/UTC is required for the tai refclock option to work correctly.

Categories
Linux Ubuntu

Proxmox Ubuntu 22.04 Jammy LTS Cloud-init Image Script

Been a while since I last posted. For basically everything I do Linux-wise, I use Ubuntu. Specifically the Long Term Support versions, which are released on even years in April (April 2020, April 2022, etc.), hence the 22.04 designation of the latest LTS, Jammy. I had standardized on 20.04 (Focal) for everything, but am finding that various packages I use that I expect to be available on 20.04, aren’t. But they are present in standard, default package lists for Jammy 22.04. Last night I was creating a new VM to transfer this very blog to my shiny, new co-located server. I was going to use the Ubuntu 20.04 Proxmox Cloud Init Image Script template I wrote up a bit ago. Then I stopped and realized I should update it. So I changed 2004 everywhere in the script to 2204 and ‘focal’ to ‘jammy’, reran it, and now I have a fancy new cloud init script for Ubuntu 22.04. Note that this script does require you to install libguestfs-tools, as indicated in the previous cloud-init post.

ChatGPT enhanced script as of 2023:

#!/bin/bash

##############################################################################
# things to double-check:
# 1. user directory
# 2. your SSH key location
# 3. which bridge you assign with the create line (currently set to vmbr100)
# 4. which storage is being utilized (script uses local-zfs)
##############################################################################

DISK_IMAGE="jammy-server-cloudimg-amd64.img"
IMAGE_URL="https://cloud-images.ubuntu.com/jammy/current/$DISK_IMAGE"

# Function to check if a file was modified in the last 24 hours or doesn't exist
should_download_image() {
    local file="$1"
    # If file doesn't exist, return true (i.e., should download)
    [[ ! -f "$file" ]] && return 0

    local current_time=$(date +%s)
    local file_mod_time=$(stat --format="%Y" "$file")
    local difference=$(( current_time - file_mod_time ))
    # If older than 24 hours, return true
    (( difference >= 86400 ))
}

# Download the disk image if it doesn't exist or if it was modified more than 24 hours ago
if should_download_image "$DISK_IMAGE"; then
    rm -f "$DISK_IMAGE"
    wget -q "$IMAGE_URL"
fi

sudo virt-customize -a "$DISK_IMAGE" --install qemu-guest-agent
sudo virt-customize -a "$DISK_IMAGE" --ssh-inject root:file:/home/austin/id_rsa.pub

if sudo qm list | grep -qw "9022"; then
    sudo qm destroy 9022
fi

sudo qm create 9022 --name "ubuntu-2204-cloudinit-template" --memory 2048 --cores 2 --net0 virtio,bridge=vmbr100
sudo qm importdisk 9022 "$DISK_IMAGE" local-zfs
sudo qm set 9022 --scsihw virtio-scsi-pci --scsi0 local-zfs:vm-9022-disk-0
sudo qm set 9022 --boot c --bootdisk scsi0
sudo qm set 9022 --ide2 local-zfs:cloudinit
sudo qm set 9022 --serial0 socket --vga serial0
sudo qm set 9022 --agent enabled=1
sudo qm template 9022

echo "Next up, clone VM, then expand the disk"
echo "You also still need to copy ssh keys to the newly cloned VM"

Original, non-ChatGPT script:

###############
# things to double-check:
# 1. user directory
# 2. your SSH key location
# 3. which bridge you assign with the create line (currently set to vmbr100)
# 4. which storage is being utilized (script uses local-zfs)
###############

rm -f jammy-server-cloudimg-amd64.img
wget -q https://cloud-images.ubuntu.com/jammy/current/jammy-server-cloudimg-amd64.img
sudo virt-customize -a jammy-server-cloudimg-amd64.img --install qemu-guest-agent
sudo virt-customize -a jammy-server-cloudimg-amd64.img --ssh-inject root:file:/home/austin/id_rsa.pub
sudo qm destroy 9022
sudo qm create 9022 --name "ubuntu-2204-cloudinit-template" --memory 2048 --cores 2 --net0 virtio,bridge=vmbr100
sudo qm importdisk 9022 jammy-server-cloudimg-amd64.img local-zfs
sudo qm set 9022 --scsihw virtio-scsi-pci --scsi0 local-zfs:vm-9022-disk-0
sudo qm set 9022 --boot c --bootdisk scsi0
sudo qm set 9022 --ide2 local-zfs:cloudinit
sudo qm set 9022 --serial0 socket --vga serial0
sudo qm set 9022 --agent enabled=1
sudo qm template 9022
rm -f jammy-server-cloudimg-amd64.img
echo "next up, clone VM, then expand the disk"
echo "you also still need to copy ssh keys to the newly cloned VM"
Proxmox Ubuntu 22.04 cloud-init image script

I suppose for a full automation I should get user with a whoami command, assign it to a variable, and use that throughout the script. That’s a task for another day.

I also added a line in my crontab to have this script run weekly, so the image is essentially always up to date. I’ll run both 20.04 and 22.04 in parallel for a bit but anticipate that I can turn off the 20.04 job fairly soon.

# m h  dom mon dow   command
52 19 * * TUE sleep $(( RANDOM \% 60 )); /usr/bin/bash /home/austin/ubuntu-2004-cloud-init-create.sh >> /home/austin/ubuntu-template.log 2>&1
52 20 * * TUE sleep $(( RANDOM \% 60 )); /usr/bin/bash /home/austin/ubuntu-2204-cloud-init-create.sh >> /home/austin/ubuntu-2204-template.log 2>&1
Categories
Ansible homelab Kubernetes Linux proxmox Terraform

Deploying a Kubernetes Cluster within Proxmox using Ansible

Introduction / Background

This post has been a long time coming. I apologize for how long it’s taken. I noticed that many other blogs left off at a similar position as I did. Get the VMs created then…. nothing. Creating a Kubernetes cluster locally is a much cheaper (read: basically free) option to learn how Kubes works compared to a cloud-hosted solution or a full-blown Kubernetes engine/solution, such as AWS Elastic Kubernetes Service (EKS), Azure Kubernetes Service (AKS), or Google Kubernetes Engine (GKE).

Anyways, I finally had some time to complete the tutorial series so here we are. Since the last post, my wife and I are now expecting our 2nd kid, I put up a new solar panel array, built our 1st kid a new bed, messed around with MacOS Monterey on Proxmox, built garden boxes, and a bunch of other stuff. Life happens. So without much more delay let’s jump back in.

Here’s a screenshot of the end state Kubernetes Dashboard showing our nodes:

ur Proxmox VM nodes deployed via Terraform
Kubernetes Dashboard showing our Proxmox VM nodes deployed via Terraform

Current State

If you’ve followed the blog series so far, you should have four VMs in your Proxmox cluster ready to go with SSH keys set, the hard drive expanded, and the right amount of vCPUs and memory allocated. If you don’t have those ready to go, take a step back (Deploying Kubernetes VMs in Proxmox with Terraform) and get caught up. We’re not going to use the storage VM. Some guides I followed had one but I haven’t found a need for it yet so we’ll skip it.

VMs in Proxmox ready for Kubernetes installation

Ansible

What is Ansible

If you ask DuckDuckGo to define ansible, it will tell you the following: “A hypothetical device that enables users to communicate instantaneously across great distances; that is, a faster-than-light communication device.”

In our case, it is “a open-source software provisioning, configuration management, and application-deployment tool enabling infrastructure as code.”

We will thus be using Ansible to run the initial Kubernetes set up steps on every machine, initialize the cluster on the master, and join the cluster on the workers/agents.

Initial Ansible Housekeeping

First we need to specify some variables similar to how we did it with Terraform. Create a file in your working directory called ansible-vars.yml and put the following into it:

# specifying a CIDR for our cluster to use.
# can be basically any private range except for ranges already in use.
# apparently it isn't too hard to run out of IPs in a /24, so we're using a /22
pod_cidr: "10.16.0.0/22"

# this defines what the join command filename will be
join_command_location: "join_command.out"

# setting the home directory for retreiving, saving, and executing files
home_dir: "/home/ubuntu"

Equally as important (and potentially a better starting point than the variables) is defining the hosts. In ansible-hosts.txt:

# this is a basic file putting different hosts into categories
# used by ansible to determine which actions to run on which hosts

[all]
10.98.1.41
10.98.1.51
10.98.1.52

[kube_server]
10.98.1.41

[kube_agents]
10.98.1.51
10.98.1.52

[kube_storage]
#10.98.1.61

Checking Ansible can communicated with our hosts

Let’s pause here and make sure Ansible can communicate with our VMs. We will use a simple built-in module named ‘ping’ to do so. The below command broken down:

  • -i ansible-hosts.txt – use the ansible-hosts.txt file
  • all – run the command against the [all] block from the ansible-hosts.txt file
  • -u ubuntu – log in with user ubuntu (since that’s what we set up with the Ubuntu 20.04 Cloud Init template). if you don’t use -u [user], it will use your currently logged in user to attempt to SSH.
  • -m ping – run the ping module
ansible -i ansible-hosts.txt all -u ubuntu -m ping

If all goes well, you will receive “ping”: “pong” for each of the VMs you have listed in the [all] block of the ansible-hosts.txt file.

Using Ansible’s ping to check communications with each of the VMs for deployment

Potential SSH errors

If you’ve previously SSH’d to these IPs and have subsequently destroyed/re-created them, you will get scary sounding SSH errors about remote host identification has changed. Run the suggested ssh-keygen -f command for each of the IPs to fix it.

You might also have to SSH into each of the hosts to accept the host key. I’ve done this whole procedure a couple times so I don’t recall what will pop up first attempt.

SSH remote host identification has changed error. Run suggested ssh-keygen -f command to resolve.
ssh-keygen -f "/home/<username_here>/.ssh/known_hosts" -R "10.98.1.41"
ssh-keygen -f "/home/<username_here>/.ssh/known_hosts" -R "10.98.1.51"
ssh-keygen -f "/home/<username_here>/.ssh/known_hosts" -R "10.98.1.52"
ssh-keygen -f "/home/<username_here>/.ssh/known_hosts" -R "10.98.1.61"

Installing Kubernetes dependencies with Ansible

Then we need a script to install the dependencies and the Kubernetes utilities themselves. This script does quite a few things. Gets apt ready to install things, adding the Docker & Kubernetes signing key, installing Docker and Kubernetes, disabling swap, and adding the ubuntu user to the Docker group.

ansible-install-kubernetes-dependencies.yml:

# https://kubernetes.io/blog/2019/03/15/kubernetes-setup-using-ansible-and-vagrant/
# https://github.com/virtualelephant/vsphere-kubernetes/blob/master/ansible/cilium-install.yml#L57

# ansible .yml files define what tasks/operations to run

---
- hosts: all # run on the "all" hosts category from ansible-hosts.txt
  # become means be superuser
  become: true
  remote_user: ubuntu
  tasks:
  - name: Install packages that allow apt to be used over HTTPS
    apt:
      name: "{{ packages }}"
      state: present
      update_cache: yes
    vars:
      packages:
      - apt-transport-https
      - ca-certificates
      - curl
      - gnupg-agent
      - software-properties-common

  - name: Add an apt signing key for Docker
    apt_key:
      url: https://download.docker.com/linux/ubuntu/gpg
      state: present

  - name: Add apt repository for stable version
    apt_repository:
      repo: deb [arch=amd64] https://download.docker.com/linux/ubuntu xenial stable
      state: present

  - name: Install docker and its dependecies
    apt: 
      name: "{{ packages }}"
      state: present
      update_cache: yes
    vars:
      packages:
      - docker-ce 
      - docker-ce-cli 
      - containerd.io
      
  - name: verify docker installed, enabled, and started
    service:
      name: docker
      state: started
      enabled: yes
      
  - name: Remove swapfile from /etc/fstab
    mount:
      name: "{{ item }}"
      fstype: swap
      state: absent
    with_items:
      - swap
      - none

  - name: Disable swap
    command: swapoff -a
    when: ansible_swaptotal_mb >= 0
    
  - name: Add an apt signing key for Kubernetes
    apt_key:
      url: https://packages.cloud.google.com/apt/doc/apt-key.gpg
      state: present

  - name: Adding apt repository for Kubernetes
    apt_repository:
      repo: deb https://apt.kubernetes.io/ kubernetes-xenial main
      state: present
      filename: kubernetes.list

  - name: Install Kubernetes binaries
    apt: 
      name: "{{ packages }}"
      state: present
      update_cache: yes
    vars:
      packages:
        # it is usually recommended to specify which version you want to install
        - kubelet=1.23.6-00
        - kubeadm=1.23.6-00
        - kubectl=1.23.6-00
        
  - name: hold kubernetes binary versions (prevent from being updated)
    dpkg_selections:
      name: "{{ item }}"
      selection: hold
    loop:
      - kubelet
      - kubeadm
      - kubectl
        
# this has to do with nodes having different internal/external/mgmt IPs
# {{ node_ip }} comes from vagrant, which I'm not using yet
#  - name: Configure node ip - 
#    lineinfile:
#      path: /etc/default/kubelet
#      line: KUBELET_EXTRA_ARGS=--node-ip={{ node_ip }}

  - name: Restart kubelet
    service:
      name: kubelet
      daemon_reload: yes
      state: restarted
      
  - name: add ubuntu user to docker
    user:
      name: ubuntu
      group: docker
  
  - name: reboot to apply swap disable
    reboot:
      reboot_timeout: 180 #allow 3 minutes for reboot to happen

With our fresh VMs straight outta Terraform, let’s now run the Ansible script to install the dependencies.

Ansible command to run the Kubernetes dependency playbook (pretty straight-forward: the -i is to input the hosts file, then the next argument is the playbook file itself):

ansible-playbook -i ansible-hosts.txt ansible-install-kubernetes-dependencies.yml

It’ll take a bit of time to run (1m26s in my case). If all goes well, you will be presented with a summary screen (called PLAY RECAP) showing some items in green with status ok and some items in orange with status changed. I got 13 ok’s, 10 changed’s, and 1 skipped.

Ansible play recap showing successful Kubernetes dependencies installation

Initialize the Kubernetes cluster on the master

With the dependencies installed, we can now proceed to initialize the Kubernetes cluster itself on the server/master machine. This script sets docker to use systemd cgroups driver (don’t recall what the alternative is at the moment but this was the easiest of the alternatives), initializes the cluster, copies the cluster files to the ubuntu user’s home directory, installs Calico networking plugin, and the standard Kubernetes dashboard.

ansible-init-cluster.yml:

- hosts: kube_server
  become: true
  remote_user: ubuntu
  
  vars_files:
    - ansible-vars.yml
    
  tasks:
  - name: set docker to use systemd cgroups driver
    copy:
      dest: "/etc/docker/daemon.json"
      content: |
        {
          "exec-opts": ["native.cgroupdriver=systemd"]
        }
  - name: restart docker
    service:
      name: docker
      state: restarted
    
  - name: Initialize Kubernetes cluster
    command: "kubeadm init --pod-network-cidr {{ pod_cidr }}"
    args:
      creates: /etc/kubernetes/admin.conf # skip this task if the file already exists
    register: kube_init
    
  - name: show kube init info
    debug:
      var: kube_init
      
  - name: Create .kube directory in user home
    file:
      path: "{{ home_dir }}/.kube"
      state: directory
      owner: 1000
      group: 1000

  - name: Configure .kube/config files in user home
    copy:
      src: /etc/kubernetes/admin.conf
      dest: "{{ home_dir }}/.kube/config"
      remote_src: yes
      owner: 1000
      group: 1000
      
  - name: restart kubelet for config changes
    service:
      name: kubelet
      state: restarted
      
  - name: get calico networking
    get_url:
      url: https://projectcalico.docs.tigera.io/manifests/calico.yaml
      dest: "{{ home_dir }}/calico.yaml"
      
  - name: apply calico networking
    become: no
    command: kubectl apply -f "{{ home_dir }}/calico.yaml"
    
  - name: get dashboard
    get_url:
      url: https://raw.githubusercontent.com/kubernetes/dashboard/v2.5.0/aio/deploy/recommended.yaml
      dest: "{{ home_dir }}/dashboard.yaml"
    
  - name: apply dashboard
    become: no
    command: kubectl apply -f "{{ home_dir }}/dashboard.yaml"

Initializing the cluster took 53s on my machine. One of the first tasks is to download the images which takes the majority of the duration. You should get 13 ok and 10 changed with the init. I had two extra user check tasks because I was fighting some issues with applying the Calico networking.

ansible-playbook -i ansible-hosts.txt ansible-init-cluster.yml
Successful Kubernetes init execution showing join token at the bottom

Getting the join command and joining worker nodes

With the master up and running, we need to retrieve the join command. I chose to save the command locally and read the file in a subsequent Ansible playbook. This could certainly be combined into a single playbook.

ansible-get-join-command.yaml –

- hosts: kube_server
  become: false
  remote_user: ubuntu
  
  vars_files:
    - ansible-vars.yml
    
  tasks:
  - name: Extract the join command
    become: true
    command: "kubeadm token create --print-join-command"
    register: join_command
    
  - name: show join command
    debug:
      var: join_command
      
  - name: Save kubeadm join command for cluster
    local_action: copy content={{ join_command.stdout_lines | last | trim }} dest={{ join_command_location }} # defaults to your local cwd/join_command.out

And for the command:

ansible-playbook -i ansible-hosts.txt ansible-get-join-command.yml
Successfully retrieved the join command and saved it to the local machine

Now to join the workers/agents, our Ansible playbook will read that join_command.out file and use it to join the cluster.

ansible-join-workers.yml –

- hosts: kube_agents
  become: true
  remote_user: ubuntu
  
  vars_files:
    - ansible-vars.yml
    
  tasks:
  - name: set docker to use systemd cgroups driver
    copy:
      dest: "/etc/docker/daemon.json"
      content: |
        {
          "exec-opts": ["native.cgroupdriver=systemd"]
        }
  - name: restart docker
    service:
      name: docker
      state: restarted
    
  - name: read join command
    debug: msg={{ lookup('file', join_command_location) }}
    register: join_command_local
    
  - name: show join command
    debug:
      var: join_command_local.msg
      
  - name: join agents to cluster
    command: "{{ join_command_local.msg }}"

And to actually join:

ansible-playbook -i ansible-hosts.txt ansible-join-workers.yml
Two worker agents successfully joined to the cluster

With the two worker nodes/agents joined up to the cluster, you now have a full on Kubernetes cluster up and running! Wait a few minutes, then log into the server and run kubectl get nodes to verify they are present and active (status = Ready):

kubectl get nodes
‘kubectl get nodes’ showing our nodes as ready

Kubernetes Dashboard

Everyone likes a dashboard. Kubernetes has a good one for poking/prodding around. It appears to basically be a visual representation of most (all?) of the “get information” types of command you can run with kubectl (kubectl get nodes, get pods, describe stuff, etc.).

The dashboard was installed with the cluster init script but we still need to create a service account and cluster role binding for the dashboard. These steps are from https://github.com/kubernetes/dashboard/blob/master/docs/user/access-control/creating-sample-user.md. NOTE: the docs state it is not recommended to give admin privileges to this service account. I’m still figuring out Kubernetes privileges so I’m going to proceed anyways.

Dashboard user/role creation

On the master machine, create a file called sa.yaml with the following contents:

apiVersion: v1
kind: ServiceAccount
metadata:
  name: admin-user
  namespace: kubernetes-dashboard

And another file called clusterrole.yaml:

apiVersion: rbac.authorization.k8s.io/v1
kind: ClusterRoleBinding
metadata:
  name: admin-user
roleRef:
  apiGroup: rbac.authorization.k8s.io
  kind: ClusterRole
  name: cluster-admin
subjects:
- kind: ServiceAccount
  name: admin-user
  namespace: kubernetes-dashboard

Apply both, then get the token to be used for logging in. The last command will spit out a long string. Copy it starting at ‘ey’ and ending before the username (ubuntu). In the screenshot I have highlighted which part is the token

kubectl apply -f sa.yaml
kubectl apply -f clusterrole.yaml
kubectl -n kubernetes-dashboard get secret $(kubectl -n kubernetes-dashboard get sa/admin-user -o jsonpath="{.secrets[0].name}") -o go-template="{{.data.token | base64decode}}"
Applying both templates and getting the user’s token

SSH Tunnel & kubectl proxy

At this point, the dashboard has been running for a while. We just can’t get to it yet. There are two distinct steps that need to happen. The first is to create a SSH tunnel between your local machine and a machine in the cluster (we will be using the master). Then, from within that SSH session, we will run kubectl proxy to expose the web services.

SSH command – the master’s IP is 10.98.1.41 in this example:

ssh -L 8001:127.0.0.1:8001 [email protected]

The above command will open what appears to be a standard SSH session but the tunnel is running as well. Now execute kubectl proxy:

Kubernetes SSH tunnel & kubectl proxy output

The Kubernetes Dashboard

At this point, you should be able to navigate to the dashboard page from a web browser on your local machine (http://localhost:8001/api/v1/namespaces/kubernetes-dashboard/services/https:kubernetes-dashboard:/proxy/) and you’ll be prompted for a log in. Make sure the token radio button is selected and paste in that long token from earlier. It expires relatively quickly (couple hours I think) so be ready to run the token retrieval command again.

Kubernetes dashboard login with token

The default view is for the “default” namespace which has nothing in it at this point. Change it to All namespaces for more details:

Kubernetes dashboard all namespaces

From here you can see information about everything in the cluster:

Kubernetes dashboard showing relatively default workloads

Conclusion

With this last post, we have concluded the journey from creating a Ubuntu cloud-init image in Proxmox, using Terraform to deploy Kubernetes VMs in Proxmox, all the way through deploying an actual Kubernetes cluster in Proxmox using Ansible. Hope you found this useful!

Video link coming soon.

Discussion

For discussion, either leave a comment here or if you’re a Reddit user, head on over to https://www.reddit.com/r/austinsnerdythings/comments/ubsk1i/i_made_a_tutorial_showing_how_to_deploy_a/.

References

https://kubernetes.io/blog/2019/03/15/kubernetes-setup-using-ansible-and-vagrant/

https://github.com/virtualelephant/vsphere-kubernetes

Categories
Linux NTP Raspberry Pi

Millisecond accurate Chrony NTP with a USB GPS for $12 USD

Introduction

Building off my last NTP post (Microsecond accurate NTP with a Raspberry Pi and PPS GPS), which required a $50-60 GPS device and a Raspberry Pi (also $40+), I have successfully tested something much cheaper, that is good enough, especially for initial PPS synchronization. Good enough, in this case, is defined as +/- 10 milliseconds, which can easily be achieved using a basic USB GPS device: GT-U7. Read on for instructions on how to set up the USB GPS as a Stratum 1 NTP time server.

YouTube Video Link

https://www.youtube.com/watch?v=DVtmDFpWkEs

Microsecond PPS time vs millisecond USB time

How accurate of time do you really need? The last post showed how to get all devices on a local area network (LAN) within 0.1 milliseconds of “real” time. Do you need you equipment to be that accurate to official atomic clock time (12:03:05.0001)? Didn’t think so. Do you care if every device is on the correct second compared to official/accurate time (12:03:05)? That’s a lot more reasonable. Using a u-blox USB GPS can get you to 0.01 seconds of official. The best part about this? The required USB GPS units are almost always less than $15 and you don’t need a Raspberry Pi.

Overview

This post will show how to add a u-blox USB GPS module to NTP as a driver or chrony (timekeeping daemon) as a reference clock (using GPSd shared memory for both) and verify the accuracy is within +/- 10 milliseconds.

Materials needed

  • USB u-blox GPS (VK-172 or GT-U7), GT-U7 preferred because it has a micro-USB plug to connect to your computer. It is important to note that both of these are u-blox modules, which has a binary data format as well as a high default baudrate (57600). These two properties allow for quick transmission of each GPS message from GPS to computer.
  • 15-30 minutes

Steps

1 – Update your host machine and install packages

This tutorial is for Linux. I use Ubuntu so we utilize Aptitude (apt) for package management:

sudo apt update
sudo apt upgrade
sudo rpi-update
sudo apt install gpsd gpsd-clients python-gps chrony

2 – Modify GPSd default startup settings

In /etc/default/gpsd, change the settings to the following:

# Start the gpsd daemon automatically at boot time
START_DAEMON="true"

# Use USB hotplugging to add new USB devices automatically to the daemon
USBAUTO="true"

# Devices gpsd should collect to at boot time.
# this could also be /dev/ttyUSB0, it is ACM0 on raspberry pi
DEVICES="/dev/ttyACM0"

# -n means start listening to GPS data without a specific listener
GPSD_OPTIONS="-n"

Reboot with sudo reboot.

3a – Chrony configuration (if using NTPd, go to 3b)

I took the default configuration, added my 10.98 servers, and more importantly, added a reference clock (refclock). Link to chrony documentation here. Arguments/parameters of this configuration file:

  • 10.98.1.198 is my microsecond accurate PPS NTP server
  • iburst means send a bunch of synchronization packets upon service start so accurate time can be determined much faster (usually a couple seconds)
  • maxpoll (and minpoll, which isn’t used in this config) is how many seconds to wait between polls, defined by 2^x where x is the number in the config. maxpoll 6 means don’t wait more than 2^6=64 seconds between polls
  • refclock is reference clock, and is the USB GPS source we are adding
    • ‘SHM 0’ means shared memory reference 0, which means it is checking with GPSd using shared memory to see what time the GPS is reporting
    • ‘refid NMEA’ means name this reference ‘NMEA’
    • ‘offset 0.000’ means don’t offset this clock source at all. We will change this later
    • ‘precision 1e-3’ means this reference is only accurate to 1e-3 (0.001) seconds, or 1 millisecond
    • ‘poll 3’ means poll this reference every 2^3 = 8 seconds
    • ‘noselect’ means don’t actually use this clock as a source. We will be measuring the delta to other known times to set the offset and make the source selectable.
pi@raspberrypi:~ $ sudo cat /etc/chrony/chrony.conf
# Welcome to the chrony configuration file. See chrony.conf(5) for more
# information about usuable directives.
#pool 2.debian.pool.ntp.org iburst
server 10.98.1.1 iburst maxpoll 6
server 10.98.1.198 iburst maxpoll 6
server 10.98.1.15 iburst

refclock SHM 0 refid NMEA offset 0.000 precision 1e-3 poll 3 noselect

Restart chrony with sudo systemctl restart chrony.

3b – NTP config

Similar to the chrony config, we need to add a reference clock (called a driver in NTP). For NTP, drivers are “servers” that start with an address of 127.127. The next two octets tell what kind of driver it is. The .28 driver is the shared memory driver, same theory as for chrony. For a full list of drivers, see the official NTP docs. To break down the server:

  • ‘server 127.127.28.0’ means use the .28 (SHM) driver
    • minpoll 4 maxpoll 4 means poll every 2^4=16 seconds
    • noselect means don’t use this for time. Similar to chrony, we will be measuring the offset to determine this value.
  • ‘fudge 127.127.28.0’ means we are going to change some properties of the listed driver
    • ‘time1 0.000’is the time offset calibration factor, in seconds
    • ‘stratum 2’ means list this source as a stratum 2 source (has to do with how close the source is to “true” time), listing it as 2 means other, higher stratum sources will be selected before this one will (assuming equal time quality)
    • ‘refid GPS’ means rename this source as ‘GPS’
server 127.127.28.0 minpoll 4 maxpoll 4 noselect
fudge 127.127.28.0 time1 0.000 stratum 2 refid GPS

Restart NTPd with sudo systemctl restart ntp.

4 – check time offset via gpsmon

Running gpsmon shows us general information about the GPS, including time offset. The output looks like the below screenshot. Of importance is the satellite count (on right, more is better, >5 is good enough for time), HDOP (horizontal dilution of precision) is a measure of how well the satellites can determine your position (lower is better, <2 works for basically all navigation purposes), and TOFF (time offset).

gpsmon showing time offset for a USB GPS

In this screenshot the TOFF is 0.081862027, which is 81.8 milliseconds off the host computer’s time. Watch this for a bit – it should hover pretty close to a certain value +/- 10ms. In my case, I’ve noticed that if there are 10 or less satellites locked on, it is around 77ms. If there are 11 or more, it is around 91ms (presumably due to more satellite information that needs to be transmitted).

5 – record statistics for a data-driven offset

If you are looking for a better offset value to put in the configuration file, we can turn on logging from either chrony or NTPd to record source information.

For chrony:

Edit /etc/chrony/chrony.conf and uncomment the line for which kinds of logging to turn on:

# Uncomment the following line to turn logging on.
log tracking measurements statistics

Then restart chrony (sudo systemctl restart chrony) and logs will start writing to /var/log/chrony (this location is defined a couple lines below the log line in chrony.conf):

pi@raspberrypi:~ $ ls /var/log/chrony
measurements.log  statistics.log  tracking.log

For NTPd (be sure to restart it after making any configuration changes):

austin@prox-3070 ~ % cat /etc/ntp.conf
# Enable this if you want statistics to be logged.
statsdir /var/log/ntpstats/

statistics loopstats peerstats clockstats
filegen loopstats file loopstats type day enable
filegen peerstats file peerstats type day enable
filegen clockstats file clockstats type day enable

Wait a few minutes for some data to record (chrony synchronizes pretty quick compared to NTPd) and check the statistics file, filtered to our NMEA refid:

cat /var/log/chrony/statistics.log | grep NMEA

This spits out the lines that have NMEA present (the ones of interest for our USB GPS). To include the headers to show what each column is we can run

# chrony
cat /var/log/chrony/statistics.log | head -2; cat /var/log/chrony/statistics.log | grep NMEA

# ntp, there is no header info so we can omit that part of the command
cat /var/log/peerstats | grep 127.127.28.0
Screenshot showing chrony statistics for our NMEA USB GPS refclock

NTP stats don’t include header information. The column of interest is the one after the 9014 column. The columns are day, seconds past midnight, source, something, estimated offset, something, something, something. We can see the offset for this VK-172 USB GPS is somewhere around 76-77 milliseconds (0.076-0.077 seconds), which we can put in place of the 0.000 for the .28 driver for NTP and remove noselect.

austin@prox-3070 ~ % cat /var/log/ntpstats/peerstats | grep 127.127.28.0
59487 49648.536 127.127.28.0 9014 -0.078425007 0.000000000 7.938064614 0.000000060
59487 49664.536 127.127.28.0 9014 -0.079488544 0.000000000 3.938033388 0.001063537
59487 49680.536 127.127.28.0 9014 -0.079514781 0.000000000 1.938035682 0.000770810
59487 49696.536 127.127.28.0 9014 -0.079772284 0.000000000 0.938092429 0.000808697
59487 49712.536 127.127.28.0 9014 -0.079711708 0.000000000 0.438080791 0.000661032
59487 49728.536 127.127.28.0 9014 -0.075098563 0.000000000 0.188028843 0.004311958

So now we have some data showing the statistics of our NMEA USB GPS NTP source. We can copy and paste this into Excel, run data to columns, and graph the result and/or get the average to set the offset.

screenshot showing chrony/NTP statistics to determine offset

This graph is certainly suspicious (sine wave pattern and such) and if I wasn’t writing this blog post, I’d let data collect overnight to determine an offset. Since time is always of the essence, I will just take the average of the ‘est offset’ column (E), which is 7.64E-2, or 0.0763 seconds. Let’s pop this into the chrony.conf file and remove noselect:

refclock SHM 0 refid NMEA offset 0.0763 precision 1e-3 poll 3

For NTP:

Restart chrony again for the config file changes to take effect – sudo systemctl restart chrony.

6 – watch ‘chrony sources’ or ‘ntpq -pn’ to see if the USB GPS gets selected as the main time source

If you aren’t aware, Ubuntu/Debian/most Linux includes a utility to rerun a command every x seconds called watch. We can use this to watch chrony to see how it is interpreting each time source every 1 second:

# for chrony
watch -n 1 chronyc sources
watching chrony sources

In the above screenshot, we can see that chrony actually has the NMEA source selected as the primary source (denoted with the *). It has the Raspberry Pi PPS NTP GPS ready to takeover as the new primary (denoted with the +). All of the sources match quite closely (from +4749us to – 505us is around 5.2 milliseconds). The source “offset” is in the square brackets ([ and ]).

# for ntp
watch -n 1 ntpq -pn
NTP showing (via ntpq -pn) that the GPS source is 0.738 milliseconds off of the host clock. The ‘-‘ in front of the remote means this will not be selected as a valid time (presumably due to the high jitter compared to the other sources, probably also due to manually setting it to stratum 2).

7- is +/- five millseconds good enough?

For 99% of use cases, yes. You can stop here and your home network will be plenty accurate. If you want additional accuracy, you are in luck. This GPS module also outputs a PPS (pulse per second) signal! We can use this to get within 0.05 millseconds (0.00005 seconds) from official/atomic clock time.

Conclusion

In this post, we got a u-blox USB GPS set up and added it as a reference clock (refclock) to chrony and demonstrated it is clearly within 10 millisecond of official GPS time.

You could write a script to do all this for you! I should probably try this myself…

In the next post, we can add PPS signals from the GPS module to increase our time accuracy by 1000x (into the microsecond range).

A note on why having faster message transmission is better for timing

My current PPS NTP server uses chrony with NMEA messages transmitted over serial and the PPS signal fed into a GPIO pin. GPSd as a rule does minimum configuration of GPS devices. It typically defaults to 9600 baud for serial devices. A typical GPS message looks like this:

$GPGGA, 161229.487, 3723.2475, N, 12158.3416, W, 1, 07, 1.0, 9.0, M, , , , 0000*18

That message is 83 bytes long. At 9600 baud (9600 bits per second), that message takes 69.1 milliseconds to transmit. Each character/byte takes 0.833 milliseconds to transmit. That means that as the message length varies, the jitter will increase. GPS messages do vary in length, sometimes significantly, depending on what is being sent (i.e. the satellite information, $GPGSV sentences, is only transmitted every 5-10 seconds).

I opened gpsmon to get a sample of sentences – I did not notice this until now but it shows how many bytes each sentence is at the front of the sentence:

(35) $GPZDA,144410.000,30,09,2021,,*59
------------------- PPS offset: -0.000001297 ------
(83) $GPGGA,144411.000,3953.xxxx,N,10504.xxxx,W,2,6,1.19,1637.8,M,-20.9,M,0000,0000*5A
(54) $GPGSA,A,3,26,25,29,18,05,02,,,,,,,1.46,1.19,0.84*02
(71) $GPRMC,144411.000,A,3953.xxxx,N,10504.xxxx,W,2.80,39.98,300921,,,D*44
(35) $GPZDA,144411.000,30,09,2021,,*58
------------------- PPS offset: -0.000000883 ------
(83) $GPGGA,144412.000,3953.xxxx,N,10504.xxxx,W,2,7,1.11,1637.7,M,-20.9,M,0000,0000*52
(56) $GPGSA,A,3,20,26,25,29,18,05,02,,,,,,1.39,1.11,0.84*00
(70) $GPGSV,3,1,12,29,81,325,27,05,68,056,21,20,35,050,17,18,34,283,24*76
(66) $GPGSV,3,2,12,25,27,210,14,15,27,153,,13,25,117,,02,23,080,19*78
(59) $GPGSV,3,3,12,26,17,311,22,23,16,222,,12,11,184,,47,,,*42
------------------- PPS offset: -0.000000833 ------
(71) $GPRMC,144412.000,A,3953.xxxx,N,10504.xxxx,W,2.57,38.19,300921,,,D*48
(35) $GPZDA,144412.000,30,09,2021,,*5B
(83) $GPGGA,144413.000,3953.xxxx,N,10504.xxxx,W,2,7,1.11,1637.6,M,-20.9,M,0000,0000*52
(56) $GPGSA,A,3,20,26,25,29,18,05,02,,,,,,1.39,1.11,0.84*00
(71) $GPRMC,144413.000,A,3953.xxxx,N,10504.xxxx,W,2.60,36.39,300921,,,D*41
(35) $GPZDA,144413.000,30,09,2021,,*5A

These sentences range from 83 bytes to 35 bytes, a variation of (83 bytes -35 bytes)*0.833 milliseconds per byte = 39.984 milliseconds.

Compare to the u-blox binary UBX messages which seem to always be 60 bytes and transmitted at 57600 baud, which is 8.33 milliseconds to transmit the entire message.

UBX protocol messages (blanked out lines). I have no idea what part of the message is location, hopefully I got the right part blanked out.

The variance (jitter) is thus much lower and can be much more accurate as a NTP source. GPSd has no problem leaving u-blox modules at 57600 baud. This is why the USB GPS modules perform much more accurate for timekeeping than NMEA-based devices when using GPSd.

For basically every GPS module/chipset, it is possible to send it commands to enable/disable sentences (as well as increase the serial baud rate). In an ideal world for timekeeping, GPSd would disable every sentence except for time ($GPZDA), and bump up the baud rate to the highest supported level (115200, 230400, etc.). Unfortunately for us, GPSd’s default behavior is to just work with every GPS, which essentially means no configuring the GPS device.

Update 2024-01-19: RIP Dave Mills, inventor/creator of NTP – https://arstechnica.com/gadgets/2024/01/inventor-of-ntp-protocol-that-keeps-time-on-billions-of-devices-dies-at-age-8

Categories
homelab Kubernetes Linux proxmox Terraform

Deploying Kubernetes VMs in Proxmox with Terraform

Background

The last post covered how to deploy virtual machines in Proxmox with Terraform. This post shows the template for deploying 4 Kubernetes virtual machines in Proxmox using Terraform.

Youtube Video Link

https://youtu.be/UXXIl421W8g

Kubernetes Proxmox Terraform Template

Without further ado, below is the template I used to create my virtual machines. The main LAN network is 10.98.1.0/24, and the Kube internal network (on its own bridge) is 10.17.0.0/24.

This template creates a Kube server, two agents, and a storage server.

Update 2022-04-26: bumped Telmate provider version to 2.9.8 from 2.7.4

terraform {
  required_providers {
    proxmox = {
      source = "telmate/proxmox"
      version = "2.9.8"
    }
  }
}

provider "proxmox" {
  pm_api_url = "https://prox-1u.home.fluffnet.net:8006/api2/json" # change this to match your own proxmox
  pm_api_token_id = [secret]
  pm_api_token_secret = [secret]
  pm_tls_insecure = true
}

resource "proxmox_vm_qemu" "kube-server" {
  count = 1
  name = "kube-server-0${count.index + 1}"
  target_node = "prox-1u"
  # thanks to Brian on YouTube for the vmid tip
  # http://www.youtube.com/channel/UCTbqi6o_0lwdekcp-D6xmWw
  vmid = "40${count.index + 1}"

  clone = "ubuntu-2004-cloudinit-template"

  agent = 1
  os_type = "cloud-init"
  cores = 2
  sockets = 1
  cpu = "host"
  memory = 4096
  scsihw = "virtio-scsi-pci"
  bootdisk = "scsi0"

  disk {
    slot = 0
    size = "10G"
    type = "scsi"
    storage = "local-zfs"
    #storage_type = "zfspool"
    iothread = 1
  }

  network {
    model = "virtio"
    bridge = "vmbr0"
  }
  
  network {
    model = "virtio"
    bridge = "vmbr17"
  }

  lifecycle {
    ignore_changes = [
      network,
    ]
  }

  ipconfig0 = "ip=10.98.1.4${count.index + 1}/24,gw=10.98.1.1"
  ipconfig1 = "ip=10.17.0.4${count.index + 1}/24"
  sshkeys = <<EOF
  ${var.ssh_key}
  EOF
}

resource "proxmox_vm_qemu" "kube-agent" {
  count = 2
  name = "kube-agent-0${count.index + 1}"
  target_node = "prox-1u"
  vmid = "50${count.index + 1}"

  clone = "ubuntu-2004-cloudinit-template"

  agent = 1
  os_type = "cloud-init"
  cores = 2
  sockets = 1
  cpu = "host"
  memory = 4096
  scsihw = "virtio-scsi-pci"
  bootdisk = "scsi0"

  disk {
    slot = 0
    size = "10G"
    type = "scsi"
    storage = "local-zfs"
    #storage_type = "zfspool"
    iothread = 1
  }

  network {
    model = "virtio"
    bridge = "vmbr0"
  }
  
  network {
    model = "virtio"
    bridge = "vmbr17"
  }

  lifecycle {
    ignore_changes = [
      network,
    ]
  }

  ipconfig0 = "ip=10.98.1.5${count.index + 1}/24,gw=10.98.1.1"
  ipconfig1 = "ip=10.17.0.5${count.index + 1}/24"
  sshkeys = <<EOF
  ${var.ssh_key}
  EOF
}

resource "proxmox_vm_qemu" "kube-storage" {
  count = 1
  name = "kube-storage-0${count.index + 1}"
  target_node = "prox-1u"
  vmid = "60${count.index + 1}"

  clone = "ubuntu-2004-cloudinit-template"

  agent = 1
  os_type = "cloud-init"
  cores = 2
  sockets = 1
  cpu = "host"
  memory = 4096
  scsihw = "virtio-scsi-pci"
  bootdisk = "scsi0"

  disk {
    slot = 0
    size = "20G"
    type = "scsi"
    storage = "local-zfs"
    #storage_type = "zfspool"
    iothread = 1
  }

  network {
    model = "virtio"
    bridge = "vmbr0"
  }
  
  network {
    model = "virtio"
    bridge = "vmbr17"
  }

  lifecycle {
    ignore_changes = [
      network,
    ]
  }

  ipconfig0 = "ip=10.98.1.6${count.index + 1}/24,gw=10.98.1.1"
  ipconfig1 = "ip=10.17.0.6${count.index + 1}/24"
  sshkeys = <<EOF
  ${var.ssh_key}
  EOF
}

After running Terraform plan and apply, you should have 4 new VMs in your Proxmox cluster:

Proxmox showing 4 virtual machines ready for Kubernetes

Conclusion

You now have 4 VMs ready for Kubernetes installation. The next post shows how to deploy a Kubernetes cluster with Ansible.