Categories
Home Assistant Weather

Viewing Ambient Weather WS-2902C data in Home Assistant

Background

If you are coming from the Handling data from Ambient Weather WS-2902C API to MQTT post, you are ready to proceed! If not, you’ll need to follow the steps in that post to get your Ambient Weather WS-2902C data into MQTT.

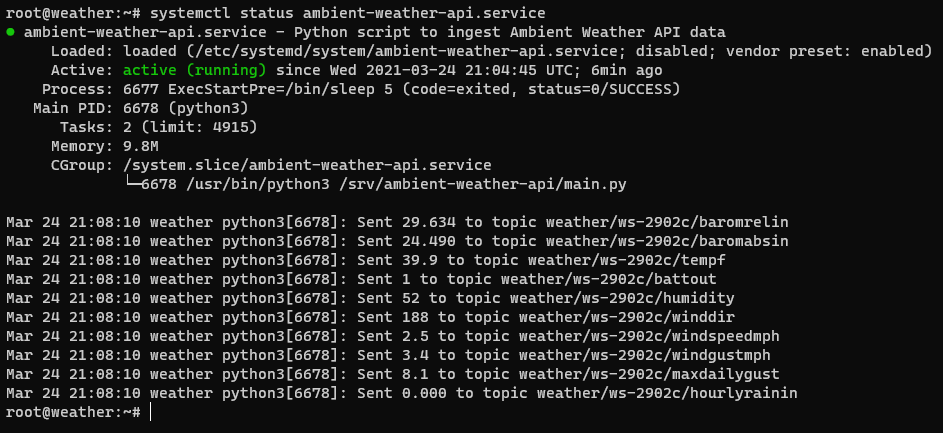
In short, we set up a Python script that listens on port 80 for data coming from the Ambient Weather base station. It then takes the data and publishes it to various MQTT topics. We can subscribe to those topics to receive new data as soon as it arrives.

Available Data

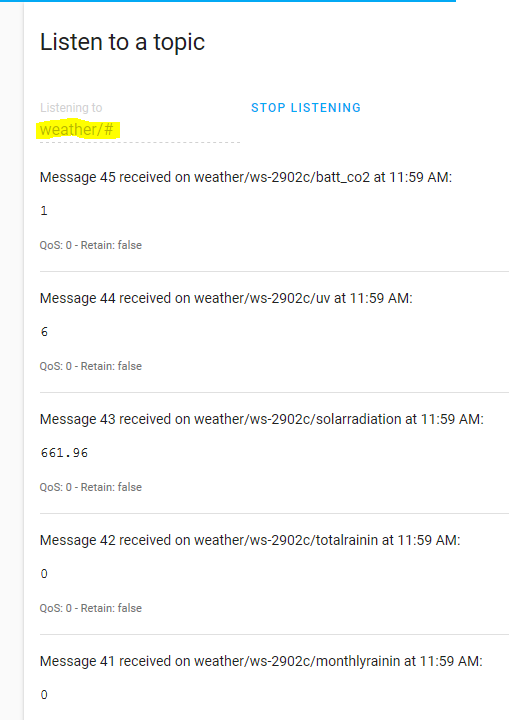
I’ll re-post the list of available data/topics from my last post:

TopicValueComment
weather/ws-2902c/PASSKEYaa:bb:cc:dd:ee:ffMAC address
weather/ws-2902c/dateutc5/15/2021date
weather/ws-2902c/tempinf70.7temp at the base station
weather/ws-2902c/humidityin36humidity at the base station
weather/ws-2902c/baromrelin29.675adjusted barometric pressure (in Hg)
weather/ws-2902c/baromabsin24.531absolute barometric pressure (in Hg)
weather/ws-2902c/tempf66.2temp at the weather station
weather/ws-2902c/battout1battery status at the weather station?
weather/ws-2902c/humidity26humidity at the weather station
weather/ws-2902c/winddir207wind direction in degrees azimuth
weather/ws-2902c/windspeedmph0.2wind speed
weather/ws-2902c/windgustmph1.1wind gust (shows peaks between updates)
weather/ws-2902c/maxdailygust3.4max daily wind gust
weather/ws-2902c/hourlyrainin0hourly rain fall
weather/ws-2902c/eventrainin0event rain fall (resets after 24 hours of no rain)
weather/ws-2902c/dailyrainin0daily rain fall
weather/ws-2902c/weeklyrainin0weekly rain fall
weather/ws-2902c/monthlyrainin0monthly rain fall
weather/ws-2902c/totalrainin0total rain fall since power on?
weather/ws-2902c/solarradiation697.92solar radiation in watts per square meter
weather/ws-2902c/uv6UV intensity index
weather/ws-2902c/batt_co21?
table showing available data topics from our Ambient Weather WS-2902C weather station

This is a lot of data. How much/little you want to use is up to you! I believe I added every topic to my Home Assistant so they’d would be available if I ever wanted to use them.

Adding the MQTT topics to Home Assistant

If you don’t have the MQTT line in your base configuration, make sure you add it. I also am using secrets here so it goes and grabs the broker IP address from my secrets file.

For my configuration.yaml file, showing the relevant lines (MQTT sensors and the sensor file)

homeassistant@ha-new:~/.homeassistant$ cat configuration.yaml

mqtt:
  broker: !secret mqtt_broker

sensor: !include sensor.yaml

For the secrets.yaml file:

homeassistant@ha-new:~/.homeassistant$ cat secrets.yaml
mqtt_broker: mqtt.home.fluffnet.net

The way the secrets file works means it looks like this in configuration.yaml:

mqtt:
  broker: mqtt.home.fluffnet.net

If you haven’t worked with .yaml in Home Assistant before, it is very picky about spacing. Ensure the spacing is correct (usually 2 spaces per indentation).

With the MQTT line added, we can turn to the sensors file (sensors.yaml). This is where the magic happens! I’ve only added a subset of the topics:

homeassistant@ha-new:~/.homeassistant$ cat sensor.yaml
[snip non-ambient weather sensors]
- platform: mqtt
  state_topic: "weather/ws-2902c/tempinf"
  name: "real kitchen temp"
  unit_of_measurement: "F"
- platform: mqtt
  state_topic: "weather/ws-2902c/tempf"
  name: "real outside temp"
  unit_of_measurement: "F"
- platform: mqtt
  state_topic: "weather/ws-2902c/humidityin"
  name: "real kitchen hum"
  unit_of_measurement: "%"
- platform: mqtt
  state_topic: "weather/ws-2902c/humidity"
  name: "real outside hum"
  unit_of_measurement: "%"
- platform: mqtt
  state_topic: "weather/ws-2902c/solarradiation"
  name: "solar radiation"
  unit_of_measurement: "W/m2"
- platform: mqtt
  state_topic: "weather/ws-2902c/dailyrainin"
  name: "daily rain"
  unit_of_measurement: "in"
- platform: mqtt
  state_topic: "weather/ws-2902c/windspeedmph"
  name: "wind speed"
  unit_of_measurement: "mph"
- platform: mqtt
  state_topic: "weather/ws-2902c/windgustmph"
  name: "wind gust"
  unit_of_measurement: "mph"

Restarting Home Assistant

With those lines added to the sensor.yaml file, restart Home Assistant. I love Home Assistant but needing to restart it for basically any configuration change is a huge pain.

sudo systemctl restart [email protected]

Adding the new Ambient Weather WS-2902C sensors to your Home Assistant screens

With the new sensors activated, you can add them to any of your Home Assistant pages!

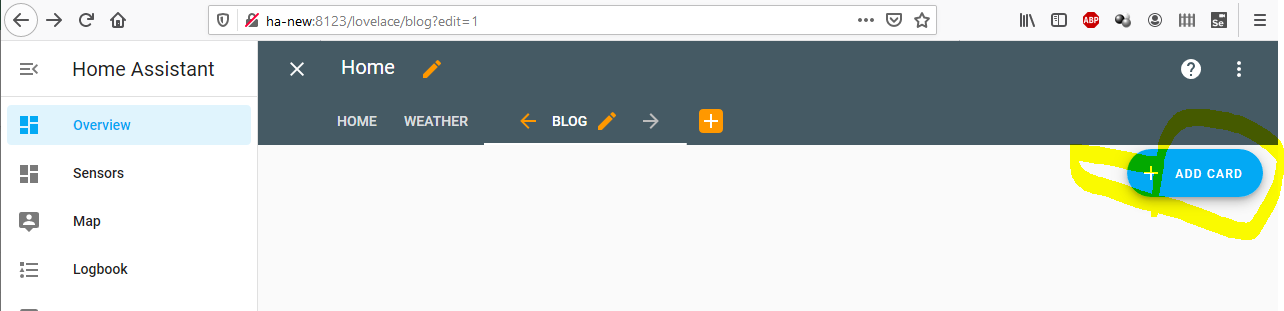
First click the edit button then Add Card:

home assistant screenshot to add card

Next up we need to select what kind of card we want to add. For most of these, they’re time series, so History Graph will be the best choice. I do not know why Home Assistant is recommending the sun position in this screenshot.

select History Graph

Now that the History Graph is selected, we can pick any of the new sensors we added in the entity drop down. In this screenshot we see most of what I added. The others are sorted elsewhere (there are 100+ entities available in my entities drop down).

New sensors available to add so we can view data from the WS-2902C
60 means it will refresh every minute (60 seconds)

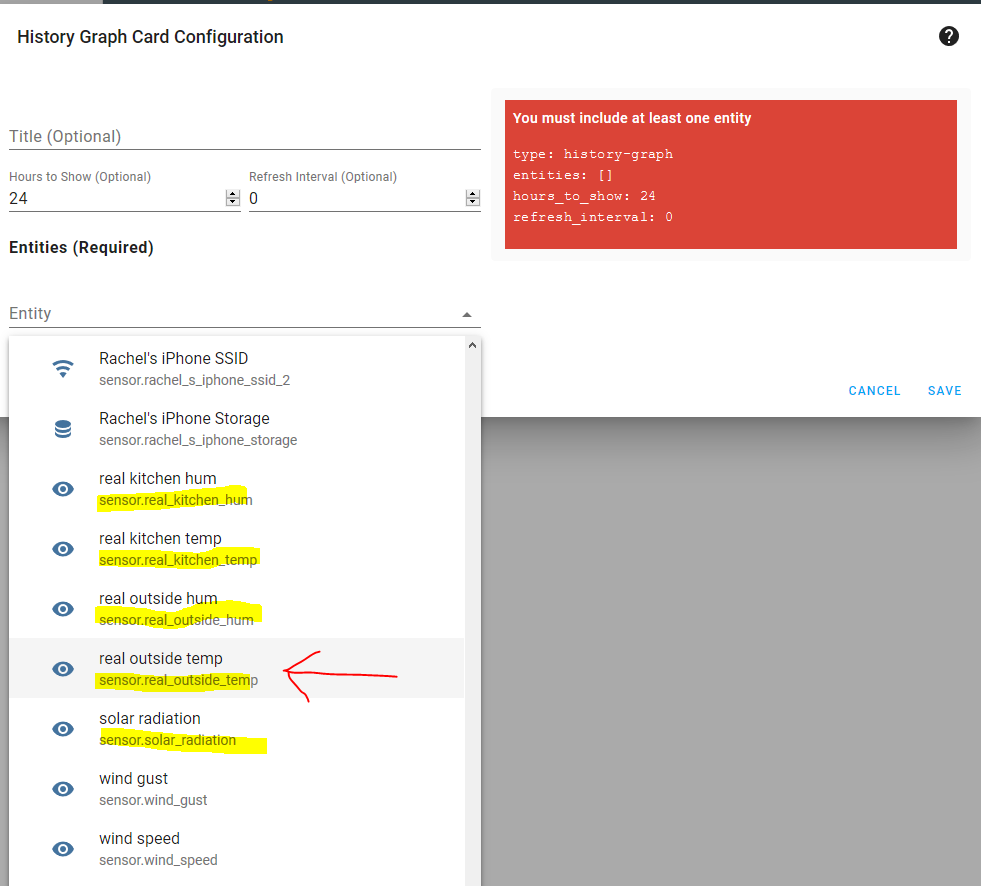
With sensor.real_outside_temp selected, I added 60 for the refresh interval, which means the graph will refresh itself every 60 seconds.

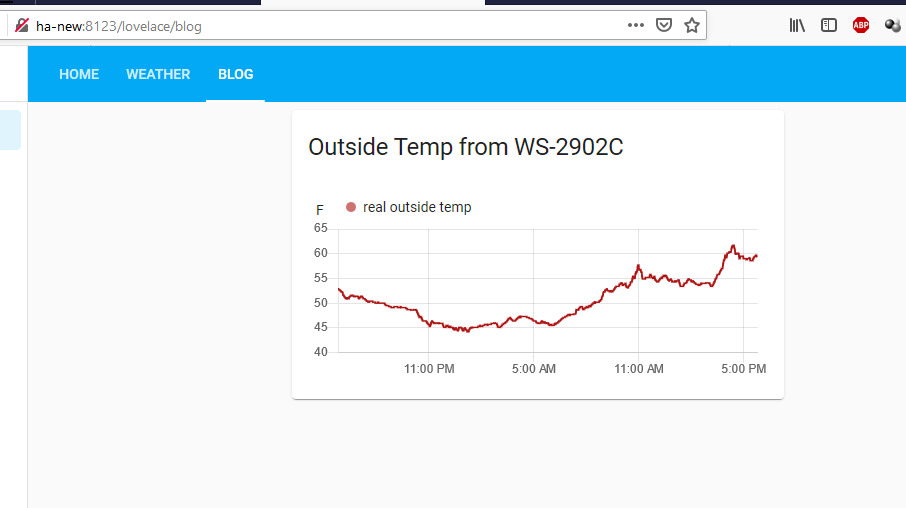
Now the graph is added to the page! You can repeat with all the other sensors you want to view. In the below screenshot, we have successfully added the outside temperature from the Ambient Weather WS-2902C to Home Assistant.

My full weather tab

I’ve added a number of sensors from my Ambient Weather WS-2902C to my Home Assistant. Below you can see I have solar radiation, daily rain, real outside humidity, real outside temp (I have another sensor labeled “outdoor temp” that is a floating sensor that is no longer outdoors), and the wind data. I also have the badges up top with just the current numeric value. You can add more or less, it’s totally up to you!

Conclusion

With this series, we have connected the Ambient Weather WS-2902C to our own Linux container to read the data, publish it to MQTT, and then view it in Home Assistant. I hope you’ve found this helpful!

Categories
Linux Python Weather

Python service to consume Ambient Weather API data

Python service to consume Ambient Weather API data

Continuing from the last post (Handling data from Ambient Weather WS-2902C to MQTT), we have a working script that reads the data coming from the Ambient Weather WS-2902 base station (Ambient Weather API) and sends it to a MQTT broker. In this post, we will turn that script into a Linux service that starts at boot and runs forever. This type of thing is perfect for Linux. Non-server Windows versions aren’t really appropriate for this since they reboot often with updates and such. If you want to run Windows Server, more power to you, you probably don’t need this guide. We will thus be focusing on Linux for consuming the Ambient Weather API. A Raspberry Pi is a perfect device for this (plenty of power, as big as a credit card, and less than $100).

Linux Services

Linux is made up of many individual components. Each component is designed to handle a single task (more or less). This differs from Windows where there are large executables/processes that handle many tasks. We will be taking advantage of Linux’s single task theory to add a new service that will run the Python script for ingesting and consuming the Ambient Weather API. In this instance for Austin’s Nerdy Things, the weather data is being provided by the Ambient Weather WS-2902C weather station.

Creating the service

For Ubuntu/Debian based distributions, service files live under /etc/systemd/system. Here is a list of services on the container I’m utilizing.

List command:

ls -1 /etc/systemd/system
dbus-org.freedesktop.resolve1.service
dbus-org.freedesktop.timesync1.service
default.target.wants
getty.target.wants
graphical.target.wants
multi-user.target.wants
socket.target.wants
sockets.target.wants
sshd.service
sys-kernel-debug.mount
sysinit.target.wants
syslog.service
timers.target.wants

Since this is a LXC container, there aren’t many services. On a standard Raspbian or Ubuntu full install, there will be 100+.

We will be creating a new service file using the nano text editor:

nano /etc/systemd/system/ambient-weather-api.service

In this file we need to define our service. The After lines mean don’t start this up until the listed services are running. The rest is pretty straight forward. I’m not 100% sure what the WantedBy line is for but it’s present in most of my service files. The contents of ambient-weather-api.service are as follows:

[Unit]
Description=Python script to ingest Ambient Weather API data
After=syslog.target
After=network.target

[Service]
Type=simple
User=root
Group=root
ExecStart=/usr/bin/python3 /srv/ambient-weather-api/main.py
ExecStartPre=/bin/sleep 5
Restart=always
RestartSec=5s
# Give the script some time to startup
TimeoutSec=10

[Install]
WantedBy=multi-user.target

Save the file. The service definition is looking for Python at /usr/bin/python3 and the python script at /srv/ambient-weather-api/main.py. You will probably be fine with the Python executable, but be sure to mv or cp the main.py file to /srv/ambient-weather-api/main.py.

We will need to reload the service definitions:

systemctl daemon-reload

Now we can start the service:

systemctl start ambient-weather-api.service

And verify it is running:

systemctl status ambient-weather-api.service

Ambient Weather API service status

The above screenshot shows it is indeed running and active. It is still showing the print messages in the log as well, which we should disable by commenting out the lines by adding a # in front of the print line. In this case, it is coming from line 56 (the status check in the publish function).

#print(f"Sent {msg} to topic {topic}")


Categories
Home Assistant Weather

Handling data from Ambient Weather WS-2902C API to MQTT

Handling data from Ambient Weather WS-2902C API to MQTT

As I mentioned in my initial Ambient Weather WS-2902C post, there is a new feature that allows sending data to a custom server. I coded up a python script to take the sent data, and publish it to MQTT. This allows for super easy data ingestion with Home Assistant and other similar solutions. I should probably publish on GitHub but I’ll post here first.

Installation

This script is reliant on Paho-MQTT. EDIT: during the creation of the service to run this at boot, I discovered version 1.5.1 will throw errors. Use version 1.5.0. Install it with pip:

sudo pip install paho-mqtt==1.5.0

Create a python file and name it main.py. Paste in the following:

# Python script to decode Ambient Weather data (from WS-2902C and similar)
# and publish to MQTT.
# original author: Austin of austinsnerdythings.com
# publish date: 2021-03-20

# some resources I used include
#https://askubuntu.com/questions/29152/how-do-i-use-python-with-apache2
#https://www.toptal.com/python/pythons-wsgi-server-application-interface
#https://www.emqx.io/blog/how-to-use-mqtt-in-python

from urllib.parse import urlparse, parse_qs
import paho.mqtt.client as mqtt
import time, os

# set MQTT vars
MQTT_BROKER_HOST  = os.getenv('MQTT_BROKER_HOST',"mqtt")
MQTT_BROKER_PORT  = int(os.getenv('MQTT_BROKER_PORT',1883))
MQTT_CLIENT_ID    = os.getenv('MQTT_CLIENT_ID',"ambient_weather_decode")
MQTT_USERNAME     = os.getenv('MQTT_USERNAME',"")
MQTT_PASSWORD     = os.getenv('MQTT_PASSWORD',"")

# looking to get resultant topic like weather/ws-2902c/[item]
MQTT_TOPIC_PREFIX = os.getenv('MQTT_TOPIC_PREFIX',"weather")
MQTT_TOPIC 		  = MQTT_TOPIC_PREFIX + "/ws-2902c"

# mostly copied + pasted from https://www.emqx.io/blog/how-to-use-mqtt-in-python and some of my own MQTT scripts
def on_connect(client, userdata, flags, rc):
    if rc == 0:
        print(f"connected to MQTT broker at {MQTT_BROKER_HOST}")
    else:
        print("Failed to connect, return code %d\n", rc)

def on_disconnect(client, userdata, flags, rc):
    print("disconnected from MQTT broker")

# set up mqtt client
client = mqtt.Client(client_id=MQTT_CLIENT_ID)
if MQTT_USERNAME and MQTT_PASSWORD:
    client.username_pw_set(MQTT_USERNAME,MQTT_PASSWORD)
    print("Username and password set.")
client.will_set(MQTT_TOPIC_PREFIX+"/status", payload="Offline", qos=1, retain=True) # set LWT     
client.on_connect = on_connect # on connect callback
client.on_disconnect = on_disconnect # on disconnect callback

# connect to broker
client.connect(MQTT_BROKER_HOST, port=MQTT_BROKER_PORT)
client.loop_start()

def publish(client, topic, msg):
    result = client.publish(topic, msg)
    # result: [0, 1]
    status = result[0]

    # uncomment for debug. don't need all the success messages.
    if status == 0:
        #print(f"Sent {msg} to topic {topic}")
        pass
    else:
        print(f"Failed to send message to topic {topic}")


def application(environ, start_response):
    # construct a full URL from the request. HTTP_HOST is FQDN, PATH_INFO is everything after
    # the FQDN (i.e. /data/stationtype=AMBWeatherV4.2.9&&tempinf=71.1&humidityin=35)
    url = "http://" + environ["HTTP_HOST"] + environ["PATH_INFO"]

    # unsure why I need to parse twice. probably just need to do it once with variable url.
    parsed = urlparse(url)
    result = parse_qs(parsed.geturl())

    # send to our other function to deal with the results.
    # result is a dict 
    handle_results(result)

    # we need to return a response. HTTP code 200 means everything is OK. other HTTP codes include 404 not found and such.
    start_response('200 OK', [('Content-Type', 'text/plain')])

    # the response doesn't actually need to contain anything
    response_body = ''

    # return the encoded bytes of the response_body. 
    # for python 2 (don't use python 2), the results don't need to be encoded
    return [response_body.encode()]


def handle_results(result):
    """ result is a dict. full list of variables include:
    stationtype: ['AMBWeatherV4.2.9'], PASSKEY: ['<station_mac_address>'], dateutc: ['2021-03-20 17:12:27'], tempinf: ['71.1'], humidityin: ['36'], baromrelin: ['29.693'],	baromabsin: ['24.549'],	tempf: ['58.8'], battout: ['1'], humidity: ['32'], winddir: ['215'],windspeedmph: ['0.0'],	windgustmph: ['0.0'], maxdailygust: ['3.4'], hourlyrainin: ['0.000'],	eventrainin: ['0.000'],	dailyrainin: ['0.000'],
    weeklyrainin: ['0.000'], monthlyrainin: ['0.000'], totalrainin: ['0.000'],	solarradiation: ['121.36'],
    uv: ['1'],batt_co2: ['1'] """

    # we're just going to publish everything. less coding.
    for key in result:
        # skip first item, which is basically a URL and MQTT doesn't like it. probably resulting from my bad url parsing.
        if 'http://' in key:
            continue

        #print(f"{key}: {result[key]}")
        # resultant topic is weather/ws-2902c/solarradiation
        specific_topic = MQTT_TOPIC + f"/{key}"

        # replace [' and '] with nothing. these come from the url parse
        msg = str(result[key]).replace("""['""", '').replace("""']""", '')
        #print(f"attempting to publish to {specific_topic} with message {msg}")
        publish(client, specific_topic, msg)

# this little guy runs a web server if this python file is called directly. if it isn't called directly, it won't run.
# Apache/Python WSGI will run the function 'application()' directly
# in theory, you don't need apache or any webserver. just run it right out of python. would need
# to improve error handling to ensure it run without interruption.
if __name__ == '__main__':
    from wsgiref.simple_server import make_server

    # probably shouldn't run on port 80 but that's what I specified in the ambient weather console
    httpd = make_server('', 80, application)
    print("Serving on http://localhost:80")

    httpd.serve_forever()

Execute with python3:

python3 main.py

Watch the results populate in the console window:

PS C:\Users\Austin\source\repos\ambient-weather-decode> python3 c:\Users\Austin\source\repos\ambient-weather-decode\main.py
connected to MQTT broker at mqtt
Serving on http://localhost:80
Sent E0:98:06:A3:42:65 to topic weather/ws-2902c/PASSKEY
Sent 2021-03-20 17:57:31 to topic weather/ws-2902c/dateutc
Sent 70.7 to topic weather/ws-2902c/tempinf
Sent 36 to topic weather/ws-2902c/humidityin
Sent 29.675 to topic weather/ws-2902c/baromrelin
Sent 24.531 to topic weather/ws-2902c/baromabsin
Sent 66.2 to topic weather/ws-2902c/tempf
Sent 1 to topic weather/ws-2902c/battout
Sent 26 to topic weather/ws-2902c/humidity
Sent 207 to topic weather/ws-2902c/winddir
Sent 0.2 to topic weather/ws-2902c/windspeedmph
Sent 1.1 to topic weather/ws-2902c/windgustmph
Sent 3.4 to topic weather/ws-2902c/maxdailygust
Sent 0.000 to topic weather/ws-2902c/hourlyrainin
Sent 0.000 to topic weather/ws-2902c/eventrainin
Sent 0.000 to topic weather/ws-2902c/dailyrainin
Sent 0.000 to topic weather/ws-2902c/weeklyrainin
Sent 0.000 to topic weather/ws-2902c/monthlyrainin
Sent 0.000 to topic weather/ws-2902c/totalrainin
Sent 697.92 to topic weather/ws-2902c/solarradiation
Sent 6 to topic weather/ws-2902c/uv
Sent 1 to topic weather/ws-2902c/batt_co2

Verification

Verify in MQTT by subscribing to topic ‘weather/#’. The # is a wildcard and will include all subtopics:

homeassistant ws-2902c mqtt messages

Conclusion

I am stoked the Ambient Weather WS-2902C makes it so easy to work the the data.

My next post will show how to turn this Python script into a persistent Linux service – Python service to consume Ambient Weather API data.

A further post will demonstrate incorporating these MQTT messages into Home Assistant sensors.

Categories
Weather

The Ambient Weather WS-2902C weather station!

The Ambient Weather WS-2902C

My new weather station came in the mail today. It is a Ambient Weather WS-2902C WiFi-Enabled Smart Weather Station. It was supposed to arrive tomorrow but I’m glad it showed up a day early, thanks Amazon! The newest firmware version also has a feature that blew me away – read on to find out what. I’m sure many others will appreciate it once they realize how powerful it is.

What I was looking for in a weather station

Before I bought a weather station, I decided on a few key requirements:

  • Basic weather data – outdoor temperature and humidity, wind speed and direction, and rain
  • The sensor station doesn’t need batteries replaced sooner than twice a year
  • A base station that shows the outdoor info with some additional inside info (inside temperature and humidity mostly)
  • The remote sensor station emits signals that could be decoded by rtl_433 so I could integrate it into my Home Automation/Smart Home system
  • Less than $200 (it is amazing how expensive some of these weather stations are! Looking at you, Davis Vantage Pro2, which is 3x the cost of the Ambient Weather WS-2902C as of writing this post)
Why I picked the WS-2902C

The Ambient Weather WS-2902C fit all of my requirements…. AND it has a few bonuses:

  • Additional sensors include: solar radiation (measured in watts per square meter) and pressure
  • Super capacitor charged by a small solar panel to really cut down on battery changes
  • Ability to interface with and send weather data to various weather services such as Weather Underground, Ambient Weather’s own service, and a few others
Initial thoughts

The sensor station is a nice little unit. I need to order a pole mount but it will be fine for a few days in my backyard. I am a but unsure why they put the solar panel on the north side of the solar sensor – it will surely block some sun. Here is what it looks like in my back yard (this snow is from the 4th largest snowstorm in Denver recorded history):

Ambient Weather WS-2902C testing
Ambient Weather WS-2902C sensor base in my backyard

The base station display looks crisp and the buttons are responsive and work as expected:

Ambient Weather WS-2902C base station
Ambient Weather WS-2902C base station in my kitchen

Nice bonus is the packaging and other packaging contents are almost entirely recyclable – nice work Ambient Weather!

Ambient Weather WS-2902C recyclable packaging

Connecting it to my WiFi was straight-forward. The iOS app is showing 2 stars out of 5 in the Apple App Store. Not sure why – it worked fine for me.

The bonus feature

When loading up the app for the first time it listed firmware v4.2.8 as the latest. In the firmware release notes was an entry – Version 4.2.8 – adds path for custom server setup. This immediately caught my eye so I updated the firmware. Indeed the app did show an entry for a custom server that I immediately filled out even though I didn’t have hosts on my network named “weather”:

Ambient weather custom server
Ambient weather custom server screen

I had no idea what the format was but I guessed it was either an HTTP POST or GET. I created a quick LXC container in Proxmox named “weather”, installed apache2, and checked the access logs. Sure enough, it was hitting my web server! Further, it was valid, usable data!

10.98.1.132 - - [19/Mar/2021:20:20:13 +0000] "GET /data/stationtype=AMBWeatherV4.2.9&PASSKEY=<MAC_ADDRESS>&dateutc=2021-03-19+20:20:12&tempinf=70.3&humidityin=29&baromrelin=29.900&baromabsin=24.756&tempf=62.8&battout=1&humidity=31&winddir=188&windspeedmph=1.1&windgustmph=3.4&maxdailygust=5.8&hourlyrainin=0.000&eventrainin=0.000&dailyrainin=0.000&weeklyrainin=0.000&monthlyrainin=0.000&totalrainin=0.000&solarradiation=622.94&uv=6&batt_co2=1 HTTP/1.1" 404 467 "-" "ESP8266"
10.98.1.132 - - [19/Mar/2021:20:20:32 +0000] "GET /data/stationtype=AMBWeatherV4.2.9&PASSKEY=<MAC_ADDRESS>&dateutc=2021-03-19+20:20:31&tempinf=70.3&humidityin=29&baromrelin=29.894&baromabsin=24.750&tempf=62.8&battout=1&humidity=32&winddir=189&windspeedmph=2.5&windgustmph=3.4&maxdailygust=5.8&hourlyrainin=0.000&eventrainin=0.000&dailyrainin=0.000&weeklyrainin=0.000&monthlyrainin=0.000&totalrainin=0.000&solarradiation=620.73&uv=6&batt_co2=1 HTTP/1.1" 404 467 "-" "ESP8266"

This means I don’t even need to reconfigure my rtl_433 set up to add a listener for the Ambient Weather WS-2902C. It will send the data directly to my server! People have been poking around these for a while, trying to connect to the base stations (port 45000 is open on Telnet) which are ESP devices (likely ESP8266 or similar). Ambient Weather needs to promote this. This is a slam dunk for a ton of people in the Home Automation/weather nerd categories. This post is long enough, I’ll document how to parse the data out in a later post. Update: I have put together a python script to parse the data and send it to MQTT here – Handling data from Ambient Weather WS-2902C to MQTT

In summary

In summary, the Ambient Weather WS-2902C appears to check all my boxes for a weather station, be reasonable priced, and connects directly to my own server to post data without needing to decode the radio traffic. Initial score for this device is 10/10 (I was going to say 9/10 until I discovered the custom server feature. That easily adds +2 points).

Disclaimer

Austin’s Nerdy Things is a participant in the Amazon Services LLC Associates Program, an affiliate advertising program designed to provide a means for sites to earn advertising fees by advertising and linking to amazon.com.