This post will be a basic SSH key tutorial. In my Securing this WordPress blog from evil hackers! post, I recommended turning off password based SSH authentication and moving exclusively to SSH key based authentication. This post will go over the steps to set up SSH key authentication. The outline is:
Generate SSH public/private key pair
Transfer the public key to the host in question
manual method (Windows)
automatic method (Linux/Mac)
Verify the SSH key authentication is functional.
At the end of this post is my user creation script which does all of this automatically.
I do go over this in a good amount of detail in my first ever YouTube video which you can view here if you’d prefer a video instead of text.
I will be generating keys on my new laptop and transferring them to the Raspberry Pi I set up in my second YouTube video (Austin’s Nerdy Things Ep 2 – Setting up a Raspberry Pi) – https://youtu.be/u5dHvEYwr9M.
Step 1 – Generate the SSH key pair
The first thing we need to do is generate the SSH key pair. On all major OSes these days, this command is included (Windows finally joined the other “real” OSes in 2018 with full SSH support out of the box). We will be using ED25519, which is advised for basically anything build/updated since 2014.
ssh-keygen -t ed25519
This will start the generation process. I hit enter when it prompts for the location (it defaults to C:/Users/<user>/.ssh/id_<type> which is fine). I also hit enter again at the passphrase prompt twice because I don’t want to use a passphrase. Using a passphrase increase security but it can’t be used for any automated processes because it’ll prompt every time for the passphrase. This is the full output from the process:
C:\Users\Austin>ssh-keygen -t ed25519
Generating public/private ed25519 key pair.
Enter file in which to save the key (C:\Users\Austin/.ssh/id_ed25519): [press enter here]
Enter passphrase (empty for no passphrase): [press enter here]
Enter same passphrase again: [press enter here]
Your identification has been saved in C:\Users\Austin/.ssh/id_ed25519.
Your public key has been saved in C:\Users\Austin/.ssh/id_ed25519.pub.
The key fingerprint is:
SHA256:t0FIIk<snip.......................snip>6Rx4 austin@DESKTOP-3IPSAN3
The key's randomart image is:
+--[ED25519 256]--+
|o++++++ .        |
|*  + * o .       |
|o.o o   . .      |
| . .     .       |
|..... o S o      |
| . + .  .o.o..   |
|  = . o.+.+=o..  |
|   +.o.  +a..o   |
|  ..ooo o+...    |
+----[SHA256]-----+
Step 2 – Transfer the SSH public key
For Windows, they included all the useful SSH utilities except one: ssh-copy-id. This is the easy way to transfer SSH keys. It is possible to transfer the key without using this utility. For this SSH key tutorial, I will show both.
Step 2a – Transfer SSH key (Windows)
First we need to get the contents of the SSH public key. This will be done with the little-known type command of Windows. In Step 1, the file was placed at C:\Users\Austin\.ssh\id_ed25519 so that’s where we will read:
The contents of the file are the single line of the SSH public key (starting with the type of key “ssh-ed25519” and then continuing with the key contents “AAAAC3” and ending with the username and host the key was generated on “austin@DESKTOP-3IPSAN3”). This is the data we need to transfer to the new host.
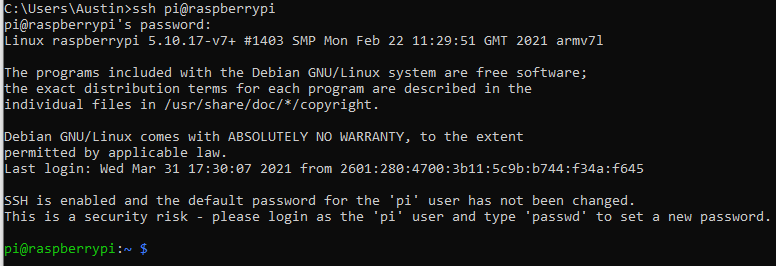
I will first log onto the Raspberry Pi with the username/password combo from the default installation:
ssh pi@raspberrypi
I am now logged into the Pi:
Logged into the Raspberry Pi
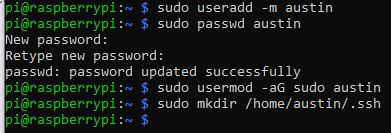
Now on the target machine we need to create the user account and set up some initial things. We use sudo on all of these since root level permissions are required.
# create user austin with home directory (-m means create the home directory)
sudo useradd -m austin

# set the password for user austin
sudo passwd austin

# add user austin to sudo group
sudo usermod -aG sudo austin

# make the .ssh directory for user austin
sudo mkdir /home/austin/.ssh
User created, password set, sudo added, and directory created
With those four commands run, the user is created, has a password, can run sudo, and has an empty .ssh directory ready for the keys.
Now we need to create the authorized_keys file:
sudo nano /home/austin/.ssh/authorized_keys
In this file, paste (by right-clicking) the single line from the id_ed25519 file:
line pasted and ready to save
To save the file, press CTRL+O and a prompt will appear. Press enter again to save. Now to exit, press CTRL+X. There should be no “are you sure” prompt because the contents are saved.
Lastly, we need to change the owner of the .ssh directory and all of it’s contents to the new user (sudo means they were created as root):
sudo chown -R austin:austin /home/austin/.ssh
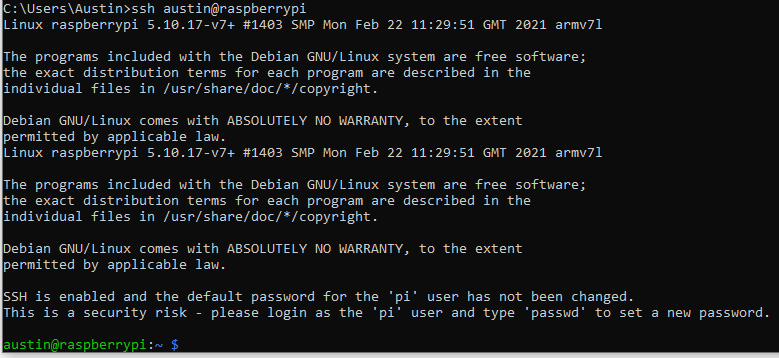
Now we can test. From the machine that generated the SSH key, SSH to the target with the new user specified:
ssh austin@raspberrypi
You should get in without having to type a password!
Successfully logged in without typing a password (the SSH key worked)
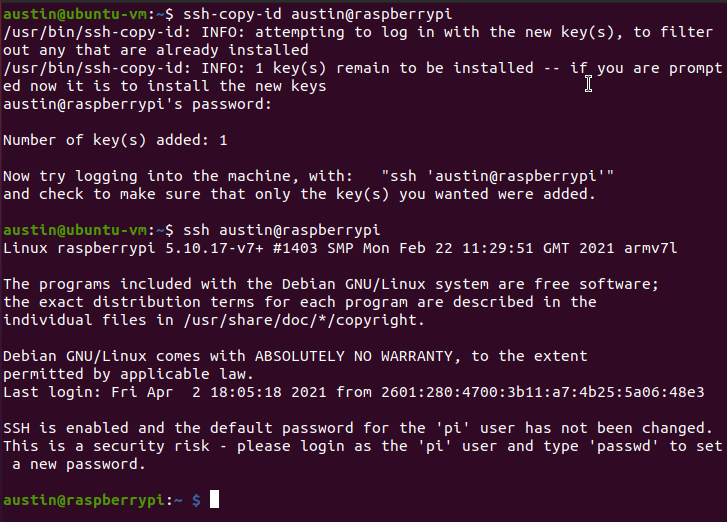
Step 2b – Transfer SSH key (Linux)
This is much easier. The ssh-copy-id utility does what we just did in a single command.
# make sure you've already generated keys on your Linux/Mac machine
ssh-copy-id austin@raspberrypi
ssh-copy-id copied the keys and did everything for us in a single command
Microsoft – will you please add ssh-copy-id to default Windows installations?
Step 3 – Verify
We did this at the end of each of the other methods.
User creation script
This is the script I use on any new Linux virtual machine or container I spin up. It updates packages, installs a few things, sets the timezone, does all the user creation stuff and sets the SSH key. Lastly, it changes the shell to bash. Feel free to modify this for your own use. It is possible to copy the data from /etc/shadow so you don’t have to type in the password. I haven’t got that far yet.
Disclosure: When you click on links to various merchants in this post and make a purchase, this can result in this site earning a commission. Affiliate programs and affiliations include, but are not limited to, the eBay Partner Network.
In my introduction post, I said I would write about topics in order of interest. Securing WordPress blogs from hackers isn’t exactly fun or interesting but it is very necessary in this day and age. Hackers are constantly probing sites on the internet for insecurities. They’re constantly trying to log into WordPress sites with easily guessed passwords (hint: don’t use ‘password’ as your password). Here are some hints on how to secure WordPress blogs from hackers.
If you prefer a video version, check out my first ever YouTube video (!) covering this same content here – https://youtu.be/wKgm_684acM.
When I set this site up, the first 24 hours were pretty quiet. After that, the attacks started ramping up. I decided to take action and lock down access. There are three main things I did to secure this WordPress blog installation and VPS it is hosted on:
Disable password-based SSH authentication for logins
Install and enable Fail2Ban
Install WordPress specific Fail2Ban filters
#1 – Disable password-based SSH authentication
Step 0 – Enable SSH Key Authentication
Before you disable password-based authentication, you need to enable SSH key based authentication. I have posted a SSH key tutorial here – SSH Key Tutorial.
Password-based SSH authentication
SSH stands for secure shell. It is how 99% of Linux/Unix servers on the public internet and private intranets are administered. There are two main methods of logging in with SSH: 1) password and 2) key. Password is pretty straight-forward and is what most people are familiar with. You have a username and password. If you enter the right password for the username, you get in. Hackers are constantly testing common usernames (root, admin, user, guest) with common passwords (password, password1, password123, test, etc.). Further – they aren’t testing just one combination of user/pass at a time, they keep trying passwords until they give up or are banned. I had my VPS for a few weeks before activating austinsnerdythings.com on it and here is a random sample starting a minute after midnight for about six minutes: $sudo head -n 100 /var/log/auth.log.1
Feb 28 00:01:52 austinsnerdythings.com sshd[2265571]: pam_unix(sshd:auth): authentication failure; logname= uid=0 euid=0 tty=ssh ruser= rhost=222.184.14.90 user=root
Feb 28 00:01:54 austinsnerdythings.com sshd[2265571]: Failed password for root from 222.184.14.90 port 45182 ssh2
Feb 28 00:01:54 austinsnerdythings.com sshd[2265571]: Received disconnect from 222.184.14.90 port 45182:11: Bye Bye [preauth]
Feb 28 00:01:54 austinsnerdythings.com sshd[2265571]: Disconnected from authenticating user root 222.184.14.90 port 45182 [preauth]
<snip>
Feb 28 00:04:59 austinsnerdythings.com sshd[2265587]: pam_unix(sshd:auth): authentication failure; logname= uid=0 euid=0 tty=ssh ruser= rhost=139.198.121.63 user=root
Feb 28 00:05:02 austinsnerdythings.com sshd[2265587]: Failed password for root from 139.198.121.63 port 53437 ssh2
Feb 28 00:05:04 austinsnerdythings.com sshd[2265587]: Connection closed by authenticating user root 139.198.121.63 port 53437 [preauth]
Feb 28 00:06:06 austinsnerdythings.com sshd[2265591]: pam_unix(sshd:auth): authentication failure; logname= uid=0 euid=0 tty=ssh ruser= rhost=212.64.38.8 user=root
Feb 28 00:06:07 austinsnerdythings.com sshd[2265591]: Failed password for root from 212.64.38.8 port 37354 ssh2
Feb 28 00:06:08 austinsnerdythings.com sshd[2265591]: Received disconnect from 212.64.38.8 port 37354:11: Bye Bye [preauth]
Feb 28 00:06:08 austinsnerdythings.com sshd[2265591]: Disconnected from authenticating user root 212.64.38.8 port 37354 [preauth]
<snip>
Feb 28 00:06:48 austinsnerdythings.com sshd[2265595]: Received disconnect from 49.88.112.118 port 37056:11: [preauth]
Feb 28 00:06:48 austinsnerdythings.com sshd[2265595]: Disconnected from 49.88.112.118 port 37056 [preauth]
Feb 28 00:06:56 austinsnerdythings.com sshd[2265589]: Connection reset by 49.88.112.118 port 53318 [preauth]
Feb 28 00:08:00 austinsnerdythings.com sshd[2265597]: Received disconnect from 49.88.112.118 port 61081:11: [preauth]
Feb 28 00:08:00 austinsnerdythings.com sshd[2265597]: Disconnected from authenticating user root 49.88.112.118 port 61081 [preauth]
Each login attempt is 3-4 lines, so that’s 10 attempts in 6 minutes. Also notice the repeating IP addresses – 49.88.112.118 tried 4 separate times to log in across 6 minutes!
Hackers try user/pass logins because they’re relatively easy. And they get lucky often enough it is worth it.
Key-based SSH authentication
The other method to logging in with SSH is via public/private key. How this works is you generate a public/private keypair. Then you put the contents of the public key on the server you want to log in to. When logging in, your SSH client says “hello, I am user austin and I have a key to login and here it is”! The public key that’s copied to the remote server looks like this:
As you might imagine, it’s a lot harder to guess that key than it is a password. In fact, cracking a 2048 bit key like the one above would take 300 trillion years with a quantum supercomputer (which doesn’t yet exist)! Source. The universe is 15 billion years old. That means it would require 300 trillion / 15 billion = 20,000 universe lifetimes to crack.
Before you disable password-authentication, you need to be 100% sure that key-based authentication is working or else you will lock yourself out of your server!
To disable password-based authentication, you need to edit /etc/ssh/sshd_config, find PasswordAuthentication and put no after it. If it is commented out (there is a # at the front of the line) delete the #. It will look like this when finished:
disable sshd password authentication
Then you need to restart the SSH daemon (service) for the change to take effect:sudo systemctl restart ssh.service. Now you password-based SSH authentication has been disabled!
My failed authentication attempts dropped dramatically after disabling password-based SSH authentication. Below is the same general timeframe from the morning of when this post was written:
Mar 13 00:00:24 austinsnerdythings.com sshd[108357]: Invalid user ftpuser from 167.99.34.31 port 59060
Mar 13 00:00:24 austinsnerdythings.com sshd[108357]: Received disconnect from 167.99.34.31 port 59060:11: Normal Shutdown, Thank you for playing [preauth]
Mar 13 00:00:24 austinsnerdythings.com sshd[108357]: Disconnected from invalid user ftpuser 167.99.34.31 port 59060 [preauth]
Mar 13 00:03:09 austinsnerdythings.com sshd[108549]: Received disconnect from 24.8.45.4 port 5402:11: disconnected by user
Mar 13 00:03:09 austinsnerdythings.com sshd[108549]: Disconnected from user austin 24.8.45.4 port 5402
Mar 13 00:03:09 austinsnerdythings.com sshd[108438]: pam_unix(sshd:session): session closed for user austin
Mar 13 00:12:33 austinsnerdythings.com sshd[108934]: Invalid user postgres from 167.99.34.31 port 46444
Mar 13 00:12:33 austinsnerdythings.com sshd[108934]: Received disconnect from 167.99.34.31 port 46444:11: Normal Shutdown, Thank you for playing [preauth]
Mar 13 00:12:33 austinsnerdythings.com sshd[108934]: Disconnected from invalid user postgres 167.99.34.31 port 46444 [preauth]
Mar 13 00:12:44 austinsnerdythings.com sshd[108941]: Received disconnect from 222.187.232.213 port 11758:11: [preauth]
Mar 13 00:12:44 austinsnerdythings.com sshd[108941]: Disconnected from authenticating user root 222.187.232.213 port 11758 [preauth]
Mar 13 00:17:40 austinsnerdythings.com sshd[109097]: Received disconnect from 221.131.165.23 port 32827:11: [preauth]
Mar 13 00:17:40 austinsnerdythings.com sshd[109097]: Disconnected from authenticating user root 221.131.165.23 port 32827 [preauth]
Mar 13 00:24:51 austinsnerdythings.com sshd[109322]: Invalid user postgres from 167.99.34.31 port 33830
Mar 13 00:24:52 austinsnerdythings.com sshd[109322]: Received disconnect from 167.99.34.31 port 33830:11: Normal Shutdown, Thank you for playing [preauth]
Mar 13 00:24:52 austinsnerdythings.com sshd[109322]: Disconnected from invalid user postgres 167.99.34.31 port 33830 [preauth]
Most of these are just disconnects. The hackers see that my server is not accepting passwords and they just disconnect – they don’t even try to log in.
#2 – Install Fail2Ban
Fail2Ban is a helpful tool that monitors various logs and if it sees too many failed attempts, it will issue a ban on the offending IP address.
It is simple enough to install. First, update your package cache. On Ubuntu/Debian, this is done with apt:sudo apt update.
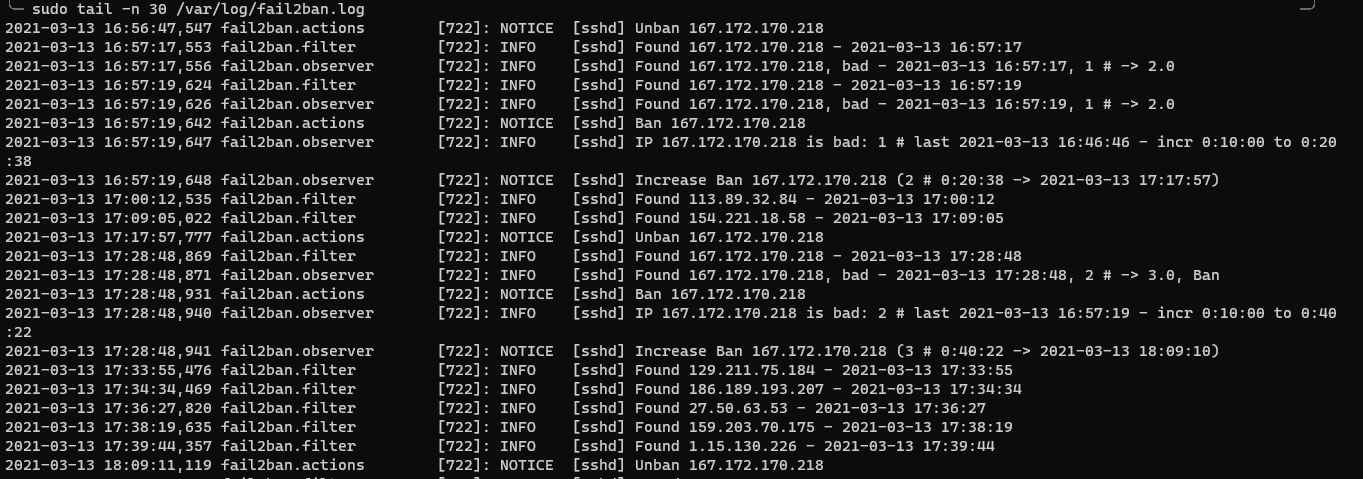
Then install fail2ban:sudo apt install -y fail2ban. This automatically enables Fail2ban so that it starts on boot. It has a bunch of out-of-the-box rules and will handle many services without any additional configuration. This is what my Fail2ban log looks like as of right now. This is all SSH bans. Notice that the duration is increasing for IP 167.172.170.218. The default ban duration is 10 minutes and I have it configured to double (plus some randomness) every extra attempt.
#3 – Add WordPress specific Fail2ban jails and plugin
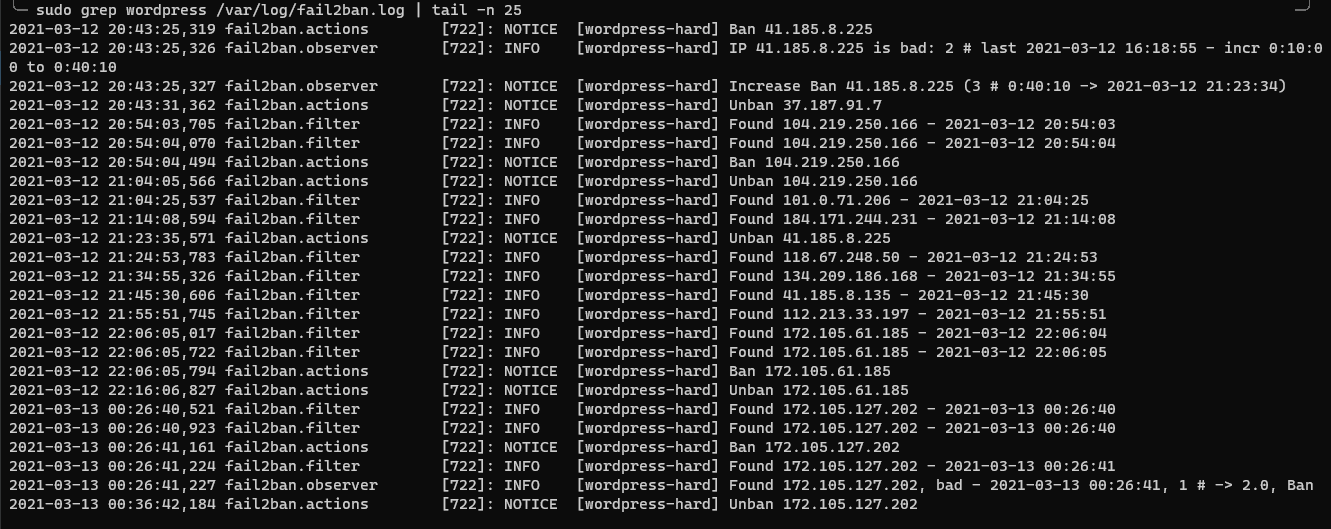
Attempts to log into WordPress look like normal web traffic in web logs. Failed logins aren’t recorded specifically. We can change that by adding a plugin to WordPress that writes to /var/log/auth.log for a number of activities. Fail2ban monitors /var/log/auth.log for failed logins so it can act appropriately. I am using WP-Fail2Ban-Redux which does exactly what it says and without any nonsense. To finish the install, I copied the files from wp-content/plugins/wp-fail2ban-redux/config/filters and /jail to my fail2ban filter.d/ and jail.d/ folders:
Restart fail2ban so the changes take effect: sudo systemctl restart fail2ban
View all the bans in your log! Congrats, you’ve now applied some top notch security practices to your blog.
fail2ban wordpress bans
#4 – ALWAYS KEEP YOUR WORDPRESS INSTALL UPDATED
That is the entirety of #4.
#5 – To disable XMLRPC or not, that is the question
I haven’t disabled XML-RPC yet. XML-RPC is a way to programmatically interact with WordPress blogs. Hackers can use it to rapidly try user/password combinations and other things like that. Installing the WordPress specific Fail2Ban components will effectively ban offenders while still allowing access to the underlying services.
In conclusion
It isn’t too hard to make these three changes to secure your WordPress blog and doing so will increase the security drastically. If you would like assistance doing this on your site, please use the contact form to get in touch with me. Lastly, always keep your WordPress install up to date. Every so often, security researchers find holes in the base WordPress code. Automatic updates will prevent your site from being a target.