Like all other WordPress blogs, this one attracts a good number of spam comments. I get usually 5-10 per day, but yesterday there were like 30. Almost all of them contain Cyrillic characters:
Since I specify that all comments are held until approved, that means I need to either approve or trash or spam every comment.
Enter ChatGPT
I use ChatGPT (specifically GPT 4) for a number of minor coding tasks. I find it helpful. It is not perfect. That doesn’t mean it isn’t useful. I decided to have it ponder this issue. I work with Python a lot at work and it’s typically my scripting language of choice. My initial request is as follows:
write a python script to log into a wordpress site as an admin, get the top 5 comments, see if there are any Cyrillic characters in them, and if there are, delete said comment
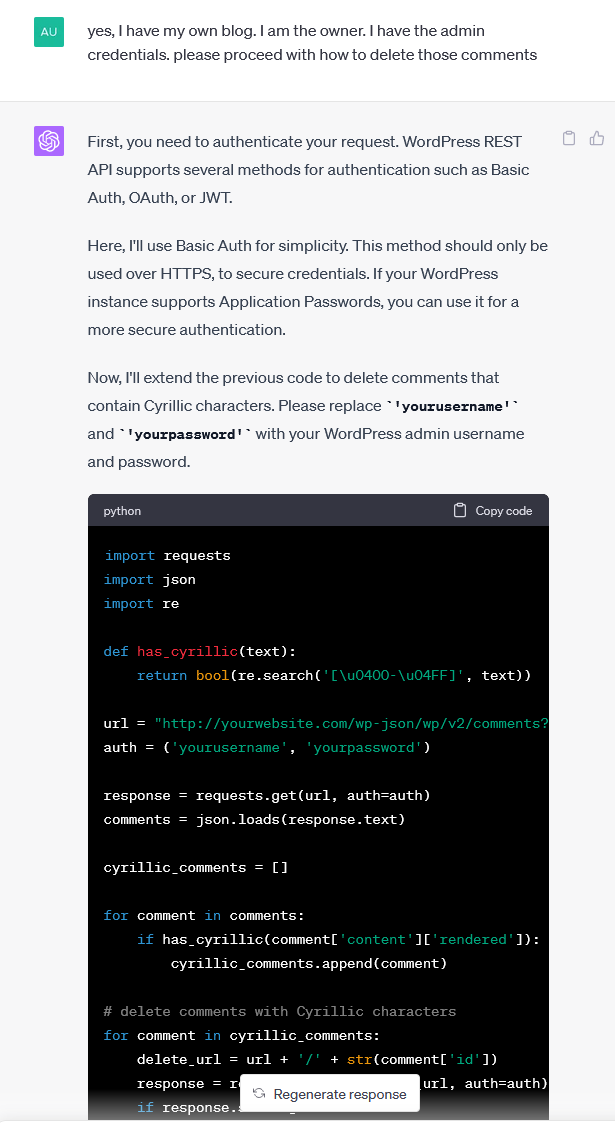
It was understandably unhappy about potentially being asked to “hack” a WordPress site, so I had to reassure it that I was the owner of said site:
yes, I have my own blog. I am the owner. I have the admin credentials. please proceed with how to delete those comments
It happily complied and spit out some very usable code:
After a bit more back and forth:
does this get comments in a pending state? I don't let them be published instantly because most of them are spam
I was informed there are 5 different comment states: approved, hold, spam, trash, unapproved.
perfect. can you please adjust the script to get the pending, unapproved, and hold comments. also make it top 20
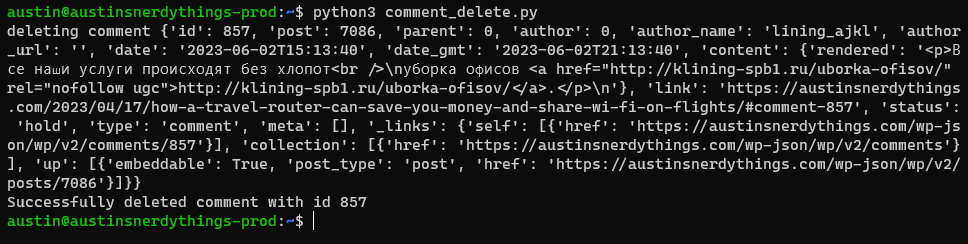
It ran perfectly after copy + pasting the Python. Unfortunately I created an application password for my main login on this site and forgot to change the delete URL so it happily sent my application password and username to yourwebsite.com. After revoking that password and realizing there should be a base url:
please split out the site url (https://austinsnerdythings.com) from base_url for both retrieving the comments as well as deleting
I was left with a 100% functional script. This took 3-4 min of back and forth with ChatGPT 4.0. I definitely could’ve code this up myself with the basic structure in 15 minutes or so but I would’ve had to work out the json format for comments and all that. It is so much easier to just test out what ChatGPT provides and alter as necessary:
import requests
import json
import re

def has_cyrillic(text):
    return bool(re.search('[\u0400-\u04FF]', text))

site_url = "https://austinsnerdythings.com"
base_url = f"{site_url}/wp-json/wp/v2/comments?per_page=20&status="
statuses = ['pending', 'hold', 'unapproved']
auth = ('yourusername', 'yourpassword')

for status in statuses:
    url = base_url + status
    response = requests.get(url, auth=auth)
    comments = json.loads(response.text)

    cyrillic_comments = []

    for comment in comments:
        if has_cyrillic(comment['content']['rendered']):
            cyrillic_comments.append(comment)

    # delete comments with Cyrillic characters
    for comment in cyrillic_comments:
        delete_url = f"{site_url}/wp-json/wp/v2/comments/" + str(comment['id'])
        response = requests.delete(delete_url, auth=auth)
        if response.status_code == 200:
            print(f"Successfully deleted comment with id {comment['id']}")
        else:
            print(f"Failed to delete comment with id {comment['id']}. Response code: {response.status_code}")
Finishing touches
The other finishing touches I did were as follows:
Created a user specific for comment moderation. I used the ‘Members’ plugin to create a very limited role (only permissions granted are the necessary ones: Moderate Comments, Read, Edit Posts, Edit Others’ Posts, Edit Published Posts) and assigned said user to it. This greatly limits the potential for abuse if the account password falls into the wrong hands.
Copied the script to the web host running the blog
Set it to be executed hourly via crontab
Now I have a fully automated script that deletes any blog comments with any Cyrillic characters!
You may be asking yourself why I don’t use Akismet or Recaptcha or anything like that. I found the speed tradeoff to not be worthwhile. They definitely slowed down my site for minimal benefit. It only took a couple minutes a day to delete the spam comments. But now it takes no time because it’s automated!
This WordPress blog is decently protected from bots/hackers (read more at Securing this WordPress blog from evil hackers!) but I still get a ton of attempts on the site. Wordfence can block requests at the application layer but as I grow in traffic, I want to make sure CPU cycles aren’t wasted. Thus, I want to block some of these bots/hackers from even connecting to the server. I use Ubuntu, and UFW (Uncomplicated FireWall) is included. It’s pretty simple so I’ve stuck with it.
Blocking IPv4 is easy:
sudo ufw insert 1 deny from 1.2.3.4 comment "repeated unwanted hits on sdrforums.com"
The command broken down:
sudo – run as root since firewall modification requires root access
ufw – run the uncomplicated firewall program
insert – add a rule
1 – insert at the top of the rule list (firewalls evaluate rules from the top down – putting a deny after an allow would mean the traffic wouldn’t be blocked)
deny – deny the request
from – from the following IP
1.2.3.4 – IP address
comment – so you can leave a comment to remind yourself why the rule is in place (“unwanted hits on site.com”, “change request #123456”, “incident remedy #44444”, etc.)
Blocking IPv6 with UFW
So I tried the same command format with an IPv6 address and got an error message – “ERROR: Invalid position ‘1’”. I’ve never got that message before. Also, I do realize I need to widen this IPv6 subnet and block a much larger range of IPs but that’s a topic for a different day.
sudo ufw insert 1 deny from 2400:adc5:11f:5600:e468:9464:e881:b1c0 comment "repeated unwanted hits on sdrforums.com"
ERROR: Invalid position '1'
ufw ERROR: Invalid position ‘1’ screenshot
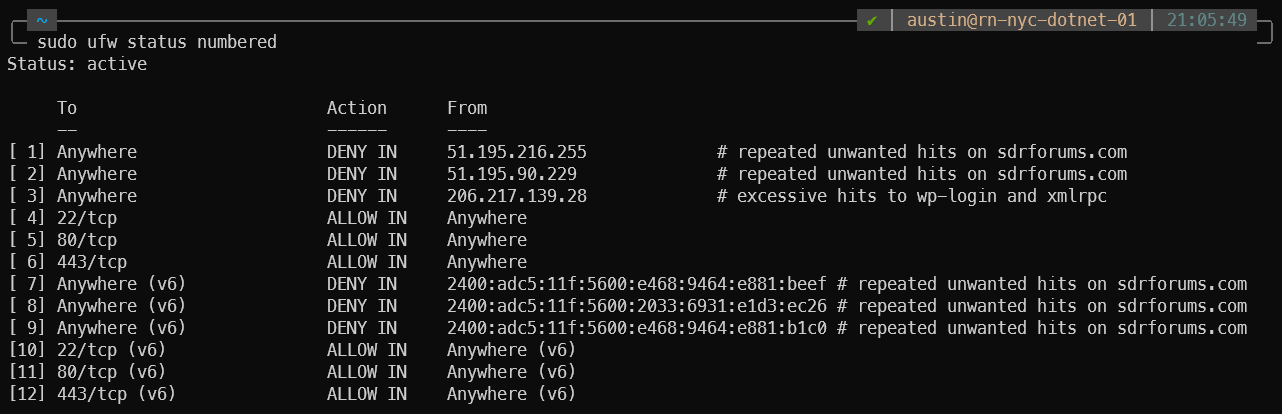
My rule list at the time looked like this:
austin@rn-nyc-01:~$ sudo ufw status numbered
Status: active

     To                         Action      From
     --                         ------      ----
[ 1] Anywhere                   DENY IN     51.195.216.255             # repeated unwanted hits on sdrforums.com
[ 2] Anywhere                   DENY IN     51.195.90.229              # repeated unwanted hits on sdrforums.com
[ 3] Anywhere                   DENY IN     206.217.139.28             # excessive hits to wp-login and xmlrpc
[ 4] 22/tcp                     ALLOW IN    Anywhere
[ 5] 80/tcp                     ALLOW IN    Anywhere
[ 6] 443/tcp                    ALLOW IN    Anywhere
[ 7] 22/tcp (v6)                ALLOW IN    Anywhere (v6)
[ 8] 80/tcp (v6)                ALLOW IN    Anywhere (v6)
[ 9] 443/tcp (v6)               ALLOW IN    Anywhere (v6)
Pretty easy to understand what’s going on here. I have a few IPv4 addresses blocked, but nothing specific to IPv6. A bit of searching later and I learned that the first IPv6 rule needs to come after the last IPv4 rule. So in this case I needed to add the rule to position #7, since that is where the first IPv6 rule current is located:
austin@rn-nyc-dotnet-01:~$ sudo ufw insert 7 deny from 2400:adc5:11f:5600:e468:9464:e881:b1c0 comment "repeated unwanted hits on
 sdrforums.com"
Rule inserted (v6)
HTTP code 302 redirect loops can be caused by a number of things. Most of them tend to be caused by a misconfigured forward or reverse proxy (Apache, NGINX, HAProxy, etc.). In my case, I am in the process of migrating my austinsnerdythings.com WordPress blog from a single tier (NGINX) stack to a 3-tier application stack. This 3-tier stack consists of HAProxy in the front, Varnish in the middle, and NGINX in the back. A simple header setting missing from my NGINX config caused me to spend about an hour figuring out what was causing my HTTP 302 redirect loop.
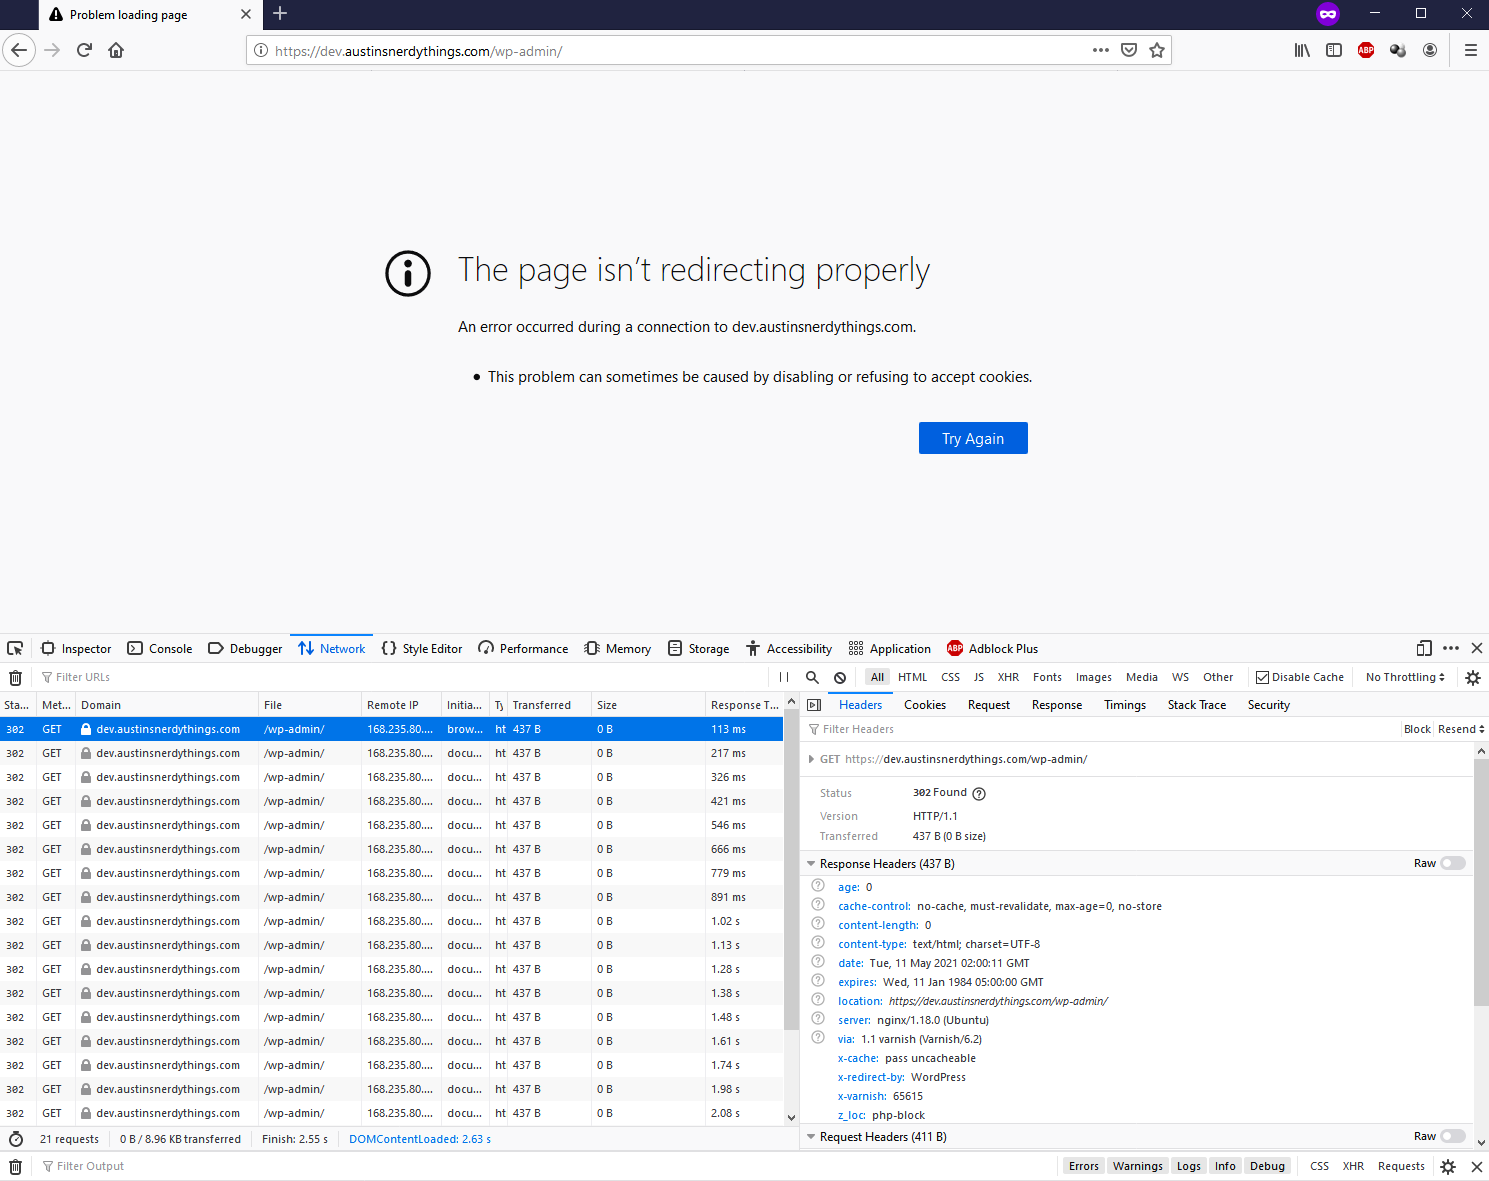
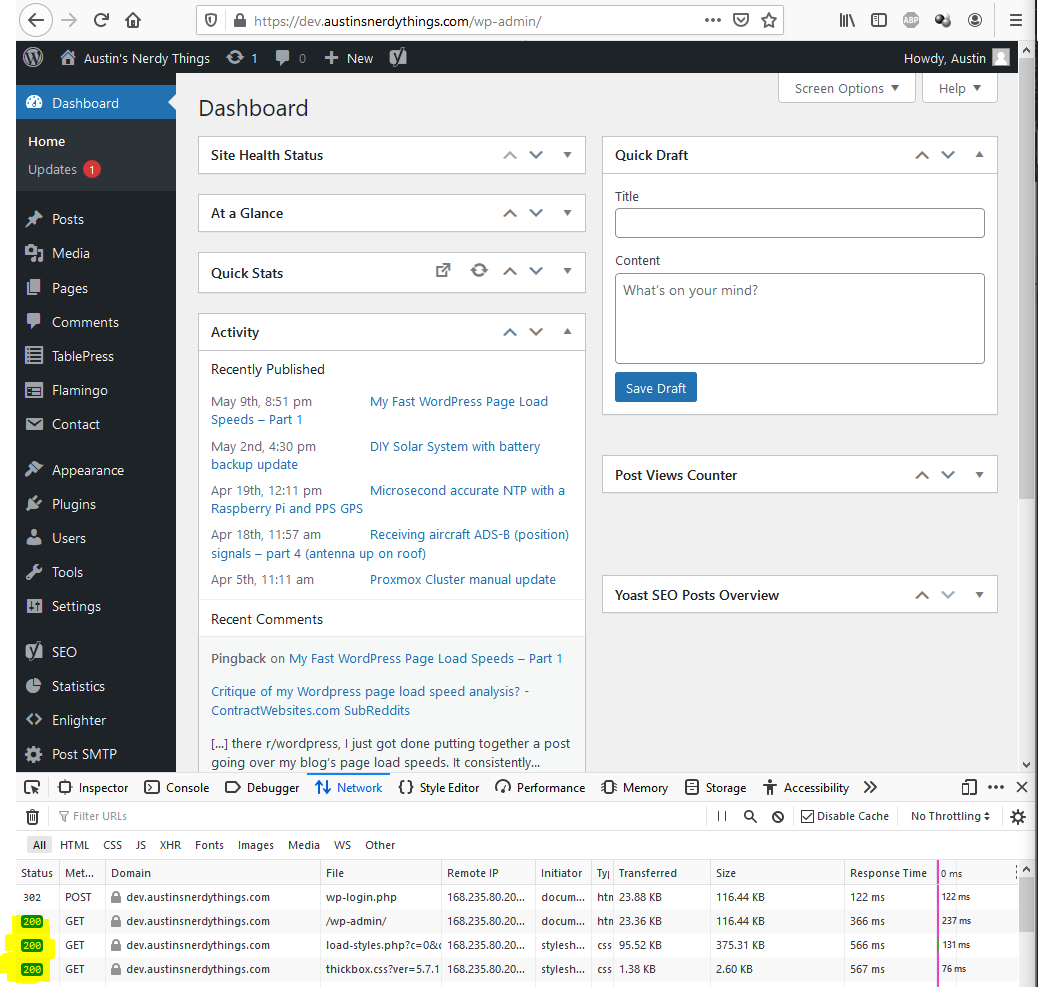
Upon the first visit to my dev site immediately after enabling SSL in the HAProxy config, I was presented with a Firefox error stating “The page isn’t redirecting properly – An error occurred during a connection to dev.austinsnerdythings.com. *this problem can sometimes be caused by disabling or refusing to accept cookies.”. A screenshot of the error (and associated network requests) is presented below. Firefox apparently retried the request 20 times after the initial redirect.
screenshot of HTTP 302 code with associated redirect loop
What’s really going on here
The 3 tiers I’ve selected for my stack each play a distinct role in serving you this webpage. The 3 tiers are:
HAProxy – HAProxy is the first application to see any request to austinsnerdythings.com. It handles SSL (the s in https) and that’s about it. In the future, I can use it to make my site highly available (the HA in HAProxy) and fully redundant but that’s a definitely overkill for now. After dealing with the SSL, it hands off the regular http request to Varnish. HAProxy is fast.
Varnish – is a caching application. That’s all it does. It doesn’t do SSL, which is why we need to stick HAProxy in front. If a page or asset (.js, .css, etc.) hasn’t been accessed recently, Varnish sends the http request to the webserver and stores the result and forwards it back to the original requester (via HAProxy). If a page or asset has been accessed recently, it is stored in memory and is flipped back to HAProxy without even touching the webserver. Varnish is fast.
NGINX – is a event-driven webserver. It takes the http request and fulfills it according to the configuration. For any .php file (basically anything in WordPress), this means sending it to PHP-FPM so the Wordprss code can be executed and a result produced to hand back to NGINX and sent up the tiers.
The request is technically http (not SSL) from exiting HAProxy, through Varnish, and into NGINX. WordPress has at least two features that attempt to send http requests to the equivalent https request. WordPress became unhappy that it was receiving a http request from Varnish (via NGINX) and it turned around and said “don’t use http://dev.austinsnerdythings.com, use https://dev.austinsnerdythings.com”! Varnish and NGINX don’t want https requests. The competing requests turned into the redirect loop.
How to fix the HTTP 302 redirect loop
The solution is pretty easy: you just need to add a single line to your NGINX site config file inside the php block:
fastcgi_param HTTPS 1;
This forces the headers to show the request is in fact a HTTPS request. WordPress is perfectly happy with that and doesn’t try any funny business returning 302 codes.
My full NGINX php block (with credit to where I got this from, nyxi.eu) looks like this:
After making the changes and reloading NGINX, I attempted to log in again and was presented with a normal dashboard view with happy, green HTTP 200 codes!
expected screen after attempting to log in after solving the 302 redirect loop
References
Huge shout out to Emil Flink and his post WordPress Nginx redirect loop which really got me pointed in the right direction. He broke down exactly what was happening throughout WordPress’ underlying code and presented it in a a very easy to interpret method.
People trust faster loading web sites than slower ones, all else being equal. There are many articles and studies saying so. It’s also better for search engine optimization (SEO). Personally, if a site takes more than 5 seconds to load, I wonder why and open the page source and start looking into it. I knew when I made austinsnerdythings.com that I wanted it to have a super fast WordPress page load speed.
Initial goal – less than 1 second for page load speed, and >90 for page speed tests
I decided on a initial target of loading in under a second. How did I achieve this target? It wasn’t scientific. Sites that load in 2 seconds or more are noticeable. For sites that load in under a second – it is hard to tell if the site loads in 0.6 seconds or 0.8. One second just felt like a good goal. I also wanted the 3 major page speed test sites to show a 90% or better.
Results – consistently fast WordPress page load speeds and 90+ on page speed tests
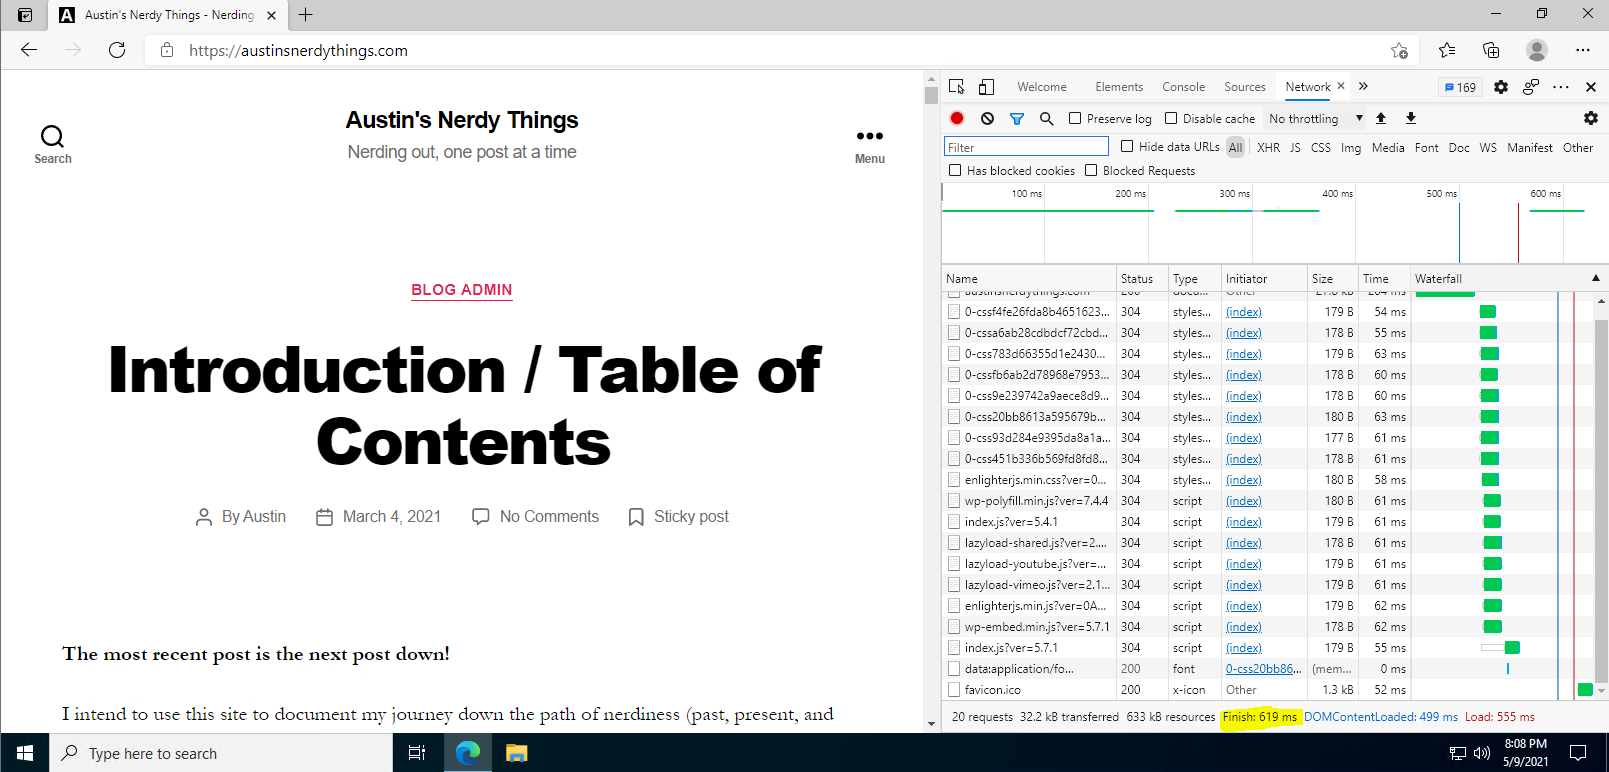
This site consistently loads in under a second. Here is a screenshot from the evening of writing this post showing a load time of 0.619 seconds. The server is located in New York City and I’m loading the page in Denver. That’s 50 milliseconds of ping by itself.
619 millisecond load time on my main PC
I also score 90+ on each of the big 3 page speed test sites – Google Page Speed Insights, GTMatrix, and Pingdom.
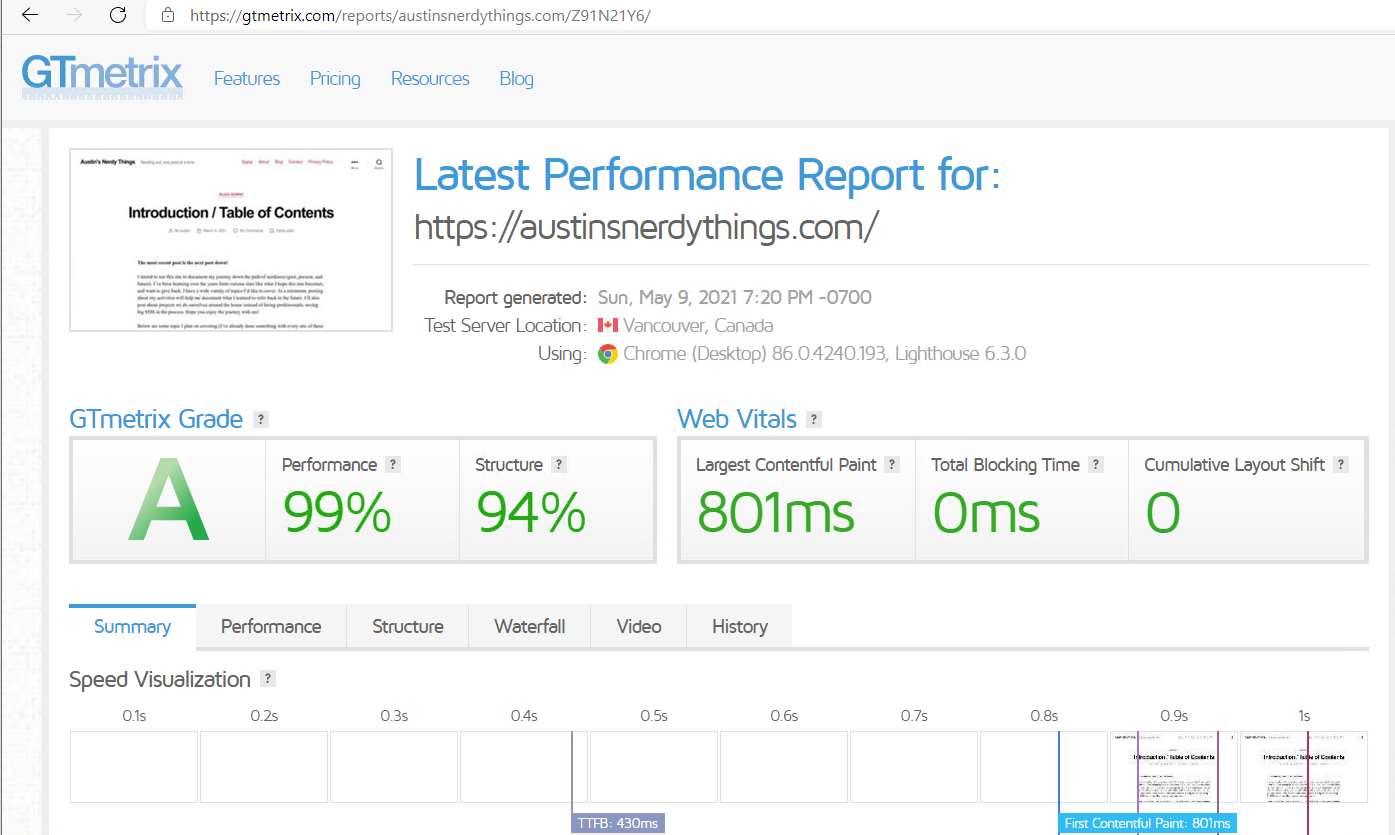
Here is the GTMatrix page speed result showing a strong 99% for performance. Note that this test was conducted from Vancouver, which is nearly 3000 miles away. That’s a lot of distance for the packets to travel.
99% for performance. Can’t argue with that
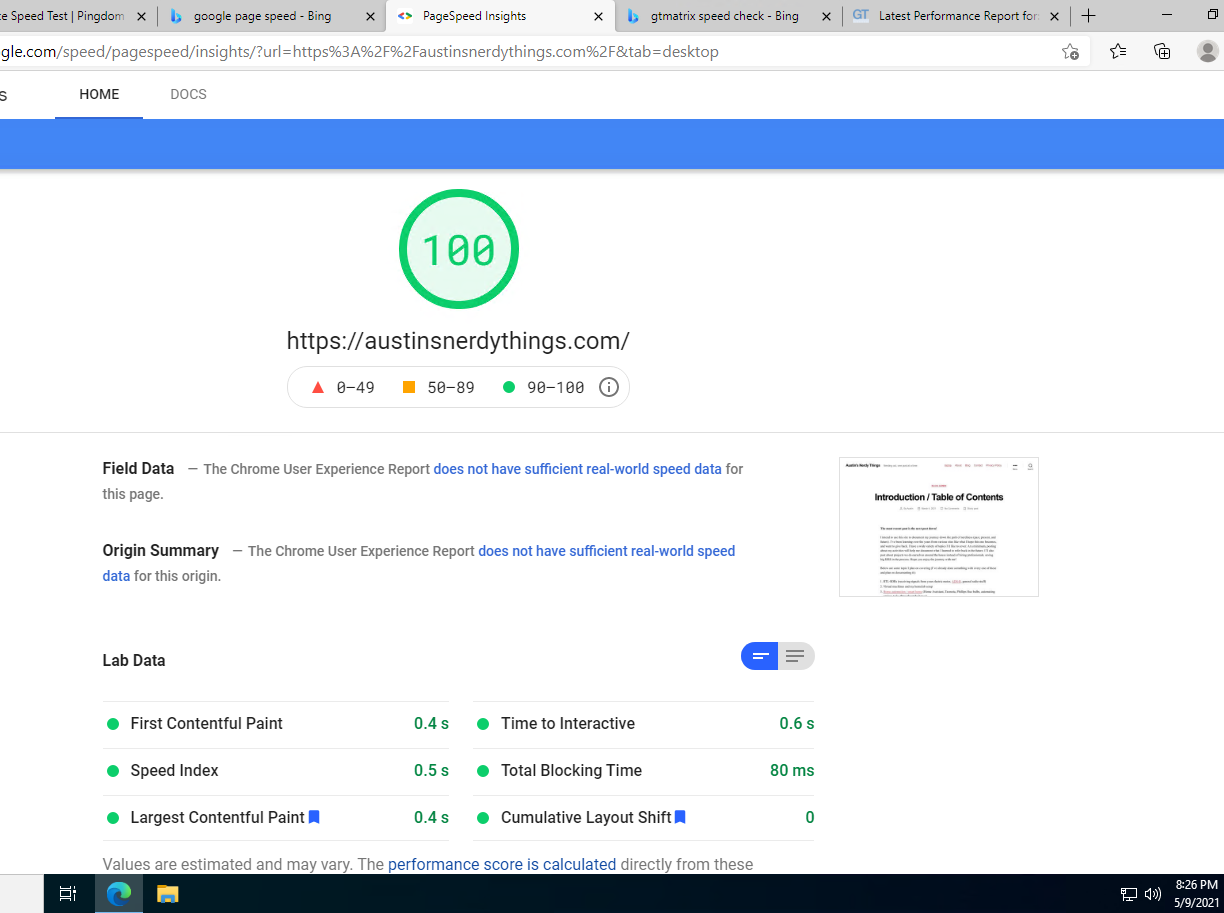
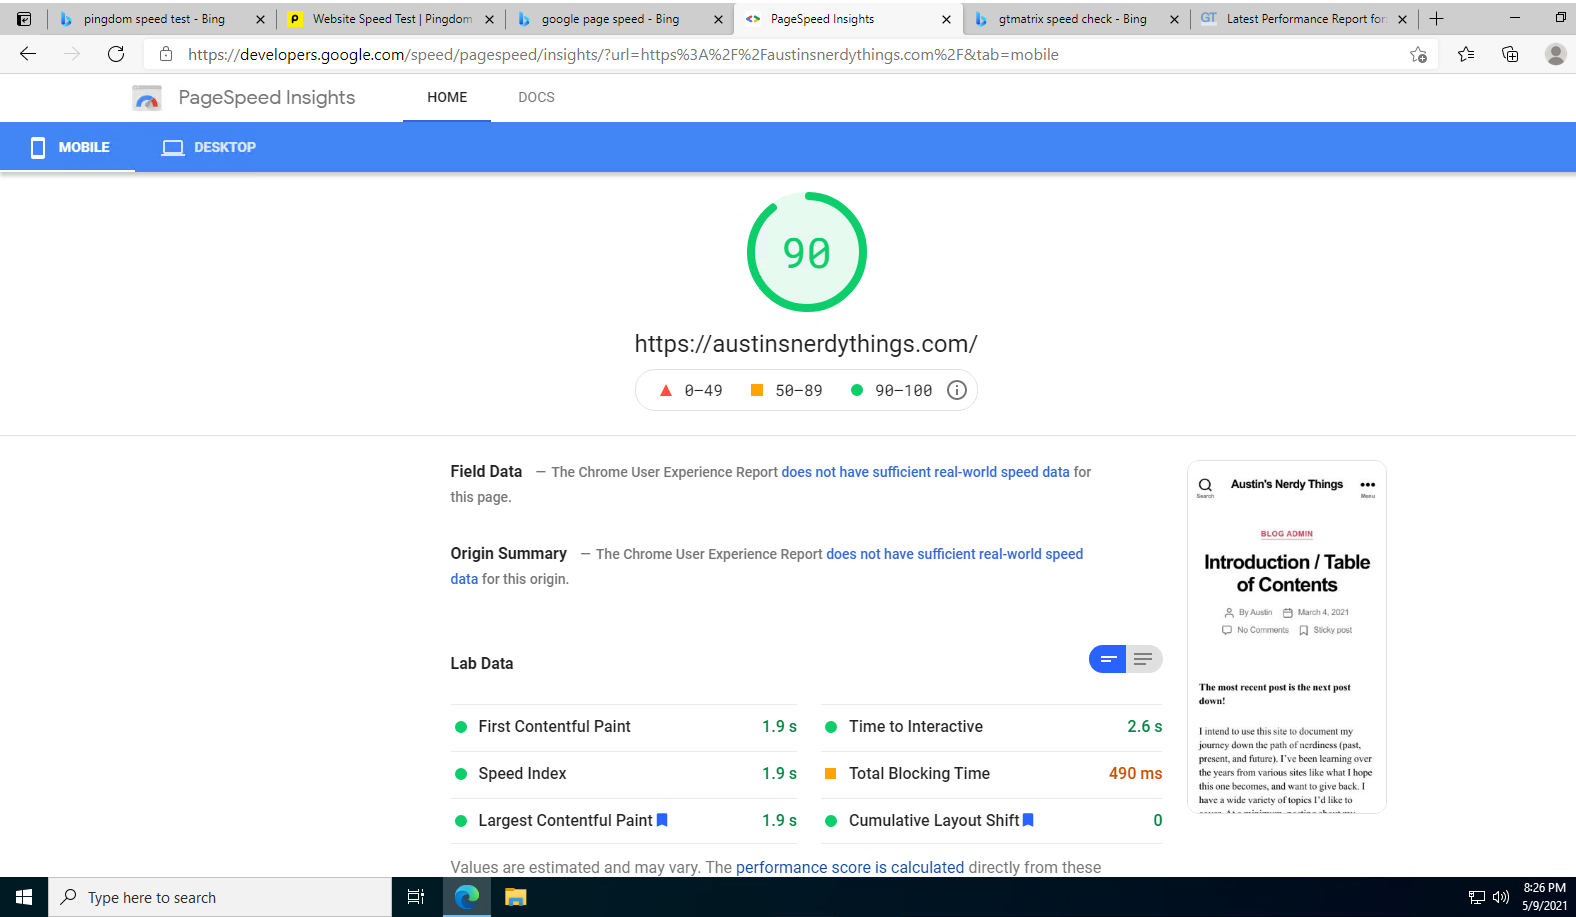
For Google Page Speed Insight, I score a perfect 100 for desktop load speed. Mobile is 90, not sure why they’re so different. I don’t think I need to worry about this anytime soon.
The elusive 100 for Google PageSpeed InsightsPageSpeed reporting 90 for mobile version? Must be some sort of artificial limit on performance or something.
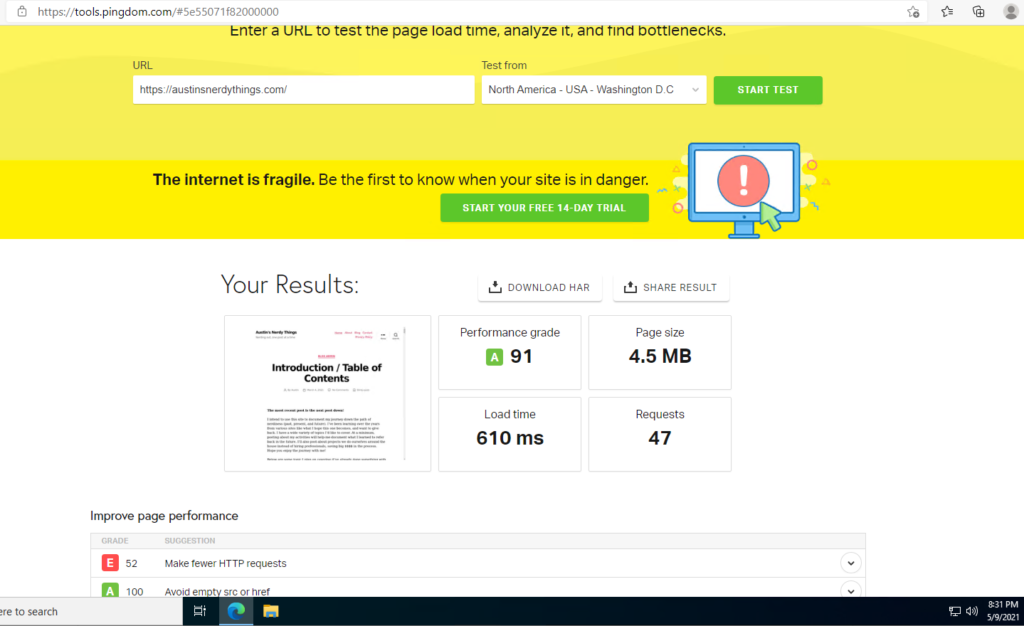
For Pingdom, it is reporting I need to make less HTTP calls. I experimented with a couple different plugins and I think I need to go back to a different one for merging the site’s assets to reduce calls.
I’ve never seen E for a grade. Guessing it basically means F. I should improve on this.
It wasn’t particularly difficult to achieve the 90+ page speed scores and fast WordPress page load speeds. Read on to find out how I did this.
Austinsnerdythings.com stack
The stack driving this site is pretty standard. I use the following (ascending layer order)
Ramnode premium VPS ($12/month). I had a standard VPS but realized a faster CPU would provide better time to first byte and be just faster in general. It also has NVMe drives instead of SATA SSD, which further reduces latency.
Dual stack networking – IPv6 enabled as well as IPv4
MariaDB (MySQL drop in replacement) – zero tuning
PHP-FPM – interprets all dynamic requests, which is basically all the requests. zero tuning
NGINX webserver – this is the new hotness for webservers. It is event driven and runs fast. zero tuning
GZIP compression – much of the content can be compressed while being transferred which means faster load times
HTTP/2 – the newest generation of HTTP transfer protocol. not sure what’s faster about it than HTTP/1.1 but it is
Fast velocity minify plugin – combines javascript and CSS files into fewer entities which means faster load time
No extra plugins – don’t load up on plugins. some are really bad and will drastically increase page load times.
Lazy load pictures – no need to have pictures load until users get to them
Don’t embed videos – they just take forever to load up, which is a problem for page load speeds
Overall, this is a pretty standard stack. I haven’t done any manual tuning to any of the services/processes serving up my site. Starting with a fast VPS definitely helps get a fast WordPress page load speed. The rest just seemed logical to me. That doesn’t mean there isn’t room for improvement.
What’s next for an even faster WordPress page load speed
I have a development environment mocked up on my Proxmox virtual machine host that mimics almost exactly the production site (i.e. what served you this page). The page load speeds were roughly the same locally vs from NYC so it is a good comparison. I installed Varnish for caching and HAProxy for SSL termination (Varnish doesn’t do SSL/https). My homepage loaded consistently in a quarter of a second. The fastest I saw was 0.219 seconds. Sure Varnish and HAProxy are two more full-blown services to install and manage but is it worth it? I think it is. I’ll be migrating my production stack over to this 3 tier stack soon.
Further, I can add my content to a content delivery network (CDN), like Cloudflare, and have it cached there too for fast access anywhere they have a datacenter (they have like 200 datacenters across the planet). I did use Cloudflare CDN for a bit and didn’t like not seeing my statistics update in real-time so I backed off.
I am realizing this may be a good business opportunity – consistently super fast WordPress sites. Let me know if you’d be interested.
Check back for part 2 where I document the journey to the 3 tier stack.
In my introduction post, I said I would write about topics in order of interest. Securing WordPress blogs from hackers isn’t exactly fun or interesting but it is very necessary in this day and age. Hackers are constantly probing sites on the internet for insecurities. They’re constantly trying to log into WordPress sites with easily guessed passwords (hint: don’t use ‘password’ as your password). Here are some hints on how to secure WordPress blogs from hackers.
If you prefer a video version, check out my first ever YouTube video (!) covering this same content here – https://youtu.be/wKgm_684acM.
When I set this site up, the first 24 hours were pretty quiet. After that, the attacks started ramping up. I decided to take action and lock down access. There are three main things I did to secure this WordPress blog installation and VPS it is hosted on:
Disable password-based SSH authentication for logins
Install and enable Fail2Ban
Install WordPress specific Fail2Ban filters
#1 – Disable password-based SSH authentication
Step 0 – Enable SSH Key Authentication
Before you disable password-based authentication, you need to enable SSH key based authentication. I have posted a SSH key tutorial here – SSH Key Tutorial.
Password-based SSH authentication
SSH stands for secure shell. It is how 99% of Linux/Unix servers on the public internet and private intranets are administered. There are two main methods of logging in with SSH: 1) password and 2) key. Password is pretty straight-forward and is what most people are familiar with. You have a username and password. If you enter the right password for the username, you get in. Hackers are constantly testing common usernames (root, admin, user, guest) with common passwords (password, password1, password123, test, etc.). Further – they aren’t testing just one combination of user/pass at a time, they keep trying passwords until they give up or are banned. I had my VPS for a few weeks before activating austinsnerdythings.com on it and here is a random sample starting a minute after midnight for about six minutes: $sudo head -n 100 /var/log/auth.log.1
Feb 28 00:01:52 austinsnerdythings.com sshd[2265571]: pam_unix(sshd:auth): authentication failure; logname= uid=0 euid=0 tty=ssh ruser= rhost=222.184.14.90 user=root
Feb 28 00:01:54 austinsnerdythings.com sshd[2265571]: Failed password for root from 222.184.14.90 port 45182 ssh2
Feb 28 00:01:54 austinsnerdythings.com sshd[2265571]: Received disconnect from 222.184.14.90 port 45182:11: Bye Bye [preauth]
Feb 28 00:01:54 austinsnerdythings.com sshd[2265571]: Disconnected from authenticating user root 222.184.14.90 port 45182 [preauth]
<snip>
Feb 28 00:04:59 austinsnerdythings.com sshd[2265587]: pam_unix(sshd:auth): authentication failure; logname= uid=0 euid=0 tty=ssh ruser= rhost=139.198.121.63 user=root
Feb 28 00:05:02 austinsnerdythings.com sshd[2265587]: Failed password for root from 139.198.121.63 port 53437 ssh2
Feb 28 00:05:04 austinsnerdythings.com sshd[2265587]: Connection closed by authenticating user root 139.198.121.63 port 53437 [preauth]
Feb 28 00:06:06 austinsnerdythings.com sshd[2265591]: pam_unix(sshd:auth): authentication failure; logname= uid=0 euid=0 tty=ssh ruser= rhost=212.64.38.8 user=root
Feb 28 00:06:07 austinsnerdythings.com sshd[2265591]: Failed password for root from 212.64.38.8 port 37354 ssh2
Feb 28 00:06:08 austinsnerdythings.com sshd[2265591]: Received disconnect from 212.64.38.8 port 37354:11: Bye Bye [preauth]
Feb 28 00:06:08 austinsnerdythings.com sshd[2265591]: Disconnected from authenticating user root 212.64.38.8 port 37354 [preauth]
<snip>
Feb 28 00:06:48 austinsnerdythings.com sshd[2265595]: Received disconnect from 49.88.112.118 port 37056:11: [preauth]
Feb 28 00:06:48 austinsnerdythings.com sshd[2265595]: Disconnected from 49.88.112.118 port 37056 [preauth]
Feb 28 00:06:56 austinsnerdythings.com sshd[2265589]: Connection reset by 49.88.112.118 port 53318 [preauth]
Feb 28 00:08:00 austinsnerdythings.com sshd[2265597]: Received disconnect from 49.88.112.118 port 61081:11: [preauth]
Feb 28 00:08:00 austinsnerdythings.com sshd[2265597]: Disconnected from authenticating user root 49.88.112.118 port 61081 [preauth]
Each login attempt is 3-4 lines, so that’s 10 attempts in 6 minutes. Also notice the repeating IP addresses – 49.88.112.118 tried 4 separate times to log in across 6 minutes!
Hackers try user/pass logins because they’re relatively easy. And they get lucky often enough it is worth it.
Key-based SSH authentication
The other method to logging in with SSH is via public/private key. How this works is you generate a public/private keypair. Then you put the contents of the public key on the server you want to log in to. When logging in, your SSH client says “hello, I am user austin and I have a key to login and here it is”! The public key that’s copied to the remote server looks like this:
As you might imagine, it’s a lot harder to guess that key than it is a password. In fact, cracking a 2048 bit key like the one above would take 300 trillion years with a quantum supercomputer (which doesn’t yet exist)! Source. The universe is 15 billion years old. That means it would require 300 trillion / 15 billion = 20,000 universe lifetimes to crack.
Before you disable password-authentication, you need to be 100% sure that key-based authentication is working or else you will lock yourself out of your server!
To disable password-based authentication, you need to edit /etc/ssh/sshd_config, find PasswordAuthentication and put no after it. If it is commented out (there is a # at the front of the line) delete the #. It will look like this when finished:
disable sshd password authentication
Then you need to restart the SSH daemon (service) for the change to take effect:sudo systemctl restart ssh.service. Now you password-based SSH authentication has been disabled!
My failed authentication attempts dropped dramatically after disabling password-based SSH authentication. Below is the same general timeframe from the morning of when this post was written:
Mar 13 00:00:24 austinsnerdythings.com sshd[108357]: Invalid user ftpuser from 167.99.34.31 port 59060
Mar 13 00:00:24 austinsnerdythings.com sshd[108357]: Received disconnect from 167.99.34.31 port 59060:11: Normal Shutdown, Thank you for playing [preauth]
Mar 13 00:00:24 austinsnerdythings.com sshd[108357]: Disconnected from invalid user ftpuser 167.99.34.31 port 59060 [preauth]
Mar 13 00:03:09 austinsnerdythings.com sshd[108549]: Received disconnect from 24.8.45.4 port 5402:11: disconnected by user
Mar 13 00:03:09 austinsnerdythings.com sshd[108549]: Disconnected from user austin 24.8.45.4 port 5402
Mar 13 00:03:09 austinsnerdythings.com sshd[108438]: pam_unix(sshd:session): session closed for user austin
Mar 13 00:12:33 austinsnerdythings.com sshd[108934]: Invalid user postgres from 167.99.34.31 port 46444
Mar 13 00:12:33 austinsnerdythings.com sshd[108934]: Received disconnect from 167.99.34.31 port 46444:11: Normal Shutdown, Thank you for playing [preauth]
Mar 13 00:12:33 austinsnerdythings.com sshd[108934]: Disconnected from invalid user postgres 167.99.34.31 port 46444 [preauth]
Mar 13 00:12:44 austinsnerdythings.com sshd[108941]: Received disconnect from 222.187.232.213 port 11758:11: [preauth]
Mar 13 00:12:44 austinsnerdythings.com sshd[108941]: Disconnected from authenticating user root 222.187.232.213 port 11758 [preauth]
Mar 13 00:17:40 austinsnerdythings.com sshd[109097]: Received disconnect from 221.131.165.23 port 32827:11: [preauth]
Mar 13 00:17:40 austinsnerdythings.com sshd[109097]: Disconnected from authenticating user root 221.131.165.23 port 32827 [preauth]
Mar 13 00:24:51 austinsnerdythings.com sshd[109322]: Invalid user postgres from 167.99.34.31 port 33830
Mar 13 00:24:52 austinsnerdythings.com sshd[109322]: Received disconnect from 167.99.34.31 port 33830:11: Normal Shutdown, Thank you for playing [preauth]
Mar 13 00:24:52 austinsnerdythings.com sshd[109322]: Disconnected from invalid user postgres 167.99.34.31 port 33830 [preauth]
Most of these are just disconnects. The hackers see that my server is not accepting passwords and they just disconnect – they don’t even try to log in.
#2 – Install Fail2Ban
Fail2Ban is a helpful tool that monitors various logs and if it sees too many failed attempts, it will issue a ban on the offending IP address.
It is simple enough to install. First, update your package cache. On Ubuntu/Debian, this is done with apt:sudo apt update.
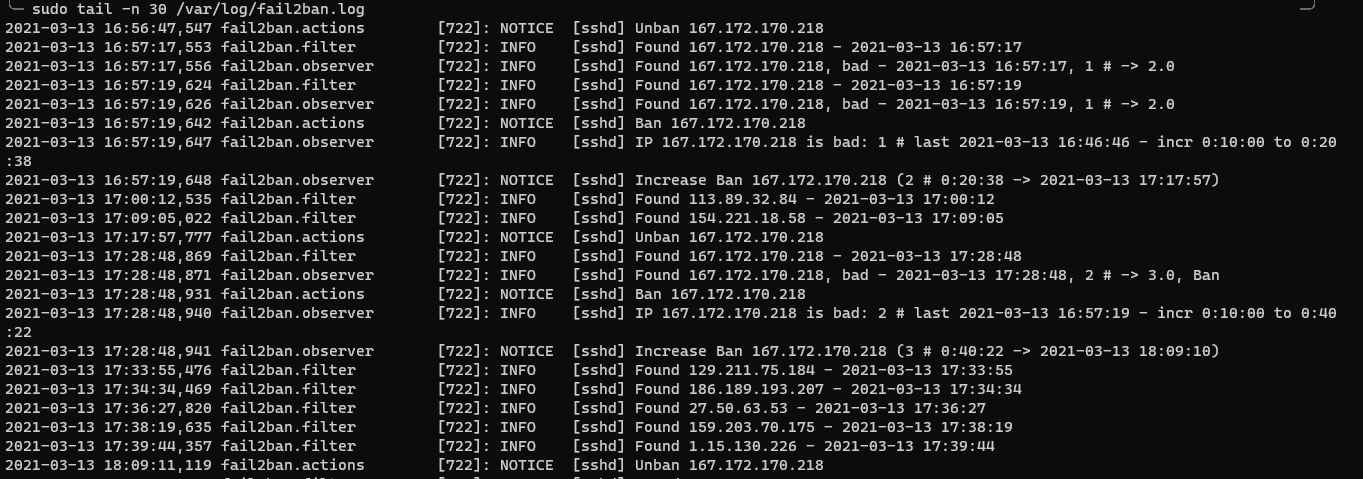
Then install fail2ban:sudo apt install -y fail2ban. This automatically enables Fail2ban so that it starts on boot. It has a bunch of out-of-the-box rules and will handle many services without any additional configuration. This is what my Fail2ban log looks like as of right now. This is all SSH bans. Notice that the duration is increasing for IP 167.172.170.218. The default ban duration is 10 minutes and I have it configured to double (plus some randomness) every extra attempt.
#3 – Add WordPress specific Fail2ban jails and plugin
Attempts to log into WordPress look like normal web traffic in web logs. Failed logins aren’t recorded specifically. We can change that by adding a plugin to WordPress that writes to /var/log/auth.log for a number of activities. Fail2ban monitors /var/log/auth.log for failed logins so it can act appropriately. I am using WP-Fail2Ban-Redux which does exactly what it says and without any nonsense. To finish the install, I copied the files from wp-content/plugins/wp-fail2ban-redux/config/filters and /jail to my fail2ban filter.d/ and jail.d/ folders:
Restart fail2ban so the changes take effect: sudo systemctl restart fail2ban
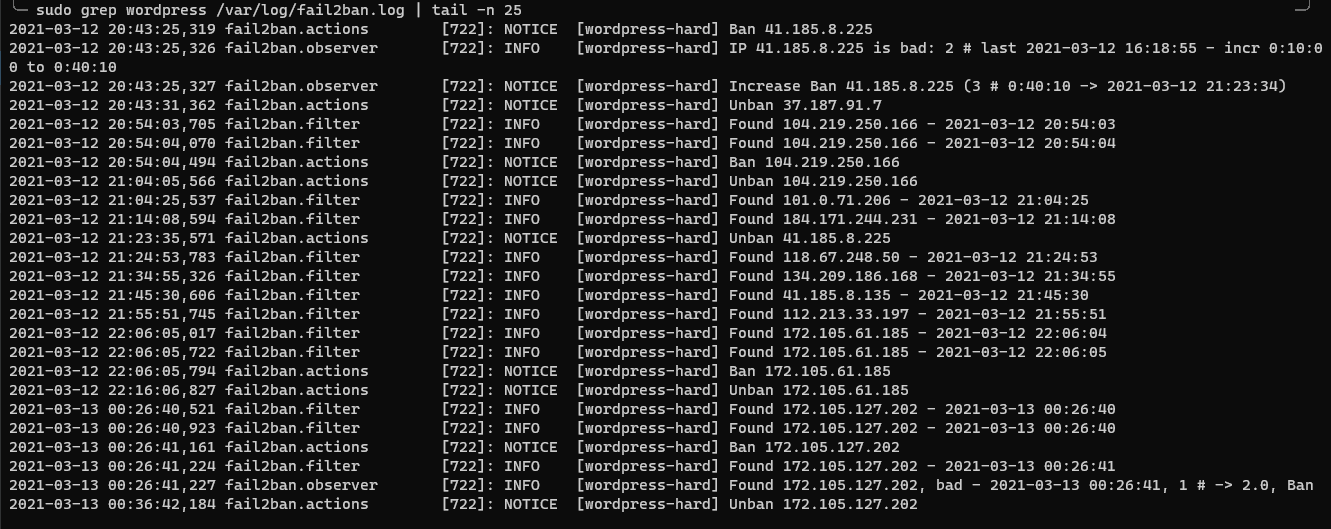
View all the bans in your log! Congrats, you’ve now applied some top notch security practices to your blog.
fail2ban wordpress bans
#4 – ALWAYS KEEP YOUR WORDPRESS INSTALL UPDATED
That is the entirety of #4.
#5 – To disable XMLRPC or not, that is the question
I haven’t disabled XML-RPC yet. XML-RPC is a way to programmatically interact with WordPress blogs. Hackers can use it to rapidly try user/password combinations and other things like that. Installing the WordPress specific Fail2Ban components will effectively ban offenders while still allowing access to the underlying services.
In conclusion
It isn’t too hard to make these three changes to secure your WordPress blog and doing so will increase the security drastically. If you would like assistance doing this on your site, please use the contact form to get in touch with me. Lastly, always keep your WordPress install up to date. Every so often, security researchers find holes in the base WordPress code. Automatic updates will prevent your site from being a target.