Categories
Home Assistant Home Automation Python

Ultra efficient “air conditioner” (fans controlled with Home Assistant and Python) using cold outside air

Just getting this up as a draft now for a Reddit user.

In short, this Python script reads the temperatures of two different sensors (outside from an The Ambient Weather WS-2902C weather station and in our master bedroom with a Govee Bluetooth Thermometer), the temperature set point for a generic thermostat entity, does some logic, and turns a switch on or off, all with the Home Assistant API. The switch control two basic box fans that are set to blow air into our bedroom from outside. It runs every X minutes (currently set to 5). This method works great if nighttime temperatures drop below 70F before bedtime. We like the bedroom temp at 66F, so unless it gets below 70F by around 9PM, it probably won’t cool enough for us to be comfortable enough to fall asleep. My wife wakes up at 5:45am, me at 6:30am, pending what our 22 month old daughter thinks of that schedule, so we typically aim to be asleep by 10pm.

Today, 2022-05-14, was the day I got out the window AC. It will be in place for the rest of the summer.

Requirements:

  • A working Home Assistant installation (mine is Python venv install in a Ubuntu VM)
  • A bearer token authorization code for a/your Home Assistant user
  • A working MQTT installation
  • A switch controllable by Home Assistant
  • 1-2 box fans plugged into said switch controlled by Home Assistant

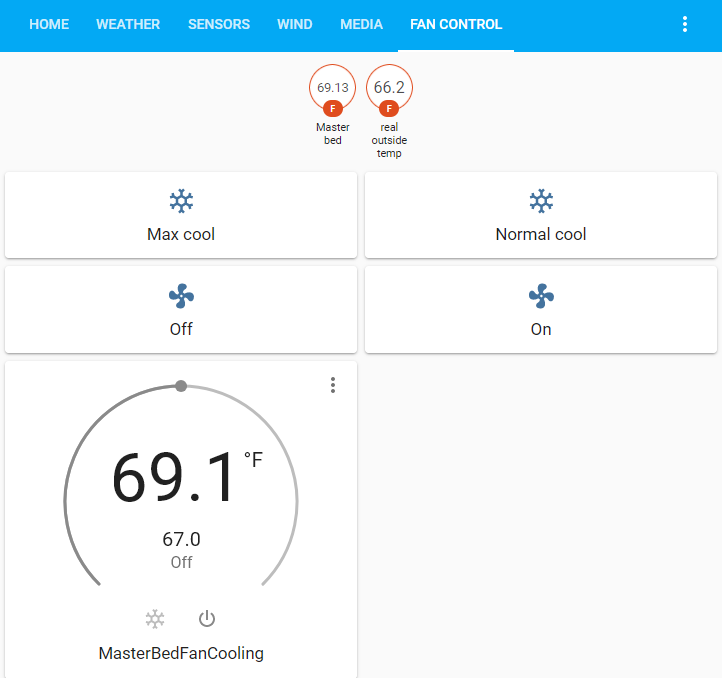
Here is what the Home Assistant control screen looks like. The buttons should be self explanatory. The generic thermostat entity doesn’t need to be on/active for this to work. It uses the set point for control purposes (set to 67.0F in the screenshot).

Home Assistant control screen for ultra efficient air conditioner system

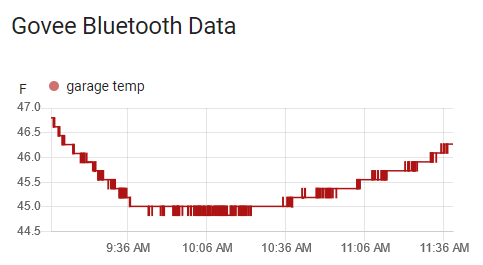
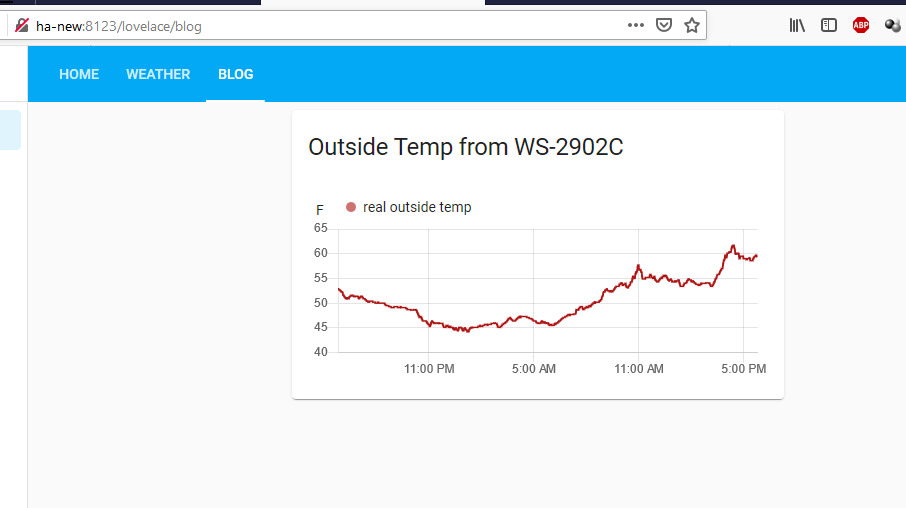
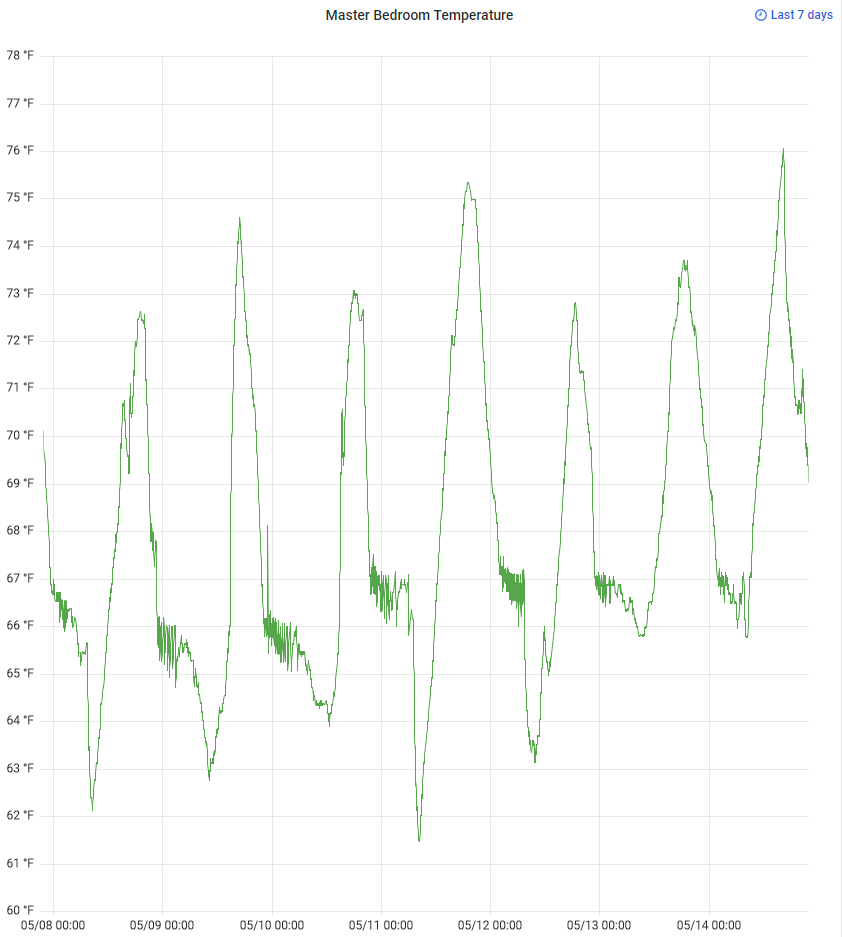
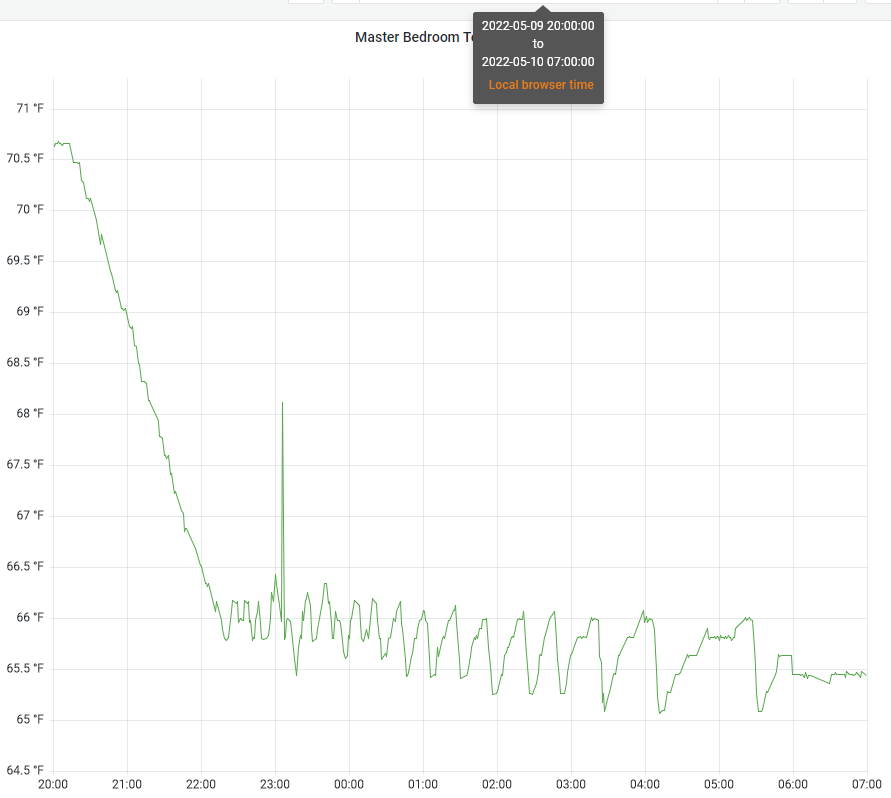
I believe there is currently a logic bug with max cool not respecting the delta_temp variable. Other than that it works perfect. Below is a screenshot of the last 7 days showing the room cooling off nicely to the setpoint of 66F on nights 1-3 and 67F on nights 4-7. Switching a control device on and off every so often is a version of a bang-bang controller. If you look closely, you will notice that each cycle on and off results in a greater temperature drop, which is due to the colder outside air being blown in for the same duration regardless of delta T.

Master bedroom temperature with Home Assistant controlled fans blowing in cold air from outside. Setpoint was 66F for evening of 5/7-5/9 (first 3 nights) and 67F for the rest (next 4 nights).
Zoomed in view of the evening of 5/9 to the morning of 5/10. The temperature drops quickly to the setpoint of 66F and does not go much above. Not sure what the spike is right after 23:00. The outside temp starts at 65F for this same timeframe, dropping to 60 at 21:00 and 55 at 22:00, so a great night to use cold outside air for cooling (thus the “ultra efficient AC”.
import json
import datetime
import time
from dateutil import parser
from requests import get, post
import paho.mqtt.client as mqttClient
import logging

logging.basicConfig(
    format='%(asctime)s - %(name)s - %(levelname)s - %(message)s', level=logging.DEBUG)

loggers_to_set_to_warning = ['urllib3.connectionpool']
for l in loggers_to_set_to_warning:
    logging.getLogger(l).setLevel(logging.WARNING)

delta_temp = 3.0
mqtt_host = "mqtt.example.com"
mqtt_port = 1883

base_url = "http://ha.example.come:8123/"
states_url = base_url + "api/states/"
switch_url = base_url + "api/services/switch"
bearer_token = "ey...Vw"
full_bearer_token = "Bearer " + bearer_token
request_headers = {
    "Authorization": full_bearer_token,
    "content-type": "application/json"
}
endpoints = ["climate.masterbedfancooling",
             "sensor.real_outside_temp"]
fan_switch_entity_id = "switch.fan_switch"
states = {}
climate_topic = "climate/fan_control_state"
current_state = "off"
last_state = None
desired_seconds_to_sleep = 300
max_cool_outdoor_temp_limit = 66
desired_temp = None
outside_temp = None
current_temp = None
next_fan_action_time = datetime.datetime.now()


def set_fan_switch_state(state):
    new_fan_state = None
    if state == "on":
        new_fan_state = "on"
    elif state == "off":
        new_fan_state = "off"
    else:
        logging.warn("requested fan state unknown")
        return

    entity_info = {"entity_id": fan_switch_entity_id}
    full_url = switch_url + "/turn_" + new_fan_state
    response = post(full_url, headers=request_headers,
                    data=json.dumps(entity_info))
    if response.status_code != 200:
        logging.error(
            f"attempted to set fan state to {new_fan_state} but encountered error with status code: {response.status_code}")
    else:
        logging.info(f"successfully set fan state to {new_fan_state}")


def set_state_from_mqtt_message(message):
    global current_state, next_fan_action_time
    if message == "max_cool":
        current_state = "max_cool"
    elif message == "normal_cool":
        current_state = "normal_cool"
    elif message == "off":
        current_state = "off"
    elif message == "on":
        current_state = "on"
    else:
        logging.error(f"unable to determine state, setting to off")
        current_state = "off"
    logging.info(f"current_state set to: {current_state}")
    next_fan_action_time = datetime.datetime.now()


def connect_mqtt():
    # Set Connecting Client ID
    client = mqttClient.Client("python_window_fan_control")
    #client.username_pw_set(username, password)
    client.on_connect = on_connect
    client.connect(mqtt_host, mqtt_port)
    return client


def on_connect(client, userdata, flags, rc):
    if rc == 0:
        logging.info("Connected to MQTT Broker!")
    else:
        logging.info("Failed to connect, return code %d\n", rc)


def on_message(client, userdata, msg):
    logging.info(f"Received `{msg.payload.decode()}` from `{msg.topic}` topic")
    set_state_from_mqtt_message(msg.payload.decode())


def on_subscribe(client, userdata, mid, granted_qos):
    logging.info(f"subscribed to topic")


def set_fan_state(state):
    if state == "on":
        logging.info(f"setting fan state to on")
        set_fan_switch_state("on")
    elif state == "off":
        logging.info(f"setting fan state to off")
        set_fan_switch_state("off")


def get_and_set_temperatures():
    global desired_temp, current_temp, outside_temp
    logging.debug("executing loop")

    for endpoint in endpoints:
        full_url = states_url + endpoint
        response = get(full_url, headers=request_headers)
        parsed_json = json.loads(response.text)
        entity = parsed_json['entity_id']
        hvac_action = ""
        if endpoint == 'climate.masterbedfancooling':
            desired_temp = float(
                parsed_json['attributes']['temperature'])
            current_temp = float(
                parsed_json['attributes']['current_temperature'])
            hvac_action = parsed_json['attributes']['hvac_action']
        elif endpoint == 'sensor.real_outside_temp':
            outside_temp = float(parsed_json['state'])
        last_updated = parser.parse(parsed_json['last_updated'])
    logging.info(
        f"temps: current={current_temp}, desired={desired_temp}, outside={outside_temp}")
    if desired_temp == None or current_temp == None or outside_temp == None:
        logging.error(
            "one or more temps invalid, turning off switch and breaking execution")
        set_fan_state("off")


client = mqttClient.Client("window-fan-client")
client.on_connect = on_connect
client.on_message = on_message
client.on_subscribe = on_subscribe
client.connect(mqtt_host, mqtt_port)
client.subscribe(climate_topic)
client.loop_start()

while(True):
    # logging.info("loop")
    if datetime.datetime.now() > next_fan_action_time:
        logging.info("fan action time")
        if current_state == "off":
            new_fan_state = "off"
            logging.info(
                f"current_state is {current_state}, turning fan {new_fan_state}")
            set_fan_state("off")
        else:
            get_and_set_temperatures()

        if current_state == "max_cool":
            logging.info(
                f"current_state is {current_state}, call for max cooling")
            if outside_temp < max_cool_outdoor_temp_limit:
                logging.info(
                    f"able to max_cool with outside temp: {outside_temp}, lower than {max_cool_outdoor_temp_limit} ")
                set_fan_state("on")
            elif outside_temp < (current_temp - delta_temp):
                logging.info(
                    f"unable to max cool, but still can cool with outside: {outside_temp} and inside: {current_temp}")
                set_fan_state("on")
            else:
                logging.info("unable to cool at all, turning fan off")
                set_fan_state("off")
        elif current_state == "normal_cool":
            logging.info(
                f"current_state is {current_state}")
            if (current_temp > desired_temp):
                logging.info(
                    f"call for cooling. current: {current_temp}, desired: {desired_temp}")
                if (current_temp > (outside_temp - delta_temp)):
                    logging.info("can cool, turning fan on")
                    set_fan_state("on")
                else:
                    logging.info("can't cool, turning fan off")
                    set_fan_state("off")
            else:
                logging.info("no need for cooling, turning fans off")
                set_fan_state("off")
        elif current_state == "on":
            new_fan_state = "on"
            logging.info(
                f"current_state is {current_state}, turning fan {new_fan_state}")
            set_fan_state("on")

        last_state = current_state
        next_fan_action_time = datetime.datetime.now() \
            + datetime.timedelta(seconds=desired_seconds_to_sleep)
        logging.info(f"next fan action in {desired_seconds_to_sleep} seconds")
        logging.info("---------loop end-------------------")
    else:
        #logging.debug("not fan action time yet, sleeping 1s")
        time.sleep(0.25)
    # actual_seconds_to_sleep = desired_seconds_to_sleep - datetime.datetime.now().minute % desired_seconds_to_sleep
    # seconds_to_sleep = actual_minutes_to_sleep * 60.0
    # logging.info(f"sleeping {desired_seconds_to_sleep}s")
    # time.sleep(desired_seconds_to_sleep)
Categories
Home Assistant Home Automation

Using the Govee Bluetooth Thermometer with Home Assistant (Python and MQTT)

Introduction

Like many other Home Automation enthusiasts, I have been on the lookout for a cheap thermometer/hygrometer that has either WiFi or Bluetooth connectivity. I think I found the answer in the $12 USD Govee Bluetooth Digital Thermometer and Hygrometer. The fact that the device broadcasts the current temperature and humidity every 2 seconds via low energy Bluetooth (BLE) is the metaphorical icing on the cake. Here is a pic of the unit in our garage:

Govee bluetooth thermometer and hygrometer showing 56*F/24% in a garage

Specifications

This is a pretty basic device. It has a screen that shows the current temperature, humidity, and min/max values. It sends the current readings (along with battery health) every 2 seconds via low-energy bluetooth (BLE). The description on Amazon says it has a “Swiss-made smart hygrometer sensor”. Dunno if I believe that but for $12 it is good enough. The temperature is accurate to +/- 0.54F and humidity is +/- 3% RH. If you use the app, it is apparently possible to read the last 20 days or 2 years of data from the device (I haven’t used the app at all).

Enough with the boring stuff. Let’s get it connected to Home Assistant.

Reading the Govee bluetooth advertisements with Python

I found some sample code on tchen’s GitHub page (link) to help get me going in the right direction.

Without further ado, here is the code I’m using to read the data and publish via MQTT:

observe.py (updated 2022-01-04 with some logging improvements. default logging level is now WARNING, which disables printing every advertisement)

# basic govee bluetooth data reading code for model https://amzn.to/3z14BIi
# written/modified by Austin of austinsnerdythings.com 2021-12-27
# original source: https://gist.github.com/tchen/65d6b29a20dd1ef01b210538143c0bf4
import logging
import json
from time import sleep
from basic_mqtt import basic_mqtt
from bleson import get_provider, Observer

logging.basicConfig(
	format='%(asctime)s.%(msecs)03d - %(name)s - %(levelname)s - %(message)s',
	datefmt='%Y-%m-%d %H:%M:%S',
	level=logging.WARNING)

# I did write all the mqtt stuff. I kept it in a separate class
mqtt = basic_mqtt()
mqtt.connect()

# writing code on my windows computer, committing, pushing, and then 
# pulling the new code on the Raspberry Pi is a tedious "debug" process.
# there are quite a few errors that spit out from bleson, which as far
# as I can tell, isn't super polished. if we set the debug level to
# critical, most of those disappear.
logging.getLogger("bleson").setLevel(logging.CRITICAL)

# basic celsius to fahrenheit function
def c2f(val):
    return round(32 + 9*val/5, 2)

last = {}

# I didn't write this, but it takes the raw BT data and spits out the data of interest
def temp_hum(values, battery, address):
    global last
    #########################
    #
    # there is a fix for temperatures below freezing here - 
    # https://github.com/joshgordon/govee_ble_to_mqtt/blob/master/observe.py
    # I will adjust post code afternoon of 2022-11-28
    #
    #########################
    values = int.from_bytes(values, 'big')
    if address not in last or last[address] != values:
        last[address] = values
        temp = float(values / 10000)
        hum = float((values % 1000) / 10)
        # this print looks like this:
        # 2021-12-27T11:22:17.040469 BDAddress('A4:C1:38:9F:1B:A9') Temp: 45.91 F  Humidity: 25.8 %  Battery: 100 %
        logging.info(f"decoded values: {address} Temp: {c2f(temp)} F  Humidity: {hum} %  Battery: {battery}")
        # this code originally just printed the data, but we need it to publish to mqtt.
        # added the return values to be used elsewhere
        return c2f(temp), hum, battery

def on_advertisement(advertisement):
    #print(advertisement)
    mfg_data = advertisement.mfg_data

    # there are lots of BLE advertisements flying around. only look at ones that have mfg_data
    if mfg_data is not None:
        #print(advertisement)
        # there are a few Govee models and the data is in different positions depending on which
        # the unit of interest isn't either of these hardcoded values, so they are skipped
        if advertisement.name == 'GVH5177_9835':
            address = advertisement.address
            temp_hum(mfg_data[4:7], mfg_data[7], address)
        elif advertisement.name == 'GVH5075_391D':
            address = advertisement.address
            temp_hum(mfg_data[3:6], mfg_data[6], address)
        elif advertisement.name != None:
            # this is where all of the advertisements for our unit of interest will be processed
            address = advertisement.address
            if 'GVH' in advertisement.name:
                #print(advertisement)
                temp_f, hum, battery = temp_hum(mfg_data[3:6], mfg_data[6], address)

                if temp_f > 180.0 or temp_f < -30.0:
                    return
                # as far as I can tell bleson doesn't have a string representation of the MAC address
                # address is of type BDAddress(). str(address) is BDAddress('A4:C1:38:9F:1B:A9')
                # substring 11:-2 is just the MAC address
                mac_addr = str(address)[11:-2]

                # construct dict with relevant info
                msg = {'temp_f':temp_f,
                        'hum':hum,
                        'batt':battery}
                
                # looks like this:
                # msg data: {'temp_f': 45.73, 'hum': 25.5, 'batt': 100}
                logging.info(f"MQTT msg data: {msg}")

                # turn into JSON for publishing
                json_string = json.dumps(msg, indent=4)

                # publish to topic separated by MAC address
                mqtt.publish(f"govee/{mac_addr}", json_string)

# base stuff from the original gist
logging.warning(f"initializing bluetooth")
adapter = get_provider().get_adapter()
observer = Observer(adapter)
observer.on_advertising_data = on_advertisement

logging.warning(f"starting observer")
observer.start()
logging.warning(f"listening for events and publishing to MQTT")
while True:
    # unsure about this loop and how much of a delay works
    sleep(1)
observer.stop()

And for the MQTT helper class (mqtt_helper.py):

# basic MQTT helper class. really needed to write one of these to simplify basic MQTT operations
# written/modified by Austin of austinsnerdythings.com 2021-12-27
# original source: https://gist.github.com/fisherds/f302b253cf7a11c2a0d814acd424b9bb
# filename is basic_mqtt.py
from paho.mqtt import client as mqtt_client
import logging
import datetime
logging.basicConfig(
	format='%(asctime)s.%(msecs)03d - %(name)s - %(levelname)s - %(message)s',
	datefmt='%Y-%m-%d %H:%M:%S',
	level=logging.INFO)


mqtt_host = "mqtt.home.fluffnet.net"
test_topic = "mqtt_test_topic"

# this is really not polished. it was a stream of consciousness project to pound
# something out to do basic MQTT publish stuff in a reusable fashion.
class basic_mqtt:
	def __init__(self):
		self.client = mqtt_client.Client()
		self.subscription_topic_name = None
		self.publish_topic_name = None
		self.callback = None
		self.host = mqtt_host
	
	def connect(self):
		self.client.on_connect = self.on_connect
		self.client.on_subscribe = self.on_subscribe
		self.client.on_message = self.on_message
		logging.info(f"connecting to MQTT broker at {mqtt_host}")
		self.client.connect(host=mqtt_host,keepalive=30)
		self.client.loop_start()

	def on_connect(self, client, userdata, flags, rc):
		print("Connected with result code "+str(rc))

		# Subscribing in on_connect() means that if we lose the connection and
		# reconnect then subscriptions will be renewed.
		#self.client.subscribe("$SYS/#")

	def on_message(self, client, userdata, msg):
		print(f"got message of topic {msg.topic} with payload {msg.payload}")

	def on_subscribe(self, client, userdata, mid, granted_qos):
		print("Subscribed: " + str(mid) + " " + str(granted_qos))

	def publish(self, topic, msg):
		self.client.publish(topic=topic, payload=msg)

	def subscribe_to_test_topic(self, topic=test_topic):
		self.client.subscribe(topic)

	def send_test_message(self, topic=test_topic):

		self.publish(topic=topic, msg=f"test message from python script at {datetime.datetime.now()}")

	def disconnect(self):
		self.client.disconnect()

	def loop(self):
		self.client.loop_forever()

if __name__ == "__main__":
	logging.info("running MQTT test")
	mqtt_helper = basic_mqtt()
	mqtt_helper.connect()
	mqtt_helper.subscribe_to_test_topic()
	mqtt_helper.send_test_message()
	mqtt_helper.disconnect()

Results

Running this script on a Raspberry Pi 3 shows the advertisements coming in as expected. The updates are very quick compared to the usual 16 second update interval for my Acurite stuff.

screenshot of Python code running to receive BLE advertisements from Govee Bluetooth Thermometer

And running mosquitto_sub with the right arguments (mosquitto_sub -h mqtt -v -t “govee/#”) shows the MQTT messages are being published as expected:

mosquitto_sub showing our published MQTT messages with temperature/humidity data from the Govee sensor

Getting Govee MQTT data into Home Assistant

Lastly, we need to add a MQTT sensor to get the data importing into Home Assistant:

- platform: mqtt
  state_topic: "govee/A4:C1:38:9F:1B:A9"
  value_template: "{{ value_json.temp_f }}"
  name: "garage temp"
  unit_of_measurement: "F"

And from there you can do whatever you want with the collected data!

Home Assistant displaying data from Govee Bluetooth temperature and humidity sensor

Conclusion

This was a relatively quick post and code development. I really hate the cycle of developing on my Bluetooth-less Windows computer, committing the code, pushing to Git, pulling on the Pi, and running to “debug”. Thus, the code isn’t as good as it can be. I probably did 20-25 iterations before calling it good enough.

Regardless, I think this $12 Govee Bluetooth Thermometer and Hygrometer is a great little tool for collecting data around the house. You don’t need an SDR to get Acurite beacons, and you don’t need to spend a lot either. You just need a way to receive BLE advertisements (basically any Bluetooth-capable device can do this). There is even a 2 pack of just the sensors that I just discovered on Amazon for $24 – 2 pack of Govee bluetooth thermometer and hygrometer. I know there are other Bluetooth devices but they’re quite a bit more expensive.

Disclosure: Some of the links on this post are Amazon affiliate links. This means that, at zero cost to you, I will earn an affiliate commission if you click through the link and finalize a purchase.

Also, at least for me, these are available with same day shipping on Amazon. Scratch that instant gratification itch.

Same day shipping available on Amazon near Denver for the Govee sensors
Categories
Home Assistant Weather

Viewing Ambient Weather WS-2902C data in Home Assistant

Background

If you are coming from the Handling data from Ambient Weather WS-2902C API to MQTT post, you are ready to proceed! If not, you’ll need to follow the steps in that post to get your Ambient Weather WS-2902C data into MQTT.

In short, we set up a Python script that listens on port 80 for data coming from the Ambient Weather base station. It then takes the data and publishes it to various MQTT topics. We can subscribe to those topics to receive new data as soon as it arrives.

Available Data

I’ll re-post the list of available data/topics from my last post:

TopicValueComment
weather/ws-2902c/PASSKEYaa:bb:cc:dd:ee:ffMAC address
weather/ws-2902c/dateutc5/15/2021date
weather/ws-2902c/tempinf70.7temp at the base station
weather/ws-2902c/humidityin36humidity at the base station
weather/ws-2902c/baromrelin29.675adjusted barometric pressure (in Hg)
weather/ws-2902c/baromabsin24.531absolute barometric pressure (in Hg)
weather/ws-2902c/tempf66.2temp at the weather station
weather/ws-2902c/battout1battery status at the weather station?
weather/ws-2902c/humidity26humidity at the weather station
weather/ws-2902c/winddir207wind direction in degrees azimuth
weather/ws-2902c/windspeedmph0.2wind speed
weather/ws-2902c/windgustmph1.1wind gust (shows peaks between updates)
weather/ws-2902c/maxdailygust3.4max daily wind gust
weather/ws-2902c/hourlyrainin0hourly rain fall
weather/ws-2902c/eventrainin0event rain fall (resets after 24 hours of no rain)
weather/ws-2902c/dailyrainin0daily rain fall
weather/ws-2902c/weeklyrainin0weekly rain fall
weather/ws-2902c/monthlyrainin0monthly rain fall
weather/ws-2902c/totalrainin0total rain fall since power on?
weather/ws-2902c/solarradiation697.92solar radiation in watts per square meter
weather/ws-2902c/uv6UV intensity index
weather/ws-2902c/batt_co21?
table showing available data topics from our Ambient Weather WS-2902C weather station

This is a lot of data. How much/little you want to use is up to you! I believe I added every topic to my Home Assistant so they’d would be available if I ever wanted to use them.

Adding the MQTT topics to Home Assistant

If you don’t have the MQTT line in your base configuration, make sure you add it. I also am using secrets here so it goes and grabs the broker IP address from my secrets file.

For my configuration.yaml file, showing the relevant lines (MQTT sensors and the sensor file)

homeassistant@ha-new:~/.homeassistant$ cat configuration.yaml

mqtt:
  broker: !secret mqtt_broker

sensor: !include sensor.yaml

For the secrets.yaml file:

homeassistant@ha-new:~/.homeassistant$ cat secrets.yaml
mqtt_broker: mqtt.home.fluffnet.net

The way the secrets file works means it looks like this in configuration.yaml:

mqtt:
  broker: mqtt.home.fluffnet.net

If you haven’t worked with .yaml in Home Assistant before, it is very picky about spacing. Ensure the spacing is correct (usually 2 spaces per indentation).

With the MQTT line added, we can turn to the sensors file (sensors.yaml). This is where the magic happens! I’ve only added a subset of the topics:

homeassistant@ha-new:~/.homeassistant$ cat sensor.yaml
[snip non-ambient weather sensors]
- platform: mqtt
  state_topic: "weather/ws-2902c/tempinf"
  name: "real kitchen temp"
  unit_of_measurement: "F"
- platform: mqtt
  state_topic: "weather/ws-2902c/tempf"
  name: "real outside temp"
  unit_of_measurement: "F"
- platform: mqtt
  state_topic: "weather/ws-2902c/humidityin"
  name: "real kitchen hum"
  unit_of_measurement: "%"
- platform: mqtt
  state_topic: "weather/ws-2902c/humidity"
  name: "real outside hum"
  unit_of_measurement: "%"
- platform: mqtt
  state_topic: "weather/ws-2902c/solarradiation"
  name: "solar radiation"
  unit_of_measurement: "W/m2"
- platform: mqtt
  state_topic: "weather/ws-2902c/dailyrainin"
  name: "daily rain"
  unit_of_measurement: "in"
- platform: mqtt
  state_topic: "weather/ws-2902c/windspeedmph"
  name: "wind speed"
  unit_of_measurement: "mph"
- platform: mqtt
  state_topic: "weather/ws-2902c/windgustmph"
  name: "wind gust"
  unit_of_measurement: "mph"

Restarting Home Assistant

With those lines added to the sensor.yaml file, restart Home Assistant. I love Home Assistant but needing to restart it for basically any configuration change is a huge pain.

sudo systemctl restart [email protected]

Adding the new Ambient Weather WS-2902C sensors to your Home Assistant screens

With the new sensors activated, you can add them to any of your Home Assistant pages!

First click the edit button then Add Card:

home assistant screenshot to add card

Next up we need to select what kind of card we want to add. For most of these, they’re time series, so History Graph will be the best choice. I do not know why Home Assistant is recommending the sun position in this screenshot.

select History Graph

Now that the History Graph is selected, we can pick any of the new sensors we added in the entity drop down. In this screenshot we see most of what I added. The others are sorted elsewhere (there are 100+ entities available in my entities drop down).

New sensors available to add so we can view data from the WS-2902C
60 means it will refresh every minute (60 seconds)

With sensor.real_outside_temp selected, I added 60 for the refresh interval, which means the graph will refresh itself every 60 seconds.

Now the graph is added to the page! You can repeat with all the other sensors you want to view. In the below screenshot, we have successfully added the outside temperature from the Ambient Weather WS-2902C to Home Assistant.

My full weather tab

I’ve added a number of sensors from my Ambient Weather WS-2902C to my Home Assistant. Below you can see I have solar radiation, daily rain, real outside humidity, real outside temp (I have another sensor labeled “outdoor temp” that is a floating sensor that is no longer outdoors), and the wind data. I also have the badges up top with just the current numeric value. You can add more or less, it’s totally up to you!

Conclusion

With this series, we have connected the Ambient Weather WS-2902C to our own Linux container to read the data, publish it to MQTT, and then view it in Home Assistant. I hope you’ve found this helpful!

Categories
Home Assistant Weather

Handling data from Ambient Weather WS-2902C API to MQTT

Handling data from Ambient Weather WS-2902C API to MQTT

As I mentioned in my initial Ambient Weather WS-2902C post, there is a new feature that allows sending data to a custom server. I coded up a python script to take the sent data, and publish it to MQTT. This allows for super easy data ingestion with Home Assistant and other similar solutions. I should probably publish on GitHub but I’ll post here first.

Installation

This script is reliant on Paho-MQTT. EDIT: during the creation of the service to run this at boot, I discovered version 1.5.1 will throw errors. Use version 1.5.0. Install it with pip:

sudo pip install paho-mqtt==1.5.0

Create a python file and name it main.py. Paste in the following:

# Python script to decode Ambient Weather data (from WS-2902C and similar)
# and publish to MQTT.
# original author: Austin of austinsnerdythings.com
# publish date: 2021-03-20

# some resources I used include
#https://askubuntu.com/questions/29152/how-do-i-use-python-with-apache2
#https://www.toptal.com/python/pythons-wsgi-server-application-interface
#https://www.emqx.io/blog/how-to-use-mqtt-in-python

from urllib.parse import urlparse, parse_qs
import paho.mqtt.client as mqtt
import time, os

# set MQTT vars
MQTT_BROKER_HOST  = os.getenv('MQTT_BROKER_HOST',"mqtt")
MQTT_BROKER_PORT  = int(os.getenv('MQTT_BROKER_PORT',1883))
MQTT_CLIENT_ID    = os.getenv('MQTT_CLIENT_ID',"ambient_weather_decode")
MQTT_USERNAME     = os.getenv('MQTT_USERNAME',"")
MQTT_PASSWORD     = os.getenv('MQTT_PASSWORD',"")

# looking to get resultant topic like weather/ws-2902c/[item]
MQTT_TOPIC_PREFIX = os.getenv('MQTT_TOPIC_PREFIX',"weather")
MQTT_TOPIC 		  = MQTT_TOPIC_PREFIX + "/ws-2902c"

# mostly copied + pasted from https://www.emqx.io/blog/how-to-use-mqtt-in-python and some of my own MQTT scripts
def on_connect(client, userdata, flags, rc):
    if rc == 0:
        print(f"connected to MQTT broker at {MQTT_BROKER_HOST}")
    else:
        print("Failed to connect, return code %d\n", rc)

def on_disconnect(client, userdata, flags, rc):
    print("disconnected from MQTT broker")

# set up mqtt client
client = mqtt.Client(client_id=MQTT_CLIENT_ID)
if MQTT_USERNAME and MQTT_PASSWORD:
    client.username_pw_set(MQTT_USERNAME,MQTT_PASSWORD)
    print("Username and password set.")
client.will_set(MQTT_TOPIC_PREFIX+"/status", payload="Offline", qos=1, retain=True) # set LWT     
client.on_connect = on_connect # on connect callback
client.on_disconnect = on_disconnect # on disconnect callback

# connect to broker
client.connect(MQTT_BROKER_HOST, port=MQTT_BROKER_PORT)
client.loop_start()

def publish(client, topic, msg):
    result = client.publish(topic, msg)
    # result: [0, 1]
    status = result[0]

    # uncomment for debug. don't need all the success messages.
    if status == 0:
        #print(f"Sent {msg} to topic {topic}")
        pass
    else:
        print(f"Failed to send message to topic {topic}")


def application(environ, start_response):
    # construct a full URL from the request. HTTP_HOST is FQDN, PATH_INFO is everything after
    # the FQDN (i.e. /data/stationtype=AMBWeatherV4.2.9&&tempinf=71.1&humidityin=35)
    url = "http://" + environ["HTTP_HOST"] + environ["PATH_INFO"]

    # unsure why I need to parse twice. probably just need to do it once with variable url.
    parsed = urlparse(url)
    result = parse_qs(parsed.geturl())

    # send to our other function to deal with the results.
    # result is a dict 
    handle_results(result)

    # we need to return a response. HTTP code 200 means everything is OK. other HTTP codes include 404 not found and such.
    start_response('200 OK', [('Content-Type', 'text/plain')])

    # the response doesn't actually need to contain anything
    response_body = ''

    # return the encoded bytes of the response_body. 
    # for python 2 (don't use python 2), the results don't need to be encoded
    return [response_body.encode()]


def handle_results(result):
    """ result is a dict. full list of variables include:
    stationtype: ['AMBWeatherV4.2.9'], PASSKEY: ['<station_mac_address>'], dateutc: ['2021-03-20 17:12:27'], tempinf: ['71.1'], humidityin: ['36'], baromrelin: ['29.693'],	baromabsin: ['24.549'],	tempf: ['58.8'], battout: ['1'], humidity: ['32'], winddir: ['215'],windspeedmph: ['0.0'],	windgustmph: ['0.0'], maxdailygust: ['3.4'], hourlyrainin: ['0.000'],	eventrainin: ['0.000'],	dailyrainin: ['0.000'],
    weeklyrainin: ['0.000'], monthlyrainin: ['0.000'], totalrainin: ['0.000'],	solarradiation: ['121.36'],
    uv: ['1'],batt_co2: ['1'] """

    # we're just going to publish everything. less coding.
    for key in result:
        # skip first item, which is basically a URL and MQTT doesn't like it. probably resulting from my bad url parsing.
        if 'http://' in key:
            continue

        #print(f"{key}: {result[key]}")
        # resultant topic is weather/ws-2902c/solarradiation
        specific_topic = MQTT_TOPIC + f"/{key}"

        # replace [' and '] with nothing. these come from the url parse
        msg = str(result[key]).replace("""['""", '').replace("""']""", '')
        #print(f"attempting to publish to {specific_topic} with message {msg}")
        publish(client, specific_topic, msg)

# this little guy runs a web server if this python file is called directly. if it isn't called directly, it won't run.
# Apache/Python WSGI will run the function 'application()' directly
# in theory, you don't need apache or any webserver. just run it right out of python. would need
# to improve error handling to ensure it run without interruption.
if __name__ == '__main__':
    from wsgiref.simple_server import make_server

    # probably shouldn't run on port 80 but that's what I specified in the ambient weather console
    httpd = make_server('', 80, application)
    print("Serving on http://localhost:80")

    httpd.serve_forever()

Execute with python3:

python3 main.py

Watch the results populate in the console window:

PS C:\Users\Austin\source\repos\ambient-weather-decode> python3 c:\Users\Austin\source\repos\ambient-weather-decode\main.py
connected to MQTT broker at mqtt
Serving on http://localhost:80
Sent E0:98:06:A3:42:65 to topic weather/ws-2902c/PASSKEY
Sent 2021-03-20 17:57:31 to topic weather/ws-2902c/dateutc
Sent 70.7 to topic weather/ws-2902c/tempinf
Sent 36 to topic weather/ws-2902c/humidityin
Sent 29.675 to topic weather/ws-2902c/baromrelin
Sent 24.531 to topic weather/ws-2902c/baromabsin
Sent 66.2 to topic weather/ws-2902c/tempf
Sent 1 to topic weather/ws-2902c/battout
Sent 26 to topic weather/ws-2902c/humidity
Sent 207 to topic weather/ws-2902c/winddir
Sent 0.2 to topic weather/ws-2902c/windspeedmph
Sent 1.1 to topic weather/ws-2902c/windgustmph
Sent 3.4 to topic weather/ws-2902c/maxdailygust
Sent 0.000 to topic weather/ws-2902c/hourlyrainin
Sent 0.000 to topic weather/ws-2902c/eventrainin
Sent 0.000 to topic weather/ws-2902c/dailyrainin
Sent 0.000 to topic weather/ws-2902c/weeklyrainin
Sent 0.000 to topic weather/ws-2902c/monthlyrainin
Sent 0.000 to topic weather/ws-2902c/totalrainin
Sent 697.92 to topic weather/ws-2902c/solarradiation
Sent 6 to topic weather/ws-2902c/uv
Sent 1 to topic weather/ws-2902c/batt_co2

Verification

Verify in MQTT by subscribing to topic ‘weather/#’. The # is a wildcard and will include all subtopics:

homeassistant ws-2902c mqtt messages

Conclusion

I am stoked the Ambient Weather WS-2902C makes it so easy to work the the data.

My next post will show how to turn this Python script into a persistent Linux service – Python service to consume Ambient Weather API data.

A further post will demonstrate incorporating these MQTT messages into Home Assistant sensors.

Categories
Home Assistant Home Automation

Home Automation 101

[this post is a work in progress – baby woke up!]

Let me start this post with a screenshot of my Home Assistant home page:

Home Assistant homepage
Austin’s Home Assistant Home Page

Home Automation sounds scary but isn’t

You can start as small as you want. The screenshot above (Home Assistant) home page shows where we’ve landed after a few hours of configuration and a couple weeks of fine tuning. We have switches for lights, heaters, and humidifiers. We have sliders to set the humidity and temperature for our six month old daughter’s nursery. And we also have some graphs showing temperature and humidity for a few spots around the house.

We also have a few simple automations:

  1. Turn on lights 50 minutes before sunset
  2. Turn everything off if everyone leaves the house (device tracking is all local and done by our WiFi controller)
  3. Turn on fan to draw in cool outside air when the temperature is cool enough outside
  4. Thermostat control that regulates temperature in our daughter’s nursery
  5. “Thermostat” control that regulates humidity in our daughter’s nursery

The rest is just extra data (I like data).

Breaking it down

How we got started with Home Automation

We started with a basic Philips Hue kit with two light bulbs and a bridge (base station you plug into your router). Philips Hue is set up with a easy-to-use app on smartphones. The app is pretty simple and allows for creation of “scenes” where you preset lights to how you want them and you can activate them whenever. At the time (early 2016ish?) the app also featured scheduled scene activation, but we found it wasn’t very reliable. Thus I began a quest for a better way to control the lights.

Enter Home Assistant. Home Assistant is an open-source application that is commonly installed on Raspberry Pi which integrates all the smart home things. It has exploded in popularity over the last couple years. From the website, Home Assistant is “[an] open source home automation that puts local control and privacy first. Powered by a worldwide community of tinkerers and DIY enthusiasts. Perfect to run on a Raspberry Pi or a local server.”

The local control and privacy aspect speaks to me. You will see in other posts that if there two ways of doing something with one being “connect it to the cloud” and easy vs “do it all locally” and hard, I will always pick the local, hard way to do it.

Anyways, I installed Home Assistant on a Raspberry Pi (similar to Piaware, they make it super easy – flash the install to a SD card and boot. bam, done.), clicked add on the Philips Hue integration, pressed the button on the Hue Bridge, and there were my bulbs in Home Assistant! I now had a method to control them via code or schedules or whatever that wasn’t linked to an app. I was hooked.

Adding other smart home devices to Home Assistant

[baby woke up again! to be continued]