Yesterday I moved the antenna up a couple feet from a “very temporary” position to a “less temporary” position. I still need to get it up on the roof. Either way, my reception and max range have increased by at least 20%. It is still in my garage, which is a terrible location, but at least is elevated.
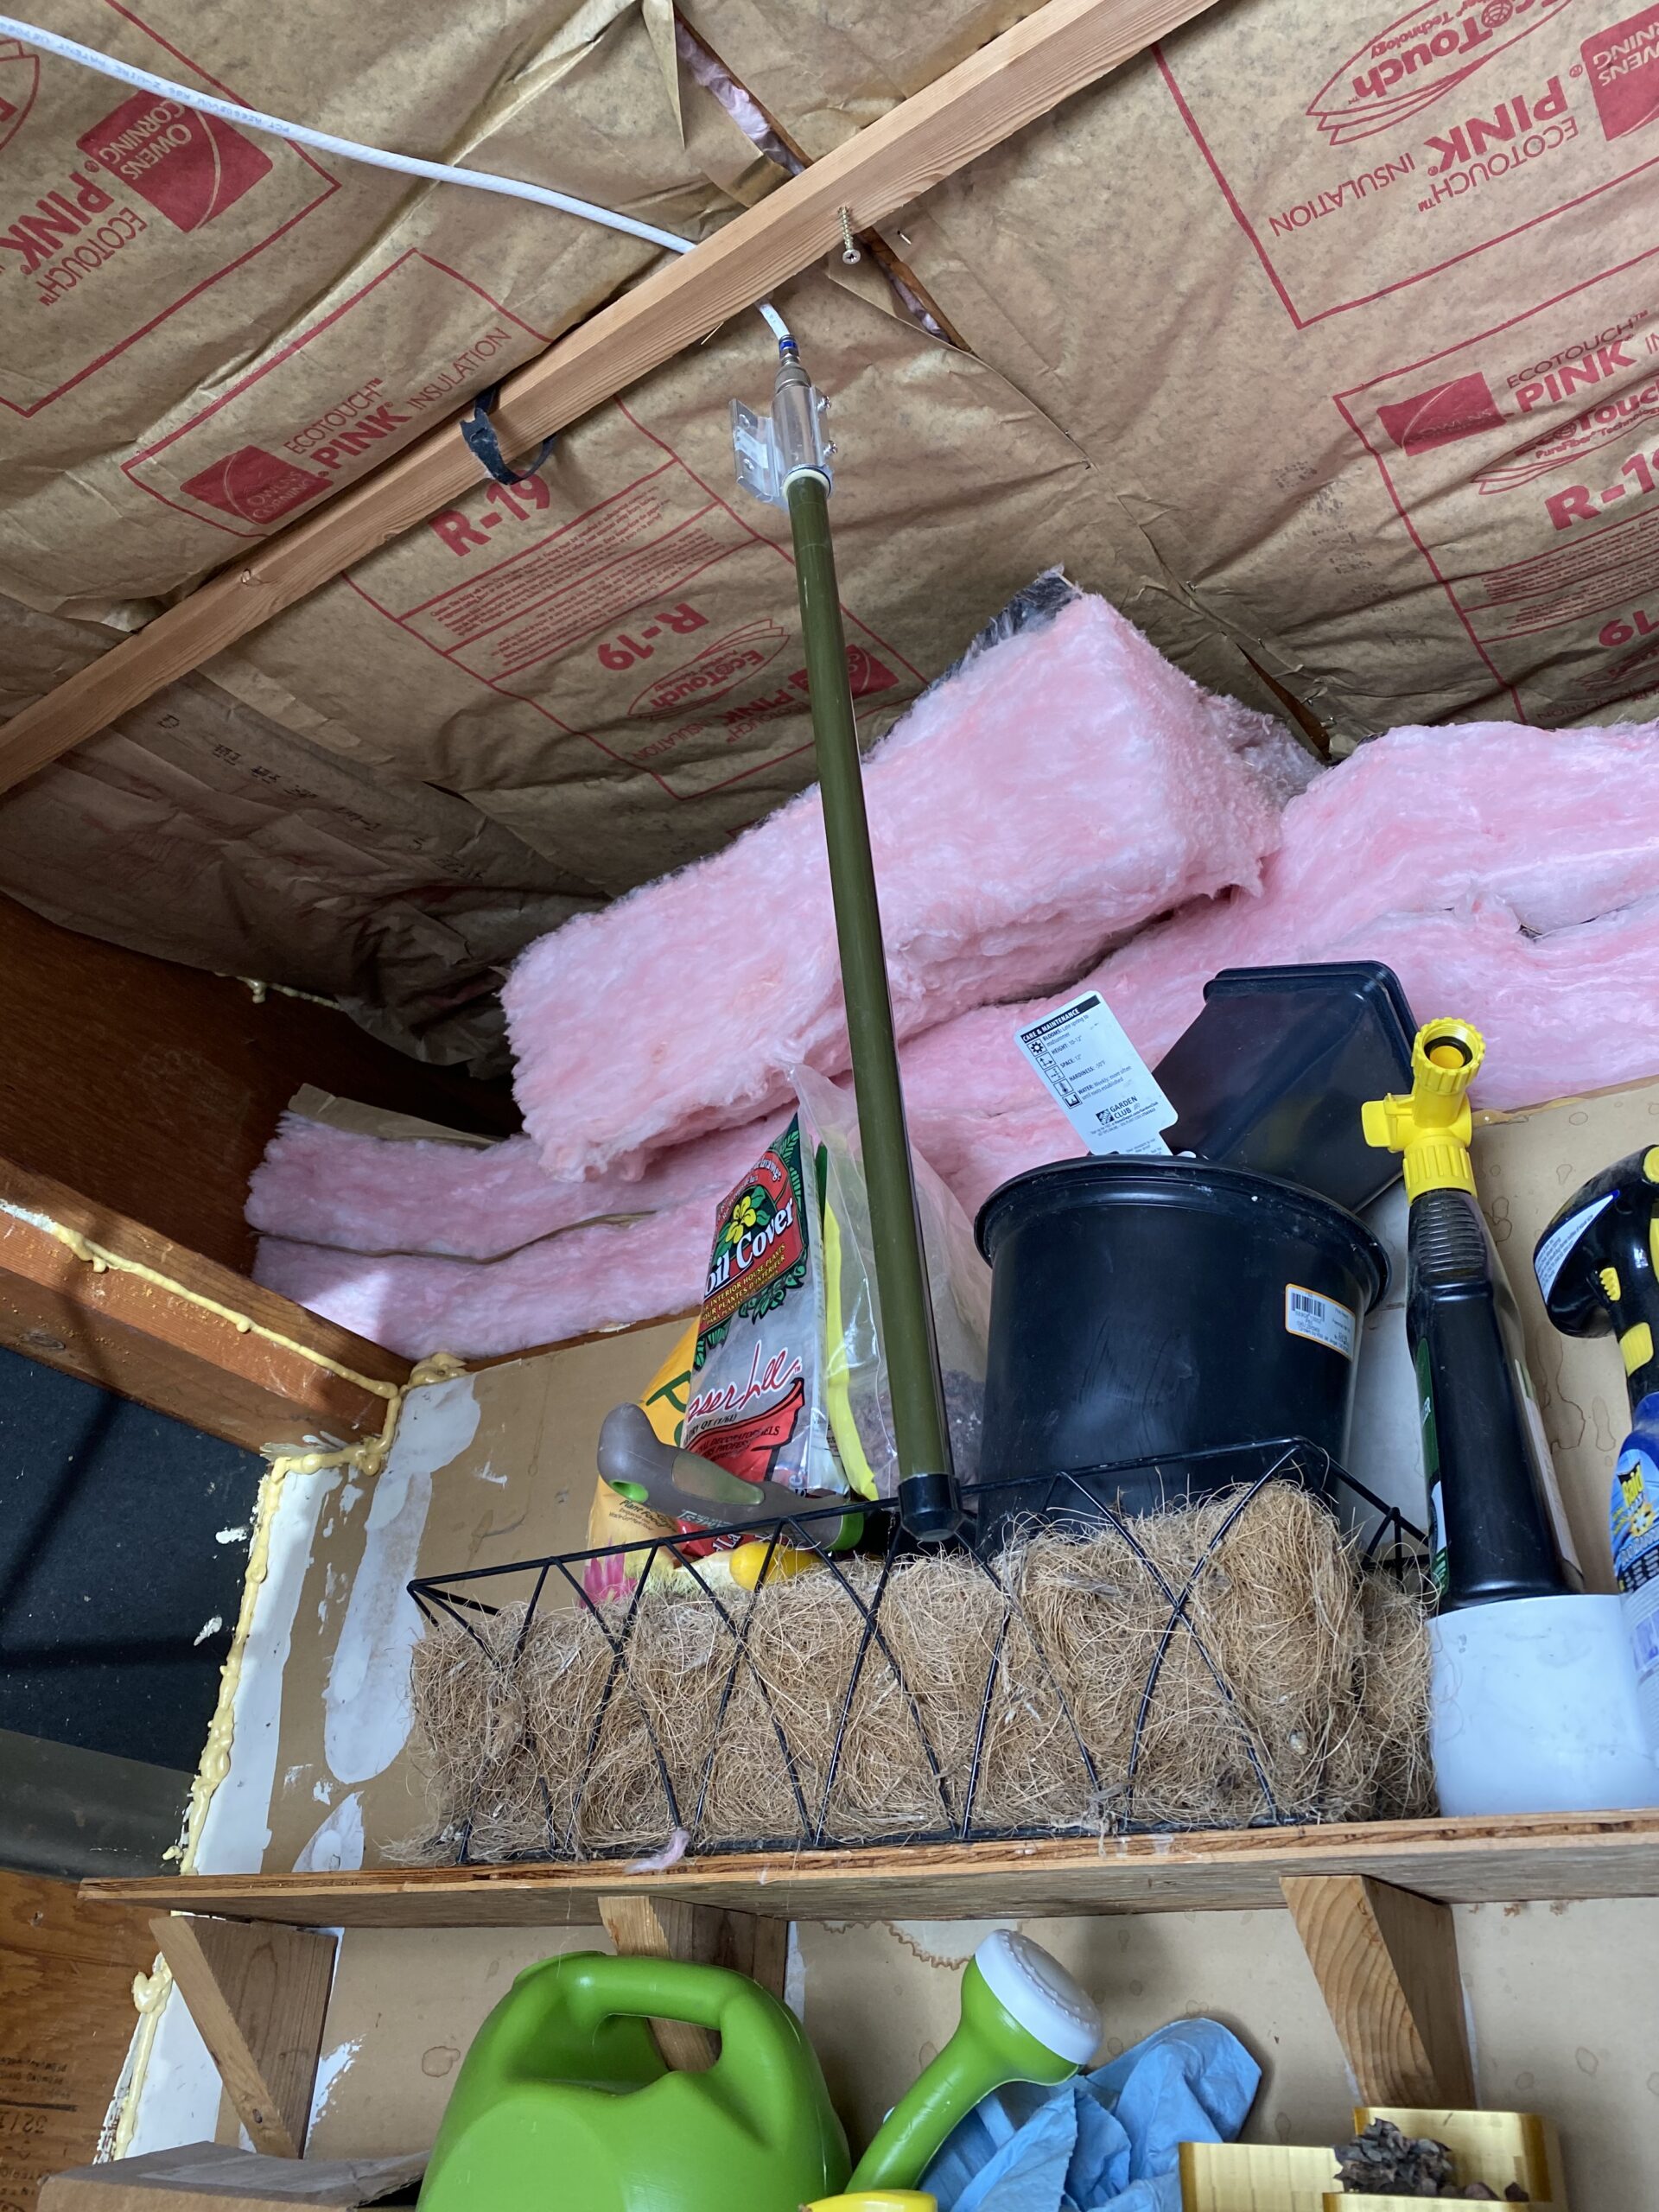
New antenna placement
ADS-B antenna in garage (we need a shed for all that gardening stuff)
The antenna needs to be vertical for maximum reception and upside down works just as well as right side up!
New antenna placement results
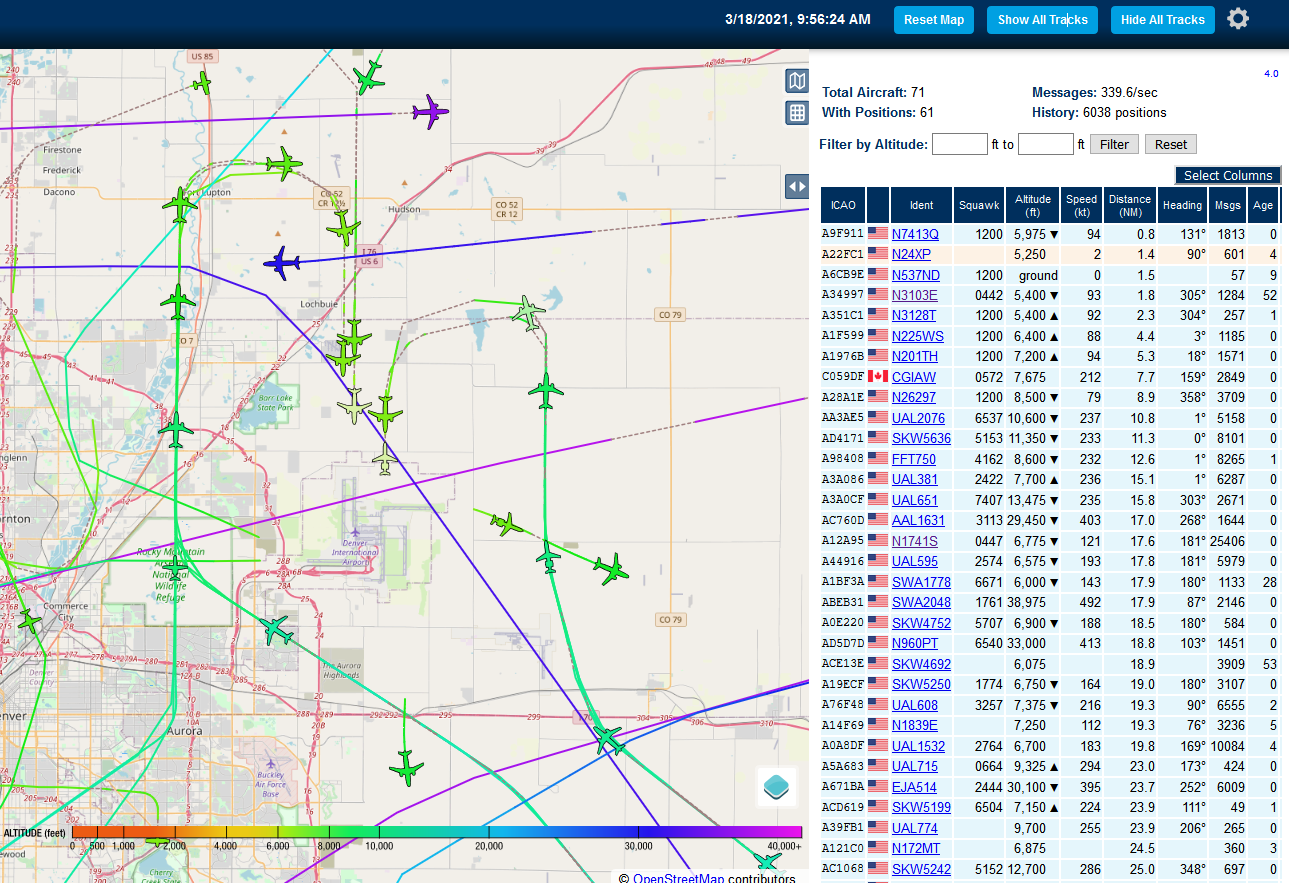
I saw up to 82 aircraft being tracked this morning. You can see the big planes lining up for southerly landings at KDEN on three separate runways and a few planes taking off to the southeast.
PiAware updated antenna KDEN focus
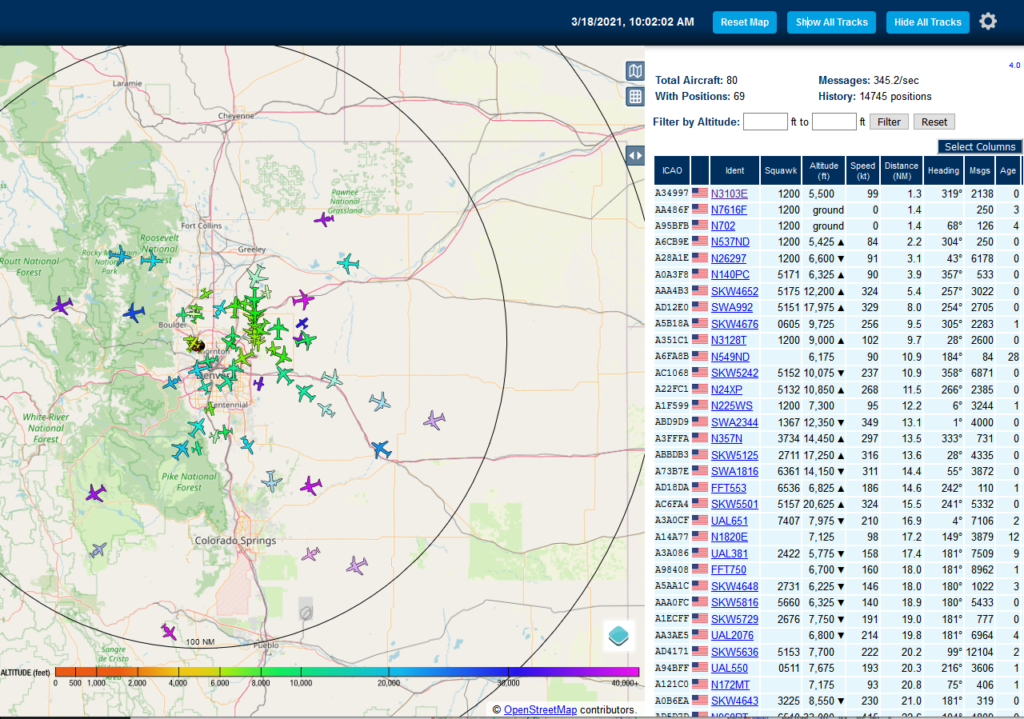
Here is a screenshot zoomed out. I’ve got quite a few position reports from >100 nm out.
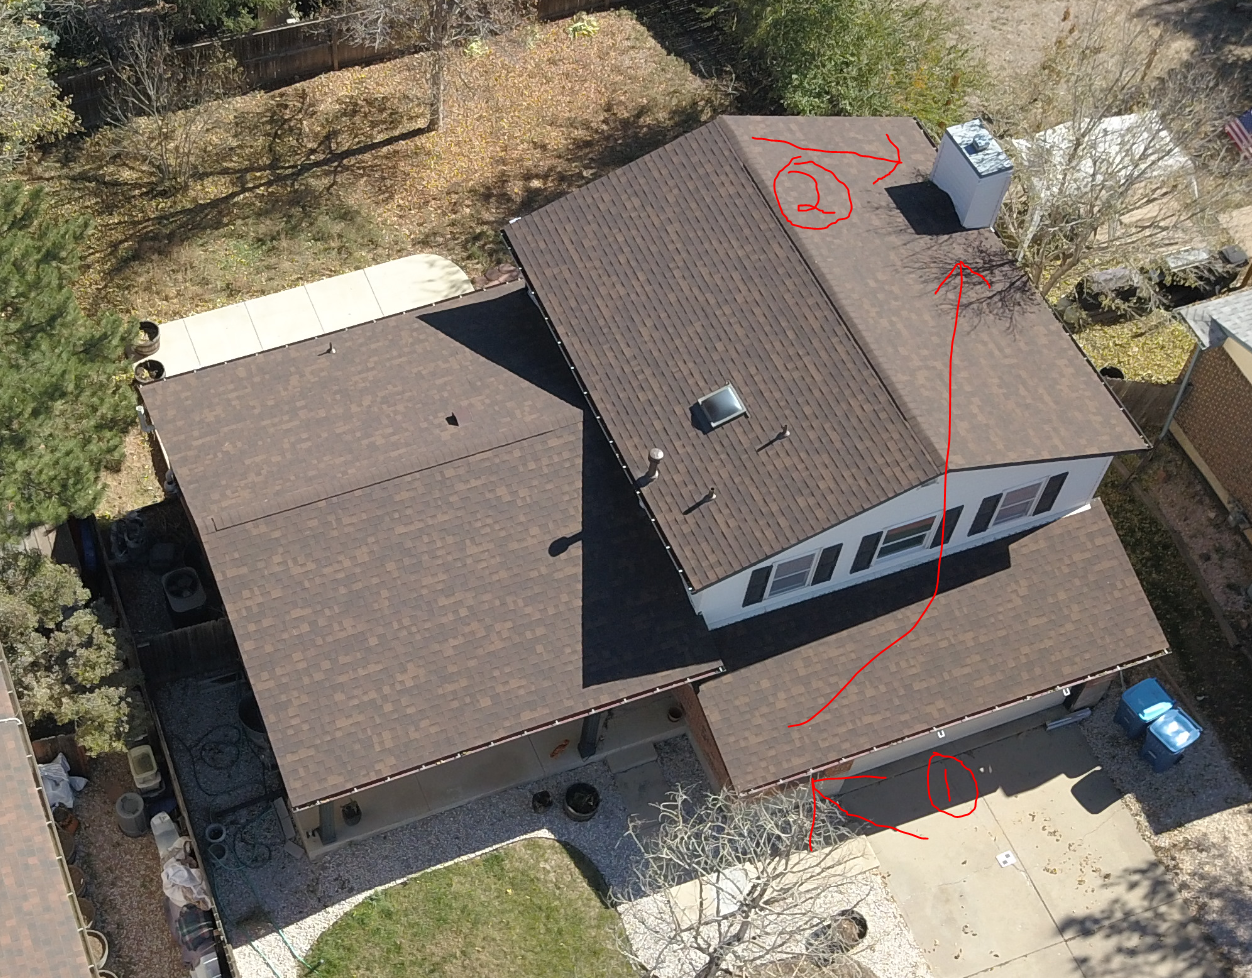
Proposed final placement of the FlightAware ADS-B antenna
Proposed placement of ADS-B antenna on chimney (1 is where it currently is inside the garage and 2 is desired final placement)
I have a new weather station coming this weekend so I’ll try to combine roof trips to install the weather station and the 1090 MHz Flightaware antenna at the same time. I’ll also need to drill a hole in the side of the house to run the cable. Or maybe I do it all solar powered and use WiFi ?? I also have a 25W solar panel arriving this weekend. Keeping it physically isolated from the house would eliminate some lightning risk. Decisions, decisions. Be on the lookout for a part 4 with the results from the new roof placement! Part 4 – moving the antenna to the roof, has produced great results! I’m now seeing 150+ planes at once and getting over 700 messages per second.
2021-04-06 – fleshing out the background and requirements
2021-04-29 – updated with parts ordered, reasoning for choices, and some more background for my DIY solar system with battery backup
Background
I’ve always been interested in solar power. Being able to generate heat and electricity from the sun is just so cool on a fundamental level. When I was little, playing with magnifying glasses (read: setting things like plastics and mulch on fire) was always a good time. My mom got me a science book at one point that had a full letter sized (8.5×11″) fresnel lens.
The fresnel lens of my childhood wasn’t quite this big but but it sure seemed like it to my 10 year old brain
That fresnel lens upped my lighting things on fire game dramatically. Even since then I’ve wanted to harness large amounts of solar power. I’ve had 50-100W solar panels for a good portion of my adult life running fans and charging small deep cycle 12v batteries, and it is now time to move up to the big leagues. Read on to join my thought process for planning a large-ish system.
Requirements
The requirements for my DIY solar system with battery backup aren’t too strict. I’m looking for the following:
Run my homelab for 5-10 minute until it can be powered off
Provide a couple hours (1-2) of space heating/cooling for comfort with plenty of battery left over
Run the refrigerators for 6-12 hours
Run the cable modem/router/WiFi for ~6-12 hours
Run the furnace as needed
Ability for a generator (to be purchased) to charge the batteries
Ability for grid power to charge the batteries
Ability for solar panels to charge the batteries
Less than $2000 total to get started with a system that can grow
Use my 2x300W solar panels I picked up off Craigslist for $100 each
Nice to haves
USB/RS-232/RS-485/Ethernet Interface to read status via Raspberry Pi or similar
Decent warranty (I don’t usually worry about warranties but this will be a decent chunk of change)
Not waiting another two months to ship from China (I may have already ordered the batteries. Ordered Feb 26 2021. Still waiting for even a tracking number as of April 29.)
Initial plan
If we add up all the electricity requirements, we end up with a couple to a few kWh (I am being intentionally vague here. I’ll post details with my next update.). This DIY solar system with battery backup is intended to grow with me – I’m not building a data center-sized system to start. As such, I have a tentative list of the basics:
2x300W solar panels. They are Canadian Solar CSUN-something 36V nominal. Already have these.
8x272Ah LiFePO4 batteries in series for 24V nominal. These will total out to 6.9 kWh of storage assuming full capacity. For $101 per cell shipped, this deal is hard to beat even if it is taking the slow boat from China. 6.9 kWh divided by $101 per cell is $116/kWh.
A 2.5ish kW inverter. Current choices are MPP Solar LV2424 (2.4 kW 24V with most of my requirements for ~$700) or the Growatt SPF 3000TL LVM (3.0 kW 24V with basically the same features as the MPP for ~$700. but there will be at least a month shipping delay).
A quality 8S BMS (expect to spend around $150 for this)
Solar panels
I get an urge to troll craigslist for solar panels (and NAS’s) every couple weeks and came across a post that had 300W solar panels in Loveland, CO. They were in great shape and they were $100 each. $0.33/W is a pretty good price for solar panels so I jumped on them. I didn’t really have a use but knew I would in the future. There is a slight “prepper” tendency I always have in the back of my mind so part of me was thinking I’d be able to use them to charge stuff in the event of an extended power outage. Since I bought them, we have had 3 power outage – one for 2 hours, one for 1 hour, and another for 15 minutes.
[insert pic of solar panels]
Batteries
For batteries, there are a lot of good options. Some better than others. There are a few big decisions:
Battery chemistry
Lead acid – the traditional “car battery” type but deep cycle. Old tech, heavy, usable capacity is relatively little compared to the full rated capacity (generally recommended to not discharge deeper than 50%). Pretty good price in terms of watt-hours per dollar. Almost all inverters/chargers are designed around 12V/24V/48V as defined by the lead acid cell voltages.
Lithium-ion – new tech. Used in many electric car batteries – primarily Tesla. Lots of used cells available (often in bulk). Each cell is about 10Wh. This means many wire connections (500-1000) and soldering. Does not handle overcharging/discharging well. Can cause fires/explosions if handled improperly. No good solutions for 12V standard stuff. 7S (7 cells in series) can work for 24V. 13S works for 48V
Lithium polymer – very power dense. Not very energy density. Quite hazardous. That by itself is enough to write these off.
Lithium iron phosphate (LiFePO4) – new tech, decent tradeoff for all other aspects mentioned above. Used in electric buses in China (which is a source for cells). Very large capacity per cell (>200Ah), which means minimal wiring. Cell voltage is 3.2V, which matches up perfectly with traditional lead acid voltages (4S is 12V, 8S is 24V, 16S is 48V). Good cycle count/capacity curve (it takes many cycles to reduce capacity). I will be using LiFePO4 batteries in my system.
Battery bank voltage – requirements are for a 2.5kW inverter.
12V – 200+ amps for a 2.5kW inverter. This would need large wires. Generally the amount of current at 12V throughout the system would be high. Ability to “start small” with only 4 LiFePO4 cells.
24V – 100 amps for 2.5kW inverter. Much more reasonable. I will be using 24V for my system.
48V – 50 amps for 2.5kW inverter. Even more reasonable but this requires greater up front investment to get enough batteries (16 cells for LiFePO4, meaning $2000+). Borders on what is considered “high voltage” for low voltage DC work (generally the cutoff is 50V).
Below is a table I created in Excel to help me make my decision. When I came across the group buy for the DIYSolar Michael Caro 272Ah cell group buy from China, I took 2 days to decide and ordered 8 cells. That was Feb 26, 2021. I still don’t even have a tracking number. I’ll probably cancel the order. Mid-April, 260Ah cells became available at batteryhookup.com. They weren’t the cheapest in terms of watt-hours per dollar, but they were in Pennsylvania and would arrive to me in a predictable amount of time. With my yearly bonus and tax refund firmly in my bank account, I figured I could have two orders opened at once. I placed the order with BatteryHookup. It took 6 days for 8 cells to arrive. I still don’t have a tracking number for the group buy from China. I can afford to wait. Or I could cancel the China order and get 8 more cells on my door step a few days from now… decisions, decisions.
For the inverter, it really came down to two options:
MPP Solar LV2424 – 24V 2.4kW 120V (able to be stacked for split phase and/or more current) – this is what I picked
Growatt SPF 3000TL LVM – 24V 3.0kW 120V (able to be stacked for split phase and/or more current)
I posted a poll on DIYSolar asking for the popular opinion. Most said go with the Growatt (5 votes to 2 as of 4/29/2021). Will Prowse (solar genius) said they’re basically the same. Both batteries allow charging by utility, have solar MPPT chargers, and monitoring via serial.
I ordered the battery and knew it wouldn’t take long to arrive. The option for Growatt involved waiting 3-4 weeks for a container to arrive at the Port of Long Beach from China. The MPP option shipped from Utah (I am in Colorado – one state to the east). I picked MPP mostly based on shipping time. Also because 8S 100A BMSs are pretty common (which works well for 2.4kW because 100A * 24V = 2.4kW) which usually have a trip limit of around 110A. The next step up is usually 200A which is a correspondingly large increase in cost.
Battery Management System (BMS)
The BMS is there to protect the battery. It protects from a number of conditions – overcharge, overdischarge, overcurrent, cold temperatures, short circuit, and others. The main criteria here is 100A nominal (with overcurrent kicking in around 110A), 8S for 24V, with some sort of monitoring capability (serial, bluetooth, WiFi, etc). An active balancer would be good but that appears to be in the next higher price range. I ended up going with the JBD 8S 100A BMS for $80. One of the things that really caught my eye was this thread about monitoring – it appears these are really capable of putting out data.
Conclusion
With all the main materials/parts ordered, it is time to focus on how to construct the system. When it is all hooked up and ready to go, I will have a small DIY solar system with battery backup to power a few select loads in the house. The main components are:
8x 260Ah prismatic LiFePO4 cells for a 24V nominal system with 6.6 kWh of storage
MPP LV2424 inverter for 2.4kW of 120V power with ability to charge from grid, solar, or generator as well as expand with more units in parallel
2x300W solar panels to charge in case of long term outage
In my introduction post, I said I would write about topics in order of interest. Securing WordPress blogs from hackers isn’t exactly fun or interesting but it is very necessary in this day and age. Hackers are constantly probing sites on the internet for insecurities. They’re constantly trying to log into WordPress sites with easily guessed passwords (hint: don’t use ‘password’ as your password). Here are some hints on how to secure WordPress blogs from hackers.
If you prefer a video version, check out my first ever YouTube video (!) covering this same content here – https://youtu.be/wKgm_684acM.
When I set this site up, the first 24 hours were pretty quiet. After that, the attacks started ramping up. I decided to take action and lock down access. There are three main things I did to secure this WordPress blog installation and VPS it is hosted on:
Disable password-based SSH authentication for logins
Install and enable Fail2Ban
Install WordPress specific Fail2Ban filters
#1 – Disable password-based SSH authentication
Step 0 – Enable SSH Key Authentication
Before you disable password-based authentication, you need to enable SSH key based authentication. I have posted a SSH key tutorial here – SSH Key Tutorial.
Password-based SSH authentication
SSH stands for secure shell. It is how 99% of Linux/Unix servers on the public internet and private intranets are administered. There are two main methods of logging in with SSH: 1) password and 2) key. Password is pretty straight-forward and is what most people are familiar with. You have a username and password. If you enter the right password for the username, you get in. Hackers are constantly testing common usernames (root, admin, user, guest) with common passwords (password, password1, password123, test, etc.). Further – they aren’t testing just one combination of user/pass at a time, they keep trying passwords until they give up or are banned. I had my VPS for a few weeks before activating austinsnerdythings.com on it and here is a random sample starting a minute after midnight for about six minutes: $sudo head -n 100 /var/log/auth.log.1
Feb 28 00:01:52 austinsnerdythings.com sshd[2265571]: pam_unix(sshd:auth): authentication failure; logname= uid=0 euid=0 tty=ssh ruser= rhost=222.184.14.90 user=root
Feb 28 00:01:54 austinsnerdythings.com sshd[2265571]: Failed password for root from 222.184.14.90 port 45182 ssh2
Feb 28 00:01:54 austinsnerdythings.com sshd[2265571]: Received disconnect from 222.184.14.90 port 45182:11: Bye Bye [preauth]
Feb 28 00:01:54 austinsnerdythings.com sshd[2265571]: Disconnected from authenticating user root 222.184.14.90 port 45182 [preauth]
<snip>
Feb 28 00:04:59 austinsnerdythings.com sshd[2265587]: pam_unix(sshd:auth): authentication failure; logname= uid=0 euid=0 tty=ssh ruser= rhost=139.198.121.63 user=root
Feb 28 00:05:02 austinsnerdythings.com sshd[2265587]: Failed password for root from 139.198.121.63 port 53437 ssh2
Feb 28 00:05:04 austinsnerdythings.com sshd[2265587]: Connection closed by authenticating user root 139.198.121.63 port 53437 [preauth]
Feb 28 00:06:06 austinsnerdythings.com sshd[2265591]: pam_unix(sshd:auth): authentication failure; logname= uid=0 euid=0 tty=ssh ruser= rhost=212.64.38.8 user=root
Feb 28 00:06:07 austinsnerdythings.com sshd[2265591]: Failed password for root from 212.64.38.8 port 37354 ssh2
Feb 28 00:06:08 austinsnerdythings.com sshd[2265591]: Received disconnect from 212.64.38.8 port 37354:11: Bye Bye [preauth]
Feb 28 00:06:08 austinsnerdythings.com sshd[2265591]: Disconnected from authenticating user root 212.64.38.8 port 37354 [preauth]
<snip>
Feb 28 00:06:48 austinsnerdythings.com sshd[2265595]: Received disconnect from 49.88.112.118 port 37056:11: [preauth]
Feb 28 00:06:48 austinsnerdythings.com sshd[2265595]: Disconnected from 49.88.112.118 port 37056 [preauth]
Feb 28 00:06:56 austinsnerdythings.com sshd[2265589]: Connection reset by 49.88.112.118 port 53318 [preauth]
Feb 28 00:08:00 austinsnerdythings.com sshd[2265597]: Received disconnect from 49.88.112.118 port 61081:11: [preauth]
Feb 28 00:08:00 austinsnerdythings.com sshd[2265597]: Disconnected from authenticating user root 49.88.112.118 port 61081 [preauth]
Each login attempt is 3-4 lines, so that’s 10 attempts in 6 minutes. Also notice the repeating IP addresses – 49.88.112.118 tried 4 separate times to log in across 6 minutes!
Hackers try user/pass logins because they’re relatively easy. And they get lucky often enough it is worth it.
Key-based SSH authentication
The other method to logging in with SSH is via public/private key. How this works is you generate a public/private keypair. Then you put the contents of the public key on the server you want to log in to. When logging in, your SSH client says “hello, I am user austin and I have a key to login and here it is”! The public key that’s copied to the remote server looks like this:
As you might imagine, it’s a lot harder to guess that key than it is a password. In fact, cracking a 2048 bit key like the one above would take 300 trillion years with a quantum supercomputer (which doesn’t yet exist)! Source. The universe is 15 billion years old. That means it would require 300 trillion / 15 billion = 20,000 universe lifetimes to crack.
Before you disable password-authentication, you need to be 100% sure that key-based authentication is working or else you will lock yourself out of your server!
To disable password-based authentication, you need to edit /etc/ssh/sshd_config, find PasswordAuthentication and put no after it. If it is commented out (there is a # at the front of the line) delete the #. It will look like this when finished:
disable sshd password authentication
Then you need to restart the SSH daemon (service) for the change to take effect:sudo systemctl restart ssh.service. Now you password-based SSH authentication has been disabled!
My failed authentication attempts dropped dramatically after disabling password-based SSH authentication. Below is the same general timeframe from the morning of when this post was written:
Mar 13 00:00:24 austinsnerdythings.com sshd[108357]: Invalid user ftpuser from 167.99.34.31 port 59060
Mar 13 00:00:24 austinsnerdythings.com sshd[108357]: Received disconnect from 167.99.34.31 port 59060:11: Normal Shutdown, Thank you for playing [preauth]
Mar 13 00:00:24 austinsnerdythings.com sshd[108357]: Disconnected from invalid user ftpuser 167.99.34.31 port 59060 [preauth]
Mar 13 00:03:09 austinsnerdythings.com sshd[108549]: Received disconnect from 24.8.45.4 port 5402:11: disconnected by user
Mar 13 00:03:09 austinsnerdythings.com sshd[108549]: Disconnected from user austin 24.8.45.4 port 5402
Mar 13 00:03:09 austinsnerdythings.com sshd[108438]: pam_unix(sshd:session): session closed for user austin
Mar 13 00:12:33 austinsnerdythings.com sshd[108934]: Invalid user postgres from 167.99.34.31 port 46444
Mar 13 00:12:33 austinsnerdythings.com sshd[108934]: Received disconnect from 167.99.34.31 port 46444:11: Normal Shutdown, Thank you for playing [preauth]
Mar 13 00:12:33 austinsnerdythings.com sshd[108934]: Disconnected from invalid user postgres 167.99.34.31 port 46444 [preauth]
Mar 13 00:12:44 austinsnerdythings.com sshd[108941]: Received disconnect from 222.187.232.213 port 11758:11: [preauth]
Mar 13 00:12:44 austinsnerdythings.com sshd[108941]: Disconnected from authenticating user root 222.187.232.213 port 11758 [preauth]
Mar 13 00:17:40 austinsnerdythings.com sshd[109097]: Received disconnect from 221.131.165.23 port 32827:11: [preauth]
Mar 13 00:17:40 austinsnerdythings.com sshd[109097]: Disconnected from authenticating user root 221.131.165.23 port 32827 [preauth]
Mar 13 00:24:51 austinsnerdythings.com sshd[109322]: Invalid user postgres from 167.99.34.31 port 33830
Mar 13 00:24:52 austinsnerdythings.com sshd[109322]: Received disconnect from 167.99.34.31 port 33830:11: Normal Shutdown, Thank you for playing [preauth]
Mar 13 00:24:52 austinsnerdythings.com sshd[109322]: Disconnected from invalid user postgres 167.99.34.31 port 33830 [preauth]
Most of these are just disconnects. The hackers see that my server is not accepting passwords and they just disconnect – they don’t even try to log in.
#2 – Install Fail2Ban
Fail2Ban is a helpful tool that monitors various logs and if it sees too many failed attempts, it will issue a ban on the offending IP address.
It is simple enough to install. First, update your package cache. On Ubuntu/Debian, this is done with apt:sudo apt update.
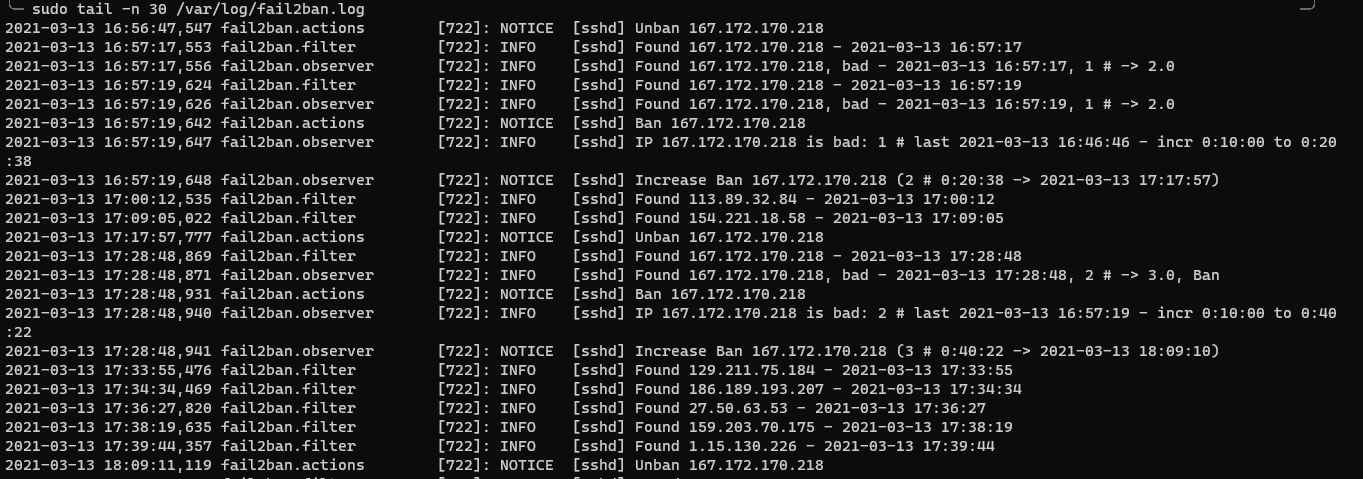
Then install fail2ban:sudo apt install -y fail2ban. This automatically enables Fail2ban so that it starts on boot. It has a bunch of out-of-the-box rules and will handle many services without any additional configuration. This is what my Fail2ban log looks like as of right now. This is all SSH bans. Notice that the duration is increasing for IP 167.172.170.218. The default ban duration is 10 minutes and I have it configured to double (plus some randomness) every extra attempt.
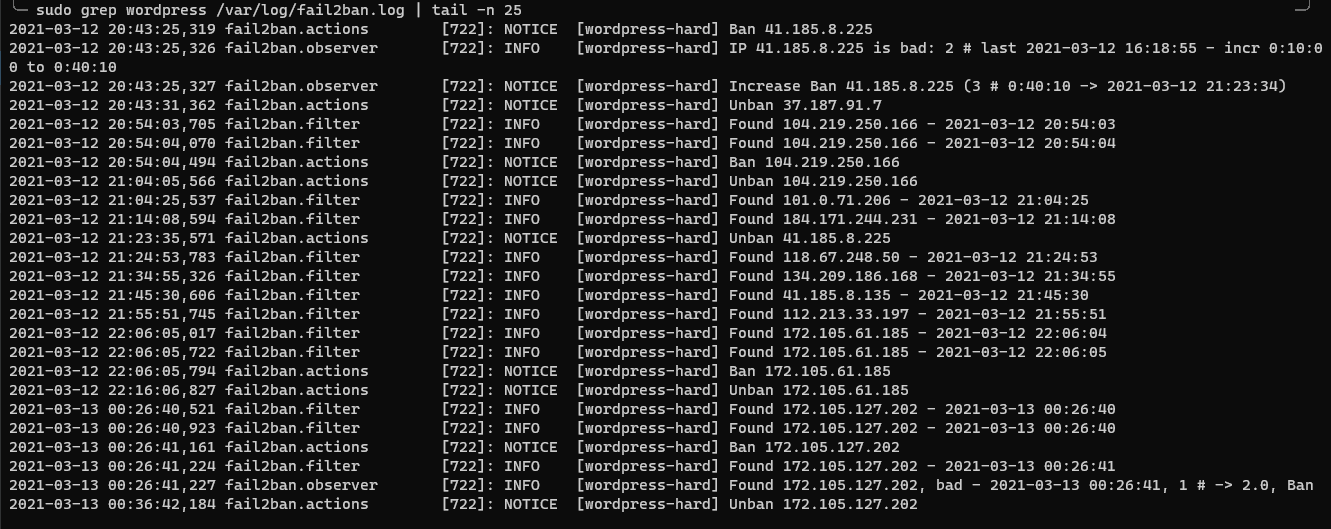
#3 – Add WordPress specific Fail2ban jails and plugin
Attempts to log into WordPress look like normal web traffic in web logs. Failed logins aren’t recorded specifically. We can change that by adding a plugin to WordPress that writes to /var/log/auth.log for a number of activities. Fail2ban monitors /var/log/auth.log for failed logins so it can act appropriately. I am using WP-Fail2Ban-Redux which does exactly what it says and without any nonsense. To finish the install, I copied the files from wp-content/plugins/wp-fail2ban-redux/config/filters and /jail to my fail2ban filter.d/ and jail.d/ folders:
Restart fail2ban so the changes take effect: sudo systemctl restart fail2ban
View all the bans in your log! Congrats, you’ve now applied some top notch security practices to your blog.
fail2ban wordpress bans
#4 – ALWAYS KEEP YOUR WORDPRESS INSTALL UPDATED
That is the entirety of #4.
#5 – To disable XMLRPC or not, that is the question
I haven’t disabled XML-RPC yet. XML-RPC is a way to programmatically interact with WordPress blogs. Hackers can use it to rapidly try user/password combinations and other things like that. Installing the WordPress specific Fail2Ban components will effectively ban offenders while still allowing access to the underlying services.
In conclusion
It isn’t too hard to make these three changes to secure your WordPress blog and doing so will increase the security drastically. If you would like assistance doing this on your site, please use the contact form to get in touch with me. Lastly, always keep your WordPress install up to date. Every so often, security researchers find holes in the base WordPress code. Automatic updates will prevent your site from being a target.
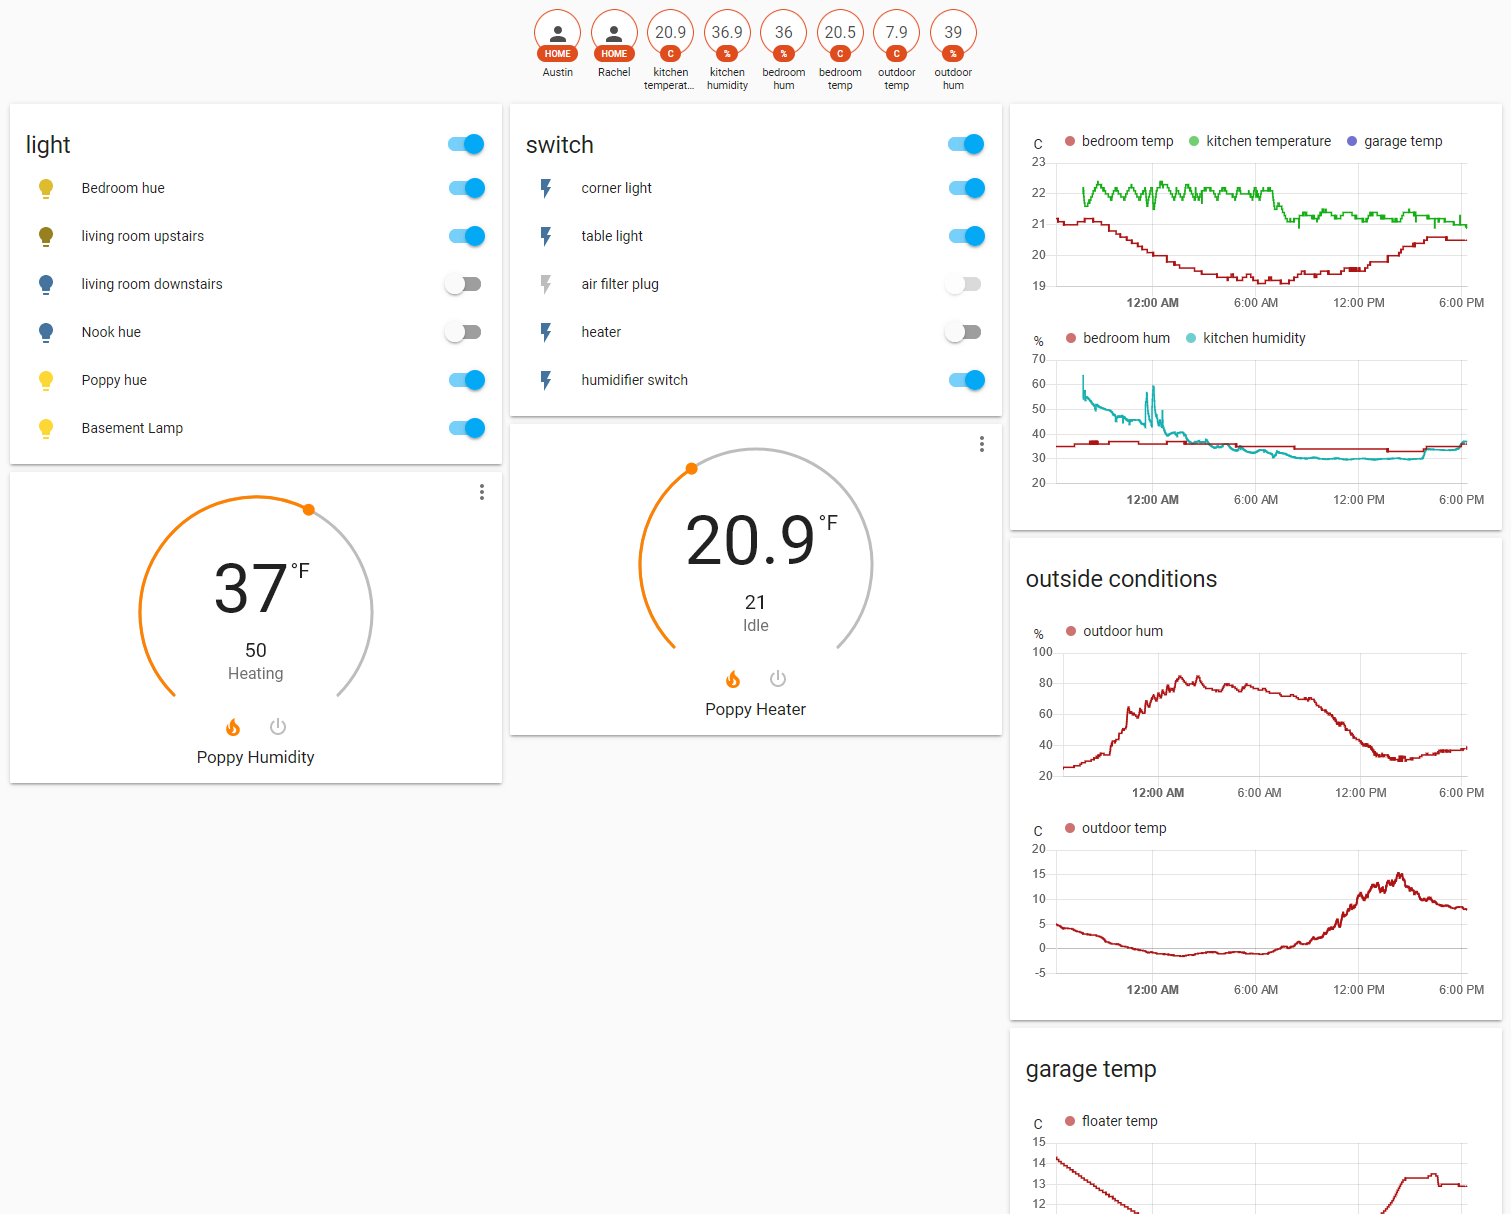
Let me start this post with a screenshot of my Home Assistant home page:
Austin’s Home Assistant Home Page
Home Automation sounds scary but isn’t
You can start as small as you want. The screenshot above (Home Assistant) home page shows where we’ve landed after a few hours of configuration and a couple weeks of fine tuning. We have switches for lights, heaters, and humidifiers. We have sliders to set the humidity and temperature for our six month old daughter’s nursery. And we also have some graphs showing temperature and humidity for a few spots around the house.
We also have a few simple automations:
Turn on lights 50 minutes before sunset
Turn everything off if everyone leaves the house (device tracking is all local and done by our WiFi controller)
Turn on fan to draw in cool outside air when the temperature is cool enough outside
Thermostat control that regulates temperature in our daughter’s nursery
“Thermostat” control that regulates humidity in our daughter’s nursery
The rest is just extra data (I like data).
Breaking it down
How we got started with Home Automation
We started with a basic Philips Hue kit with two light bulbs and a bridge (base station you plug into your router). Philips Hue is set up with a easy-to-use app on smartphones. The app is pretty simple and allows for creation of “scenes” where you preset lights to how you want them and you can activate them whenever. At the time (early 2016ish?) the app also featured scheduled scene activation, but we found it wasn’t very reliable. Thus I began a quest for a better way to control the lights.
Enter Home Assistant. Home Assistant is an open-source application that is commonly installed on Raspberry Pi which integrates all the smart home things. It has exploded in popularity over the last couple years. From the website, Home Assistant is “[an] open source home automation that puts local control and privacy first. Powered by a worldwide community of tinkerers and DIY enthusiasts. Perfect to run on a Raspberry Pi or a local server.”
The local control and privacy aspect speaks to me. You will see in other posts that if there two ways of doing something with one being “connect it to the cloud” and easy vs “do it all locally” and hard, I will always pick the local, hard way to do it.
Anyways, I installed Home Assistant on a Raspberry Pi (similar to Piaware, they make it super easy – flash the install to a SD card and boot. bam, done.), clicked add on the Philips Hue integration, pressed the button on the Hue Bridge, and there were my bulbs in Home Assistant! I now had a method to control them via code or schedules or whatever that wasn’t linked to an app. I was hooked.
Welcome back from part one (Receiving aircraft ADS-B (position) signals)! Now that you have all the required equipment – what do you need to do to set it up? Thankfully, the folks over at FlightAware have made this super easy. FlightAware provides a flight tracking platform that is mostly fed by users like me (and soon to be you!). In return for feeding them data, they will give you a free enterprise subscription, which is normally $89/month. It adds a lot of tracking abilities which are great for aviation nerds like myself. To get the most data possible, they have put together some great getting started guides, which I will link here – https://flightaware.com/adsb/piaware/build. The short version is:
Write the Piaware operating system to your SD card
Either enable WiFi or plug into your router
Plug everything in
Claim your station on FlightAware.com after a few minutes
Watch the data start flowing!
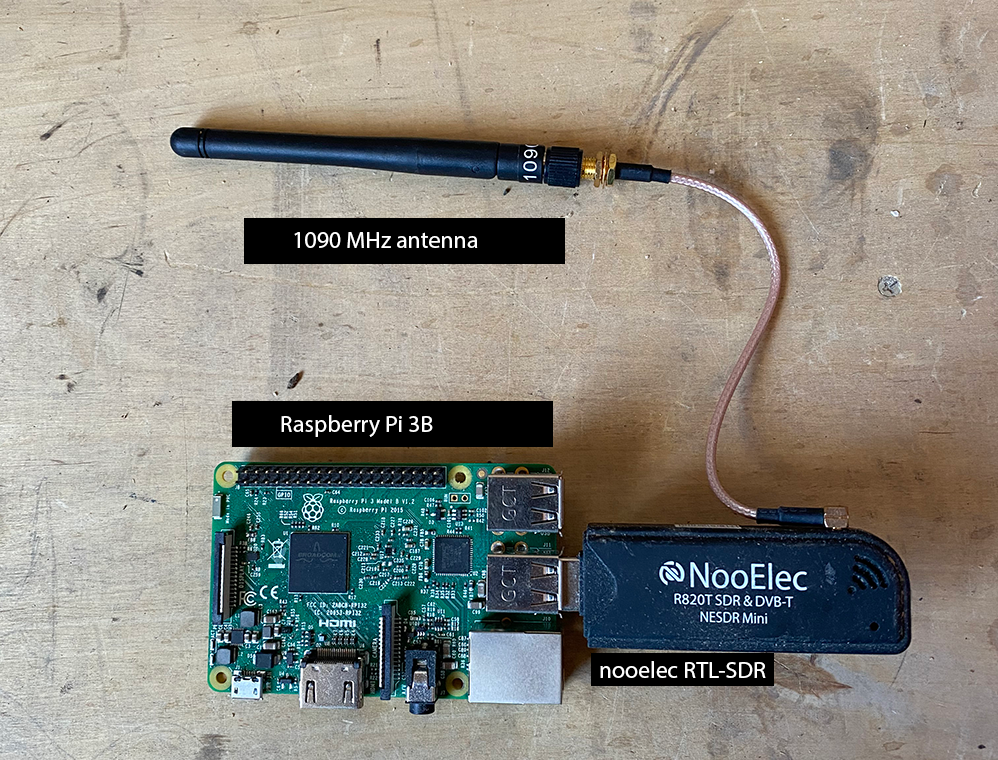
Here is a picture of the most basic setup possible:
Simple ADS-B receiver setup with RTL-SDR and 1090 MHz antenna
To really increase your reception, there are three things you need to do (but before you proceed, I must warn you – this becomes addictive):
Get a bigger/better antenna. Antennas are measured by something called “gain”. The more gain, the better (generally speaking). More gain means the same signal is received stronger and with more clarity.
Reduce the other noise. A bigger antenna will amplify all signals in the same frequency range. ADS-B is on a very specific frequency (1090 MHz). An ADS-B filter reduces the signal at frequencies other than 1090 MHz.
Amplify the filtered signal. With the other signals filtered out, amplify what remains (legit 1090 MHz ADS-B signals).
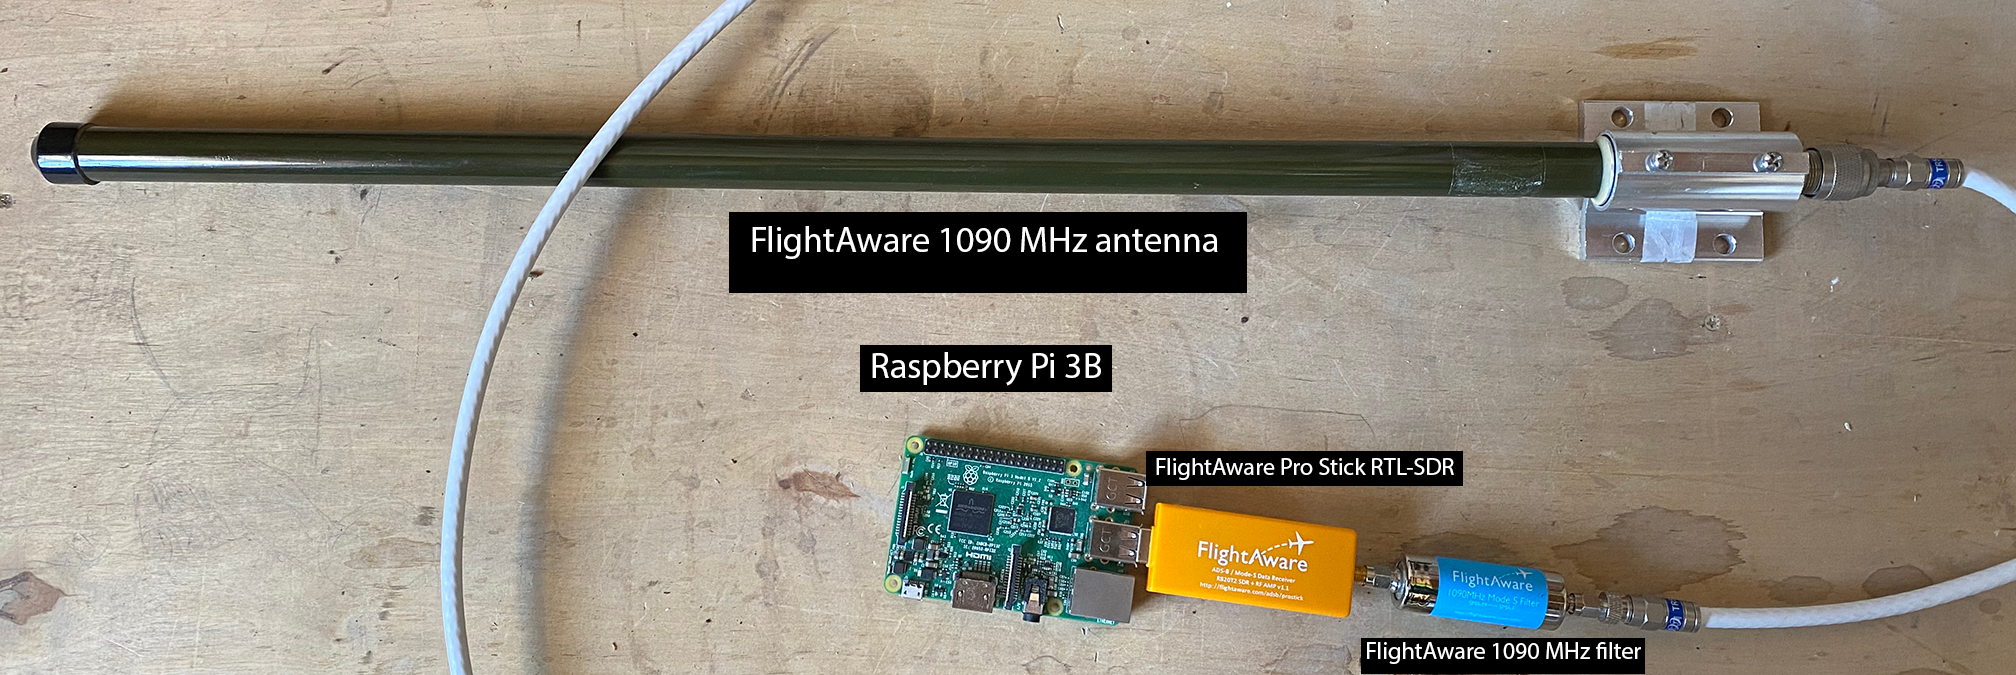
This is what my full setup looks like:
Full ADS-B setup with 1090 MHz antenna, 1090 MHz filter, and Flightaware Pro stick
FlightAware started producing each of these a couple years ago (again, sticking with the theme of making it easy to provide them data). Originally, each was a separate item. Now the amplifier and filter are built into the same device on the FlightAware Pro Stick Plus. The antenna will remain separate. These upgrades together will cost around $80-90. I’ve provided some Amazon links below to check the current prices:
Combined receiver and filter – FlightAware Pro Stick Plus (seems like it is currently unavailable on Amazon but in stock on eBay)
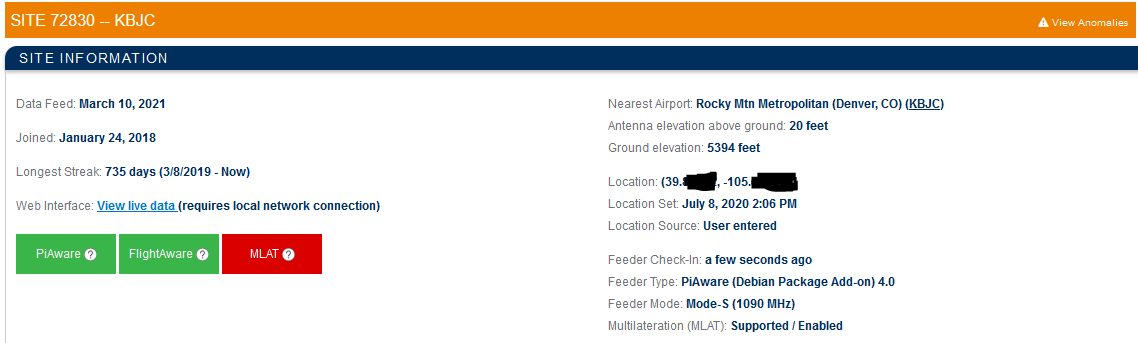
I like to keep the filter and receiver separate so if something goes wrong with either I can keep sending signals. As a side note, I am up to 735 days feeding FlightAware without interruption (two years and two days)!
flightaware connected for 735 days straight
The antenna is currently hanging in my garage which isn’t ideal but I still get signals from 100+ miles away consistently. I messed with a bunch of DIY antennas that I’ll post one day but settled on the FlightAware stuff because it works so well. I have the full setup of FlightAware antenna feeding the 1090 MHz SMA filter into the Pro Stick. When I lived in California this yielded 100-200 planes on busy days up to 200 miles away. This stuff is good fun, and as I warned above, it gets addictive. There is a physical limit though to how far you can receive signals, and that limit is around 250 miles for planes at 40,000 ft due to the curvature of the earth. Planes flying lower will fall off at closer distances.
Please let me know in the comments what you want to see about my setup! I will get around to making YouTube videos eventually to post because I know a lot of people like videos more than text but I want to do the text stuff first to get my thoughts together.
Austin’s Nerdy Things is a participant in the Amazon Services LLC Associates Program, an affiliate advertising program designed to provide a means for sites to earn advertising fees by advertising and linking to amazon.com.

 Proposed final placement of the FlightAware ADS-B antenna