The next big thing
I’ve been trying to come up with “the next big thing” in terms of apps for quite some time. I may finally have an idea worth coding. To do so requires that I actually know how to code it (duh). For smartphones, I started with Android like any self-respecting nerd would. But after some time, I realized I loved the Apple design, features, and overall “feel” and all the Android hacks and ads and reliance on Google made me want to switch. My first iPhone was the iPhone 5S and I was hooked. I now have an iPhone 11. This means I need to learn Swift, which is the newest Apple iOS programming language.
Stanford CS193p
Someone on the Swift sub-Reddit posted a link to some YouTube lecture videos by Paul Hegarty, a Stanford Computer Science professor. He speaks really well. I know how to program reasonably well in a few other languages but Swift never “clicked” for me. He is straightening things out for me so I can finally learn Swift. The lectures are for CS193p Spring 2021 and should be released twice a week, which is a perfect speed for me to pick things up. I’m already caught up through the 2nd lecture, with the code to match.
Documenting “Memorize”
The app we’re developing in the lectures is called “Memorize” and it basically the card flipping/matching game that many of us played in childhood. I plan to document my version here on austinsnerdythings.com. I was thinking of turning this into a game for Poppy at some point.
Progress after Lecture 2
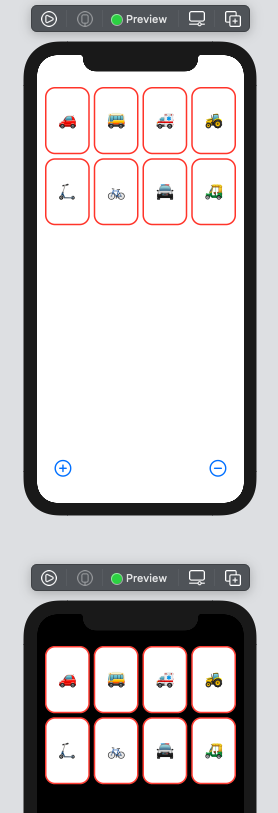
After lecture 2, I have an app that generates “cards” on demand (using vehicle emojis), puts them in a decent layout, and you can add/subtract cards as desired. Learning Swift via this method will be super nice.
Without further ado (I realized this is becoming like recipe blogs, where there is an unnecessarily long intro before the content), here is the code after the end of lecture 2 (including the 24 vehicles snippet), but before any of the assignment stuff:
//
//  ContentView.swift
//  Memorize
//
//  Created by Austin from austinsnerdythings.com on 5/25/21.
//
import SwiftUI
struct ContentView: View {
    var emojis = ["?","?","?","?","?","?","?","?","?","?","?","?","?","✈️","?","?","?","?","?","?","?","?","?","?"]
    @State var emojiCount: Int = 4
    var body: some View {
        VStack {
            ScrollView {
                LazyVGrid(columns: [GridItem(.adaptive(minimum: 80))]){
                    ForEach(emojis[0..<emojiCount], id: \.self) { emoji in
                        CardView(content: emoji)
                            .aspectRatio(2/3, contentMode: .fit)
                    }
                }
            }
            .foregroundColor(.red)
            Spacer()
            HStack {
                add
                Spacer()
                remove
            }
            .font(.largeTitle)
            .padding(.horizontal)
        }
        .padding()
    }

    var remove: some View {
        Button {
            if emojiCount > 1 {
                emojiCount -= 1
            }
        } label: {
            Image(systemName: "minus.circle")
        }
    }

    var add: some View {
        Button {
            if emojiCount < emojis.count {
                emojiCount += 1
            }
        } label: {
            Image(systemName: "plus.circle")
        }
    }
}
struct CardView: View {
    var content: String
    @State var isFaceUp: Bool = true

    var body: some View {
        ZStack {
            let shape = RoundedRectangle(cornerRadius: 20)
            if isFaceUp {
                shape.fill().foregroundColor(.white)
                shape.strokeBorder(lineWidth: 3)
                Text(content).font(.largeTitle)
            } else {
                shape.fill()
            }
        }
        .onTapGesture {
            if isFaceUp == true {
                isFaceUp = false
            } else {
                isFaceUp = true
            }
        }
    }
}
struct ContentView_Previews: PreviewProvider {
    static var previews: some View {
        ContentView()
            .preferredColorScheme(.light)
        ContentView()
            .preferredColorScheme(.dark)
    }
}
Screenshots

What’s next
There is an assignment after lecture 2. I need to do that next. I wonder if Professor Hegarty will grade it for me?
Update 5/27/2021 – I have completed assignment 1 – post here: Learning Swift – CS193p Spring 2021 Assignment 1.
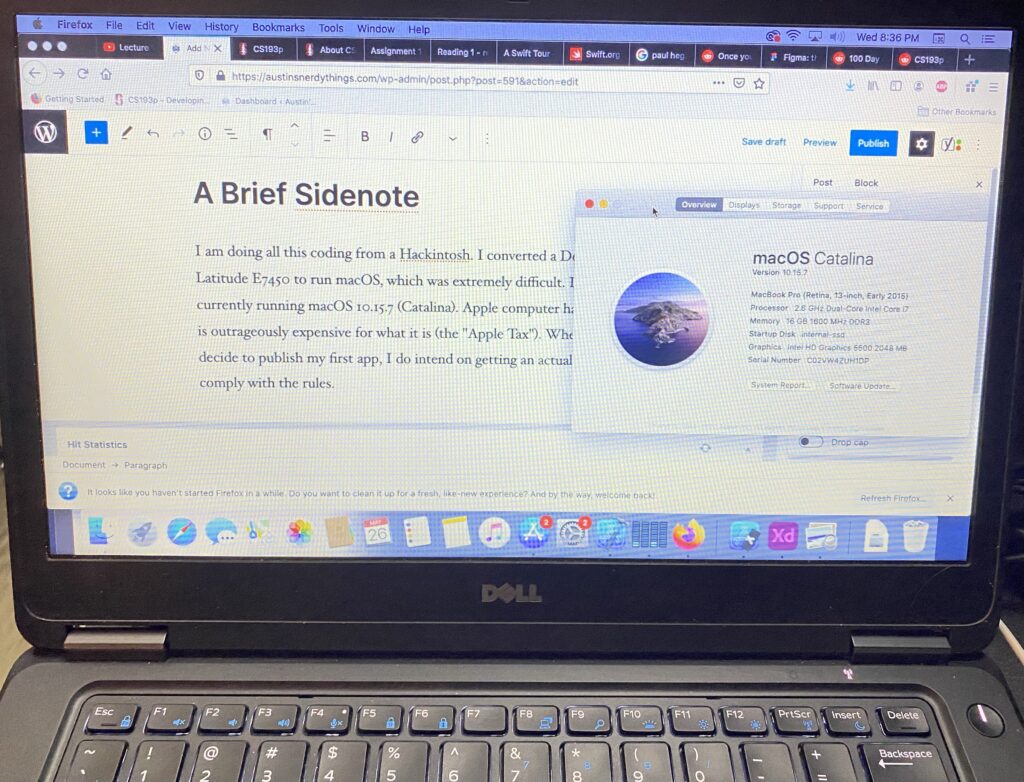
A Brief Side Note – Hackintosh
I am doing all this coding from a Hackintosh. I converted a Dell Latitude E7450 to run macOS, which was not easy. It is currently running macOS 10.15.7 (Catalina). Apple computer hardware is outrageously expensive for what it is (the “Apple Tax”). When I decide to publish my first app, I do intend on getting an actual Mac to comply with the rules. Pics or it didn’t happen: