Sometimes I make a change to my Proxmox cluster configuration without all nodes in a healthy state (i.e. they are off). This isn’t a great habit to get into and sometimes results in troubleshooting.
Putting a quick post up so I can easily reference how to resolve corosync issues.
# stop corosync and pmxcfs on all nodes
$ systemctl stop corosync pve-cluster

# start pmxcfs in local mode on all nodes
$ pmxcfs -l

# put correct corosync config into local pmxcfs and corosync config dir (make sure to bump the 'config_version' inside the config file)
$ cp correct_corosync.conf /etc/pve/corosync.conf
$ cp correct_corosync.conf /etc/corosync/corosync.conf

# kill local pmxcfs
$ killall pmxcfs

# start corosync and pmxcfs again
$ systemctl start pve-cluster corosync

# check status
$ journalctl --since '-5min' -u pve-cluster -u corosync
$ pvecm status
This post has been a long time coming. I apologize for how long it’s taken. I noticed that many other blogs left off at a similar position as I did. Get the VMs created then…. nothing. Creating a Kubernetes cluster locally is a much cheaper (read: basically free) option to learn how Kubes works compared to a cloud-hosted solution or a full-blown Kubernetes engine/solution, such as AWS Elastic Kubernetes Service (EKS), Azure Kubernetes Service (AKS), or Google Kubernetes Engine (GKE).
Anyways, I finally had some time to complete the tutorial series so here we are. Since the last post, my wife and I are now expecting our 2nd kid, I put up a new solar panel array, built our 1st kid a new bed, messed around with MacOS Monterey on Proxmox, built garden boxes, and a bunch of other stuff. Life happens. So without much more delay let’s jump back in.
Here’s a screenshot of the end state Kubernetes Dashboard showing our nodes:
Kubernetes Dashboard showing our Proxmox VM nodes deployed via Terraform
Current State
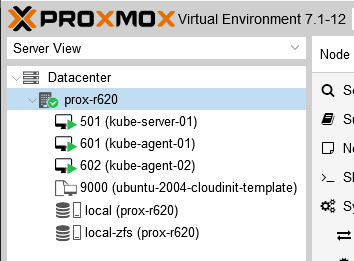
If you’ve followed the blog series so far, you should have four VMs in your Proxmox cluster ready to go with SSH keys set, the hard drive expanded, and the right amount of vCPUs and memory allocated. If you don’t have those ready to go, take a step back (Deploying Kubernetes VMs in Proxmox with Terraform) and get caught up. We’re not going to use the storage VM. Some guides I followed had one but I haven’t found a need for it yet so we’ll skip it.
VMs in Proxmox ready for Kubernetes installation
Ansible
What is Ansible
If you ask DuckDuckGo to define ansible, it will tell you the following: “A hypothetical device that enables users to communicate instantaneously across great distances; that is, a faster-than-light communication device.”
We will thus be using Ansible to run the initial Kubernetes set up steps on every machine, initialize the cluster on the master, and join the cluster on the workers/agents.
Initial Ansible Housekeeping
First we need to specify some variables similar to how we did it with Terraform. Create a file in your working directory called ansible-vars.yml and put the following into it:
# specifying a CIDR for our cluster to use.
# can be basically any private range except for ranges already in use.
# apparently it isn't too hard to run out of IPs in a /24, so we're using a /22
pod_cidr: "10.16.0.0/22"

# this defines what the join command filename will be
join_command_location: "join_command.out"

# setting the home directory for retreiving, saving, and executing files
home_dir: "/home/ubuntu"
Equally as important (and potentially a better starting point than the variables) is defining the hosts. In ansible-hosts.txt:
# this is a basic file putting different hosts into categories
# used by ansible to determine which actions to run on which hosts

[all]
10.98.1.41
10.98.1.51
10.98.1.52

[kube_server]
10.98.1.41

[kube_agents]
10.98.1.51
10.98.1.52

[kube_storage]
#10.98.1.61
Checking Ansible can communicated with our hosts
Let’s pause here and make sure Ansible can communicate with our VMs. We will use a simple built-in module named ‘ping’ to do so. The below command broken down:
-i ansible-hosts.txt – use the ansible-hosts.txt file
all – run the command against the [all] block from the ansible-hosts.txt file
-u ubuntu – log in with user ubuntu (since that’s what we set up with the Ubuntu 20.04 Cloud Init template). if you don’t use -u [user], it will use your currently logged in user to attempt to SSH.
-m ping – run the ping module
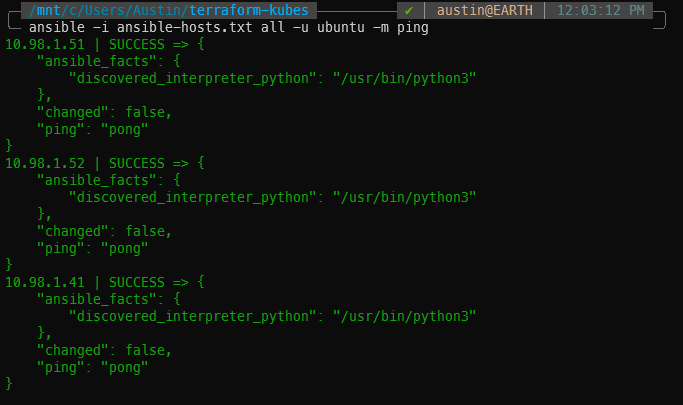
ansible -i ansible-hosts.txt all -u ubuntu -m ping
If all goes well, you will receive “ping”: “pong” for each of the VMs you have listed in the [all] block of the ansible-hosts.txt file.
Using Ansible’s ping to check communications with each of the VMs for deployment
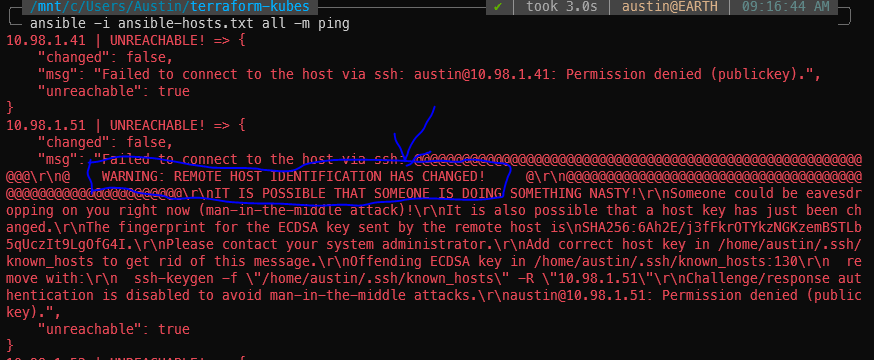
Potential SSH errors
If you’ve previously SSH’d to these IPs and have subsequently destroyed/re-created them, you will get scary sounding SSH errors about remote host identification has changed. Run the suggested ssh-keygen -f command for each of the IPs to fix it.
You might also have to SSH into each of the hosts to accept the host key. I’ve done this whole procedure a couple times so I don’t recall what will pop up first attempt.
SSH remote host identification has changed error. Run suggested ssh-keygen -f command to resolve.
Then we need a script to install the dependencies and the Kubernetes utilities themselves. This script does quite a few things. Gets apt ready to install things, adding the Docker & Kubernetes signing key, installing Docker and Kubernetes, disabling swap, and adding the ubuntu user to the Docker group.
ansible-install-kubernetes-dependencies.yml:
# https://kubernetes.io/blog/2019/03/15/kubernetes-setup-using-ansible-and-vagrant/
# https://github.com/virtualelephant/vsphere-kubernetes/blob/master/ansible/cilium-install.yml#L57

# ansible .yml files define what tasks/operations to run

---
- hosts: all # run on the "all" hosts category from ansible-hosts.txt
  # become means be superuser
  become: true
  remote_user: ubuntu
  tasks:
  - name: Install packages that allow apt to be used over HTTPS
    apt:
      name: "{{ packages }}"
      state: present
      update_cache: yes
    vars:
      packages:
      - apt-transport-https
      - ca-certificates
      - curl
      - gnupg-agent
      - software-properties-common

  - name: Add an apt signing key for Docker
    apt_key:
      url: https://download.docker.com/linux/ubuntu/gpg
      state: present

  - name: Add apt repository for stable version
    apt_repository:
      repo: deb [arch=amd64] https://download.docker.com/linux/ubuntu xenial stable
      state: present

  - name: Install docker and its dependecies
    apt:
      name: "{{ packages }}"
      state: present
      update_cache: yes
    vars:
      packages:
      - docker-ce
      - docker-ce-cli
      - containerd.io

  - name: verify docker installed, enabled, and started
    service:
      name: docker
      state: started
      enabled: yes

  - name: Remove swapfile from /etc/fstab
    mount:
      name: "{{ item }}"
      fstype: swap
      state: absent
    with_items:
      - swap
      - none

  - name: Disable swap
    command: swapoff -a
    when: ansible_swaptotal_mb >= 0

  - name: Add an apt signing key for Kubernetes
    apt_key:
      url: https://packages.cloud.google.com/apt/doc/apt-key.gpg
      state: present

  - name: Adding apt repository for Kubernetes
    apt_repository:
      repo: deb https://apt.kubernetes.io/ kubernetes-xenial main
      state: present
      filename: kubernetes.list

  - name: Install Kubernetes binaries
    apt:
      name: "{{ packages }}"
      state: present
      update_cache: yes
    vars:
      packages:
        # it is usually recommended to specify which version you want to install
        - kubelet=1.23.6-00
        - kubeadm=1.23.6-00
        - kubectl=1.23.6-00

  - name: hold kubernetes binary versions (prevent from being updated)
    dpkg_selections:
      name: "{{ item }}"
      selection: hold
    loop:
      - kubelet
      - kubeadm
      - kubectl

# this has to do with nodes having different internal/external/mgmt IPs
# {{ node_ip }} comes from vagrant, which I'm not using yet
#  - name: Configure node ip -
#    lineinfile:
#      path: /etc/default/kubelet
#      line: KUBELET_EXTRA_ARGS=--node-ip={{ node_ip }}

  - name: Restart kubelet
    service:
      name: kubelet
      daemon_reload: yes
      state: restarted

  - name: add ubuntu user to docker
    user:
      name: ubuntu
      group: docker

  - name: reboot to apply swap disable
    reboot:
      reboot_timeout: 180 #allow 3 minutes for reboot to happen
With our fresh VMs straight outta Terraform, let’s now run the Ansible script to install the dependencies.
Ansible command to run the Kubernetes dependency playbook (pretty straight-forward: the -i is to input the hosts file, then the next argument is the playbook file itself):
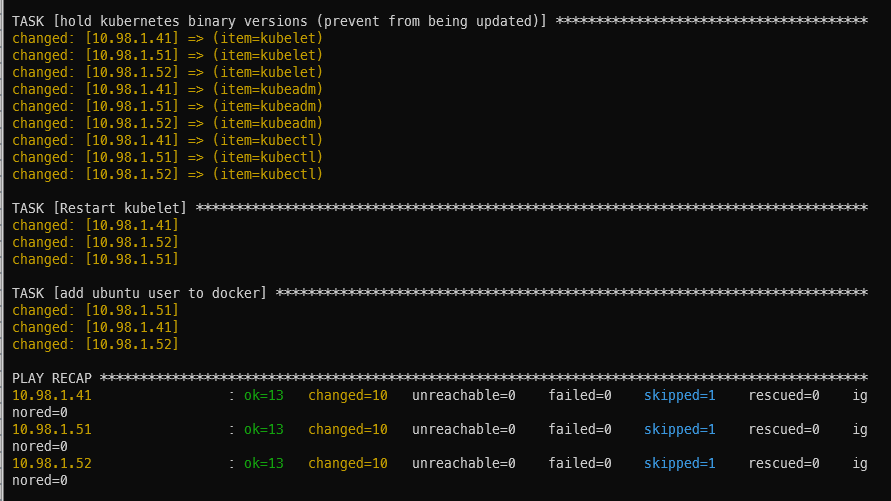
It’ll take a bit of time to run (1m26s in my case). If all goes well, you will be presented with a summary screen (called PLAY RECAP) showing some items in green with status ok and some items in orange with status changed. I got 13 ok’s, 10 changed’s, and 1 skipped.
Ansible play recap showing successful Kubernetes dependencies installation
Initialize the Kubernetes cluster on the master
With the dependencies installed, we can now proceed to initialize the Kubernetes cluster itself on the server/master machine. This script sets docker to use systemd cgroups driver (don’t recall what the alternative is at the moment but this was the easiest of the alternatives), initializes the cluster, copies the cluster files to the ubuntu user’s home directory, installs Calico networking plugin, and the standard Kubernetes dashboard.
ansible-init-cluster.yml:
- hosts: kube_server
  become: true
  remote_user: ubuntu

  vars_files:
    - ansible-vars.yml

  tasks:
  - name: set docker to use systemd cgroups driver
    copy:
      dest: "/etc/docker/daemon.json"
      content: |
        {
          "exec-opts": ["native.cgroupdriver=systemd"]
        }
  - name: restart docker
    service:
      name: docker
      state: restarted

  - name: Initialize Kubernetes cluster
    command: "kubeadm init --pod-network-cidr {{ pod_cidr }}"
    args:
      creates: /etc/kubernetes/admin.conf # skip this task if the file already exists
    register: kube_init

  - name: show kube init info
    debug:
      var: kube_init

  - name: Create .kube directory in user home
    file:
      path: "{{ home_dir }}/.kube"
      state: directory
      owner: 1000
      group: 1000

  - name: Configure .kube/config files in user home
    copy:
      src: /etc/kubernetes/admin.conf
      dest: "{{ home_dir }}/.kube/config"
      remote_src: yes
      owner: 1000
      group: 1000

  - name: restart kubelet for config changes
    service:
      name: kubelet
      state: restarted

  - name: get calico networking
    get_url:
      url: https://projectcalico.docs.tigera.io/manifests/calico.yaml
      dest: "{{ home_dir }}/calico.yaml"

  - name: apply calico networking
    become: no
    command: kubectl apply -f "{{ home_dir }}/calico.yaml"

  - name: get dashboard
    get_url:
      url: https://raw.githubusercontent.com/kubernetes/dashboard/v2.5.0/aio/deploy/recommended.yaml
      dest: "{{ home_dir }}/dashboard.yaml"

  - name: apply dashboard
    become: no
    command: kubectl apply -f "{{ home_dir }}/dashboard.yaml"
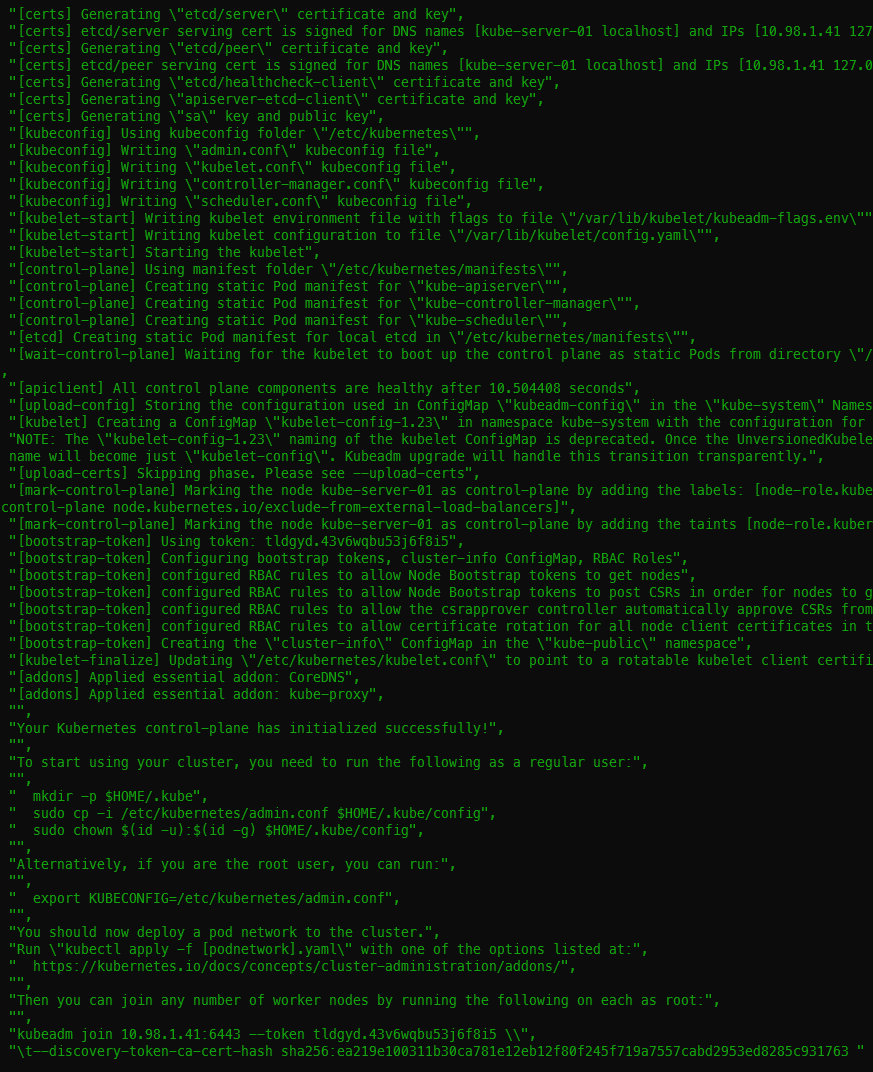
Initializing the cluster took 53s on my machine. One of the first tasks is to download the images which takes the majority of the duration. You should get 13 ok and 10 changed with the init. I had two extra user check tasks because I was fighting some issues with applying the Calico networking.
Successful Kubernetes init execution showing join token at the bottom
Getting the join command and joining worker nodes
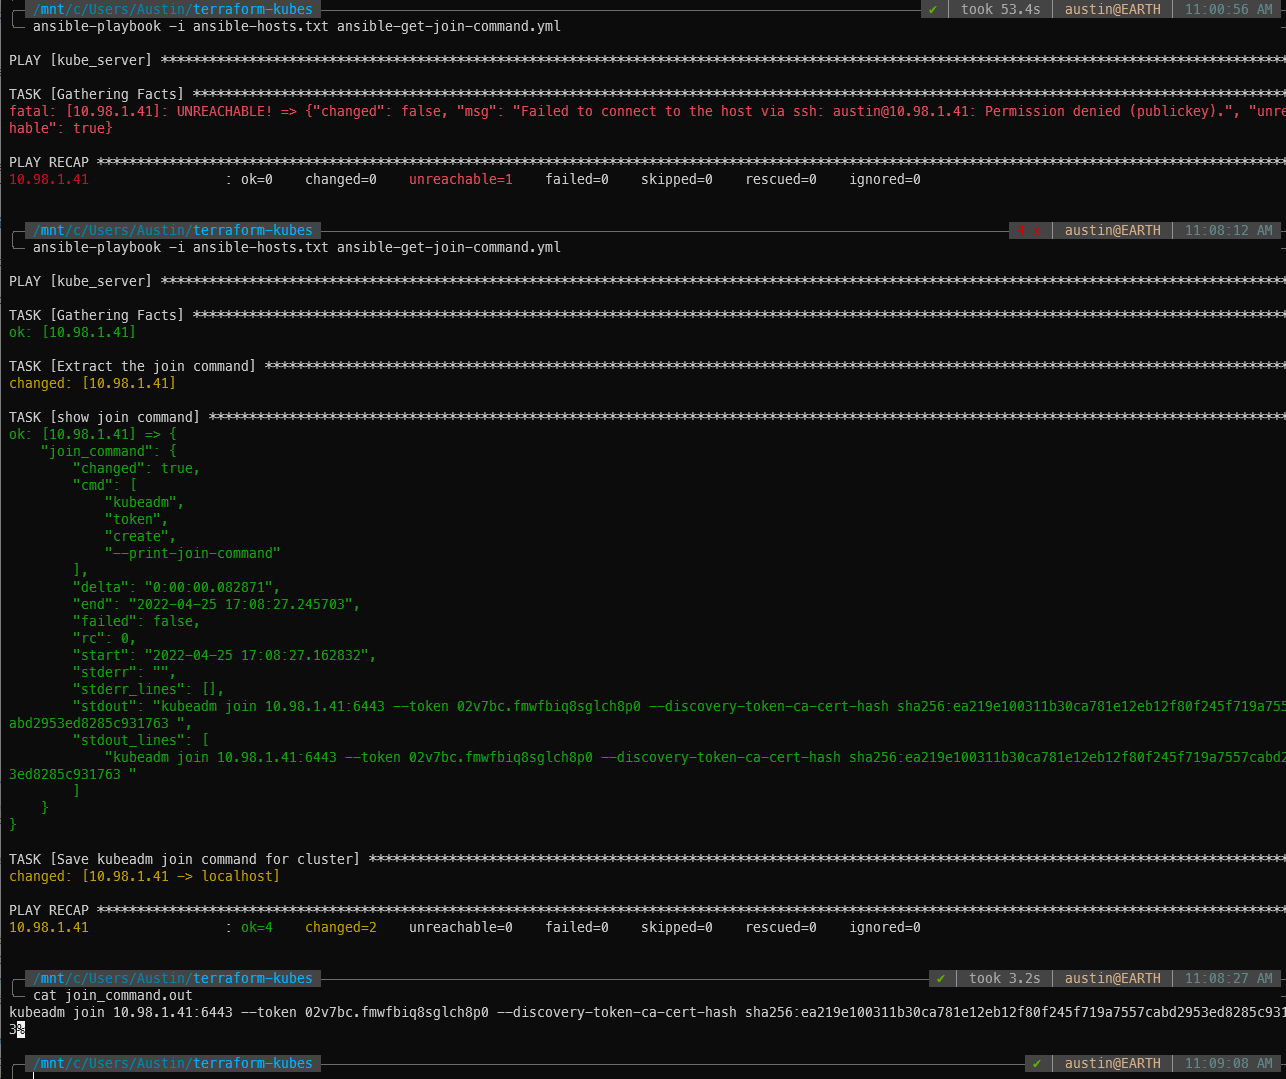
With the master up and running, we need to retrieve the join command. I chose to save the command locally and read the file in a subsequent Ansible playbook. This could certainly be combined into a single playbook.
ansible-get-join-command.yaml –
- hosts: kube_server
  become: false
  remote_user: ubuntu

  vars_files:
    - ansible-vars.yml

  tasks:
  - name: Extract the join command
    become: true
    command: "kubeadm token create --print-join-command"
    register: join_command

  - name: show join command
    debug:
      var: join_command

  - name: Save kubeadm join command for cluster
    local_action: copy content={{ join_command.stdout_lines | last | trim }} dest={{ join_command_location }} # defaults to your local cwd/join_command.out
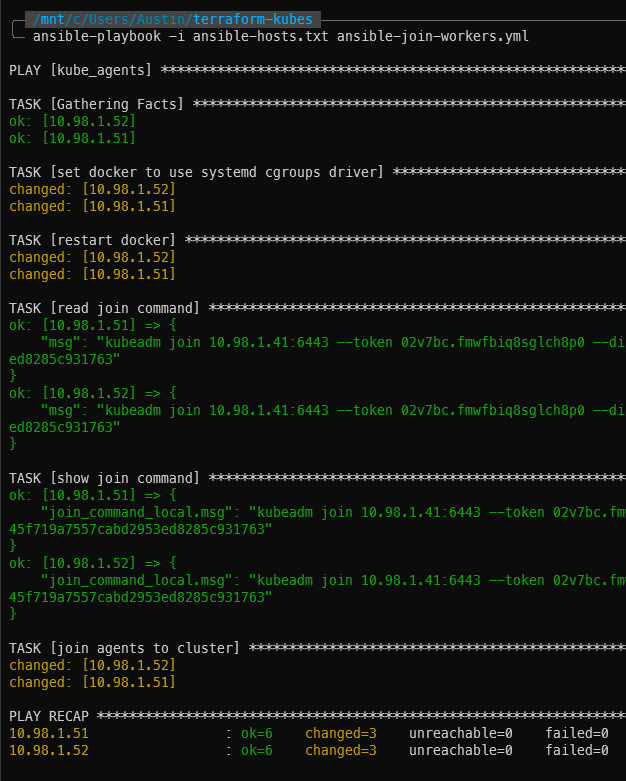
Two worker agents successfully joined to the cluster
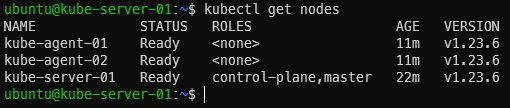
With the two worker nodes/agents joined up to the cluster, you now have a full on Kubernetes cluster up and running! Wait a few minutes, then log into the server and run kubectl get nodes to verify they are present and active (status = Ready):
kubectl get nodes
‘kubectl get nodes’ showing our nodes as ready
Kubernetes Dashboard
Everyone likes a dashboard. Kubernetes has a good one for poking/prodding around. It appears to basically be a visual representation of most (all?) of the “get information” types of command you can run with kubectl (kubectl get nodes, get pods, describe stuff, etc.).
The dashboard was installed with the cluster init script but we still need to create a service account and cluster role binding for the dashboard. These steps are from https://github.com/kubernetes/dashboard/blob/master/docs/user/access-control/creating-sample-user.md. NOTE: the docs state it is not recommended to give admin privileges to this service account. I’m still figuring out Kubernetes privileges so I’m going to proceed anyways.
Dashboard user/role creation
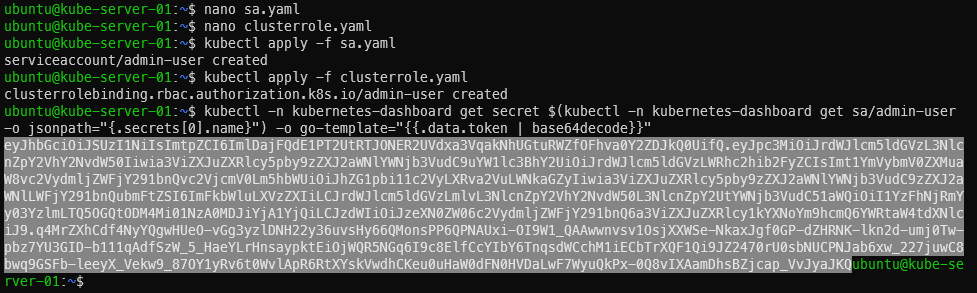
On the master machine, create a file called sa.yaml with the following contents:
Apply both, then get the token to be used for logging in. The last command will spit out a long string. Copy it starting at ‘ey’ and ending before the username (ubuntu). In the screenshot I have highlighted which part is the token
Applying both templates and getting the user’s token
SSH Tunnel & kubectl proxy
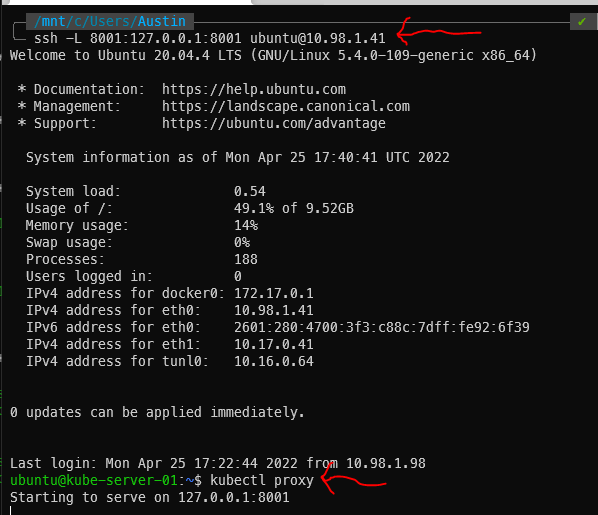
At this point, the dashboard has been running for a while. We just can’t get to it yet. There are two distinct steps that need to happen. The first is to create a SSH tunnel between your local machine and a machine in the cluster (we will be using the master). Then, from within that SSH session, we will run kubectl proxy to expose the web services.
SSH command – the master’s IP is 10.98.1.41 in this example:
The above command will open what appears to be a standard SSH session but the tunnel is running as well. Now execute kubectl proxy:
Kubernetes SSH tunnel & kubectl proxy output
The Kubernetes Dashboard
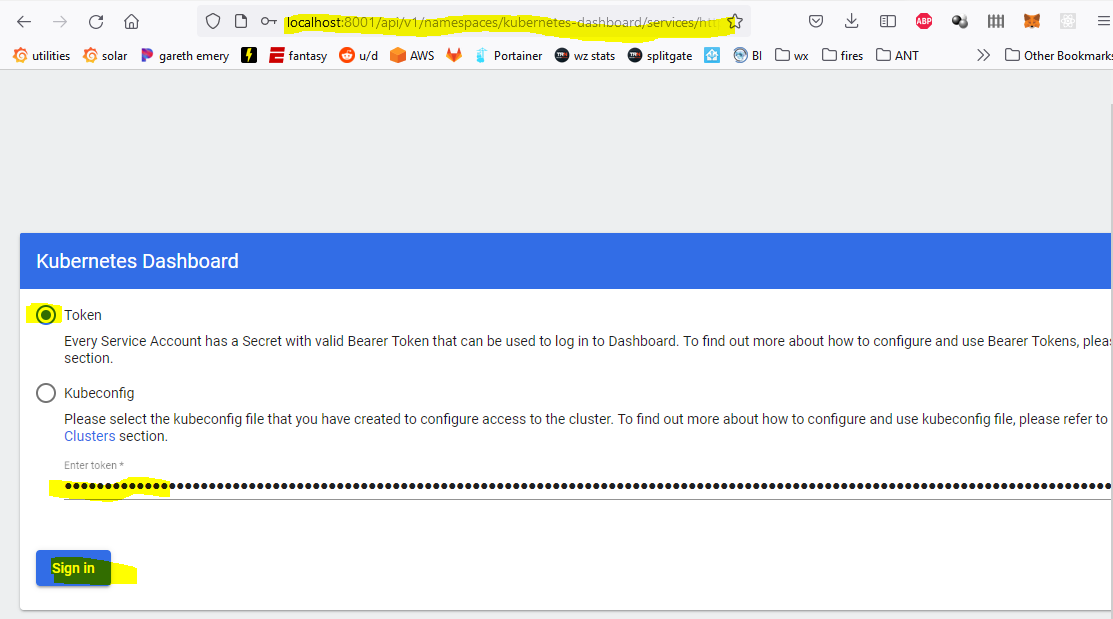
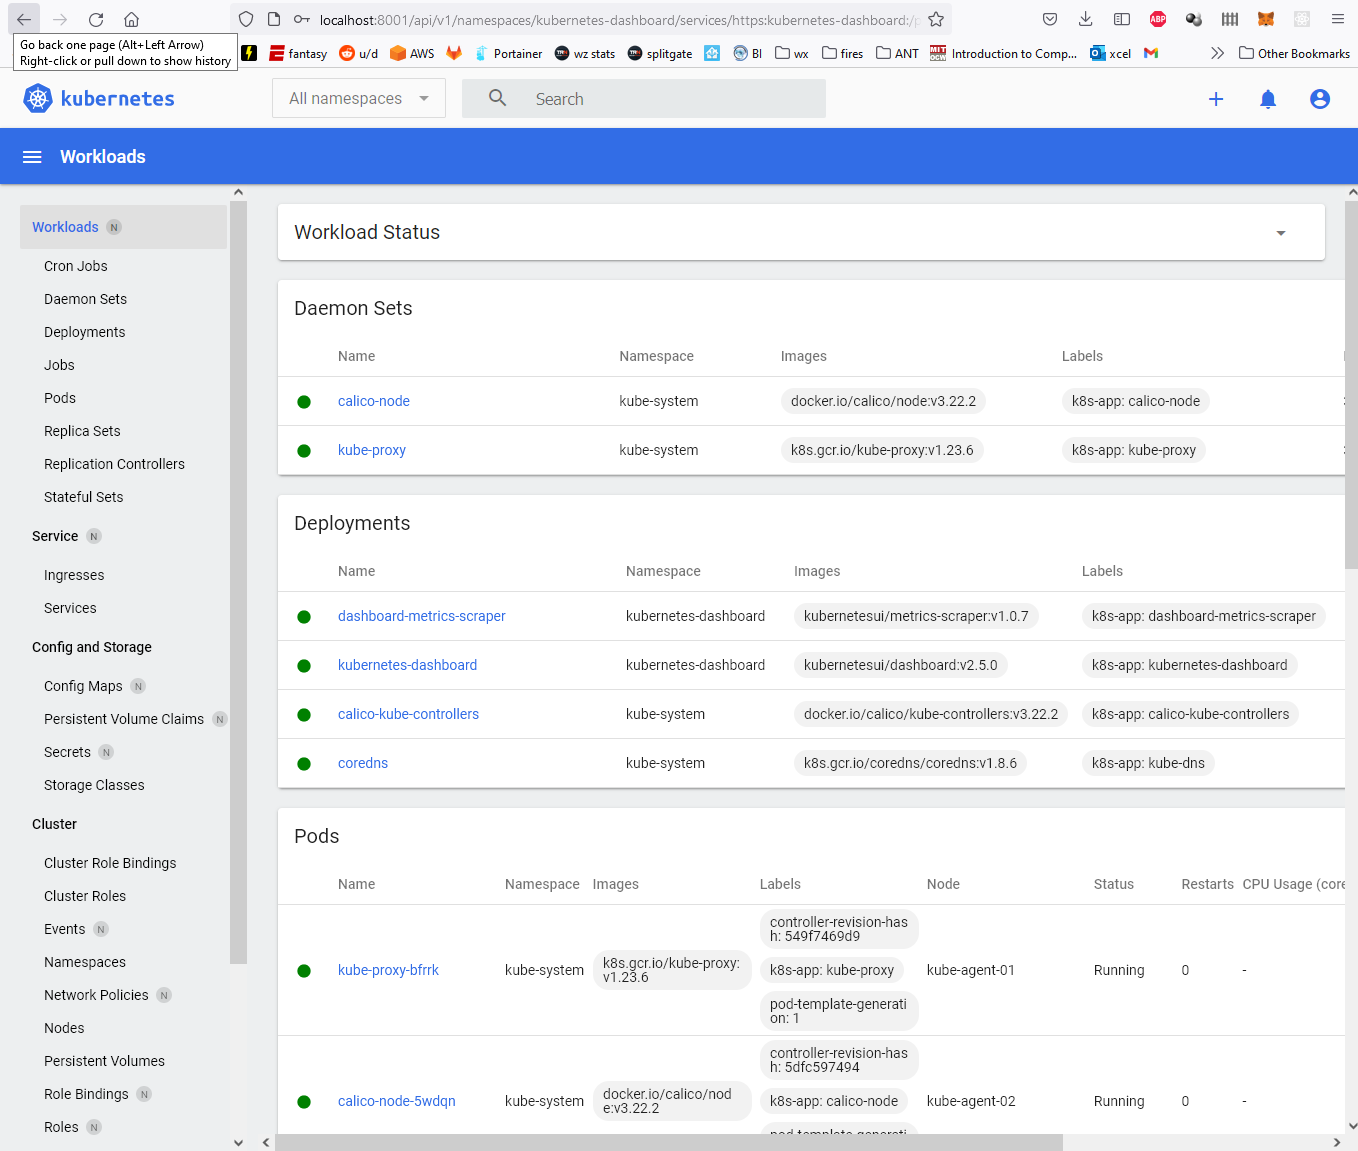
At this point, you should be able to navigate to the dashboard page from a web browser on your local machine (http://localhost:8001/api/v1/namespaces/kubernetes-dashboard/services/https:kubernetes-dashboard:/proxy/) and you’ll be prompted for a log in. Make sure the token radio button is selected and paste in that long token from earlier. It expires relatively quickly (couple hours I think) so be ready to run the token retrieval command again.
Kubernetes dashboard login with token
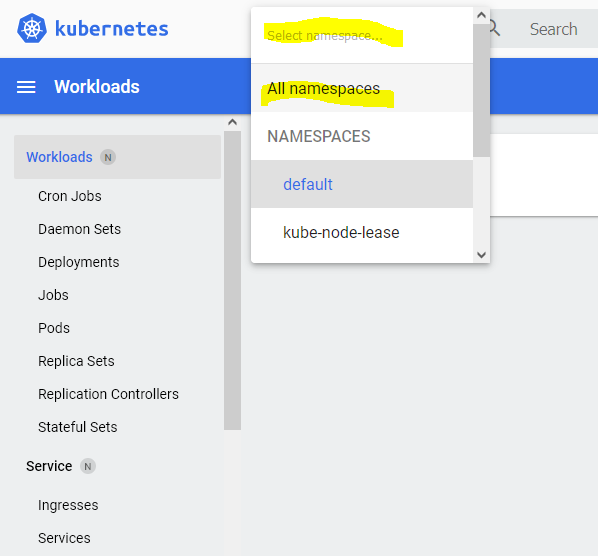
The default view is for the “default” namespace which has nothing in it at this point. Change it to All namespaces for more details:
Kubernetes dashboard all namespaces
From here you can see information about everything in the cluster:
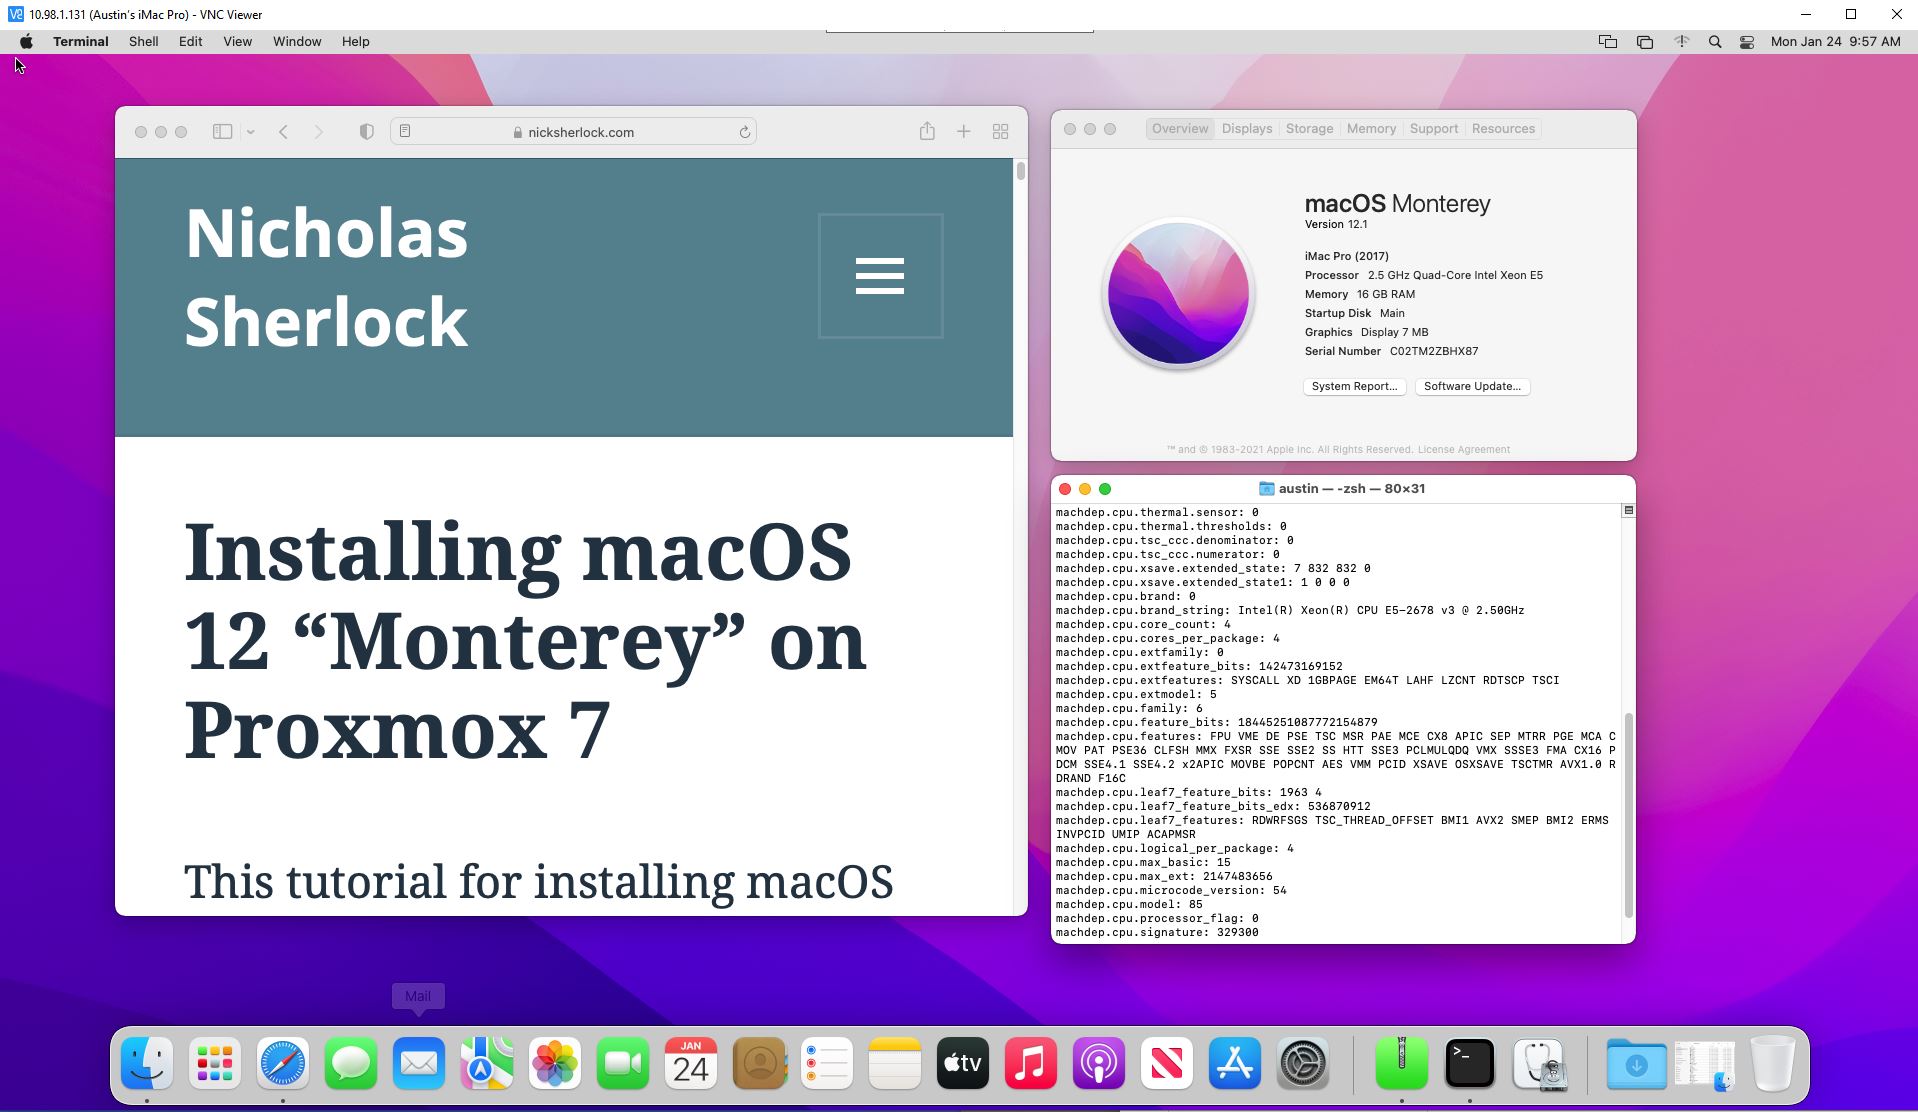
My main use for MacOS VM is to use Apple’s XCode for basic app development (Swift, SwiftUI, UIKit, React Native, etc.) in a fairly fast environment. I have a slower actual Mac for publishing and such but like the flexibility of working in a virtual environment within Proxmox.
I’m still thinking about writing a script to automate the deployment – keep checking back if you’re interested!
Here’s a picture of the environment showing my Xeon e5-2678v3 as the processor in the MacOS desktop:
MacOS Monterey running in a Proxmox virtual machine for Xcode
For Part 2, which includes activities such as setting your MacOS Monterey VM to automatically boot, consolidating the OpenCore bootloader disk, reviewing the procedure for activating your Mac VM, please click the following link: https://www.youtube.com/watch?v=oF7n2ejdTPU
Without further ado, below is the template I used to create my virtual machines. The main LAN network is 10.98.1.0/24, and the Kube internal network (on its own bridge) is 10.17.0.0/24.
This template creates a Kube server, two agents, and a storage server.
Update 2022-04-26: bumped Telmate provider version to 2.9.8 from 2.7.4
I’d like to learn Kubernetes and DevOps. A Kubernetes cluster requires at least 3 VMs/bare metal machines. In my last post, I wrote about how to create a Ubuntu cloud-init template for Proxmox. In this post, we’ll take that template and use it to deploy a couple VMs via automation using Terraform. If you don’t have a template, you need one before proceeding.
Overview
Install Terraform
Determine authentication method for Terraform to interact with Proxmox (user/pass vs API keys)
Terraform basic initialization and provider installation
Develop Terraform plan
Terraform plan
Run Terraform plan and watch the VMs appear!
Youtube Video Link
If you prefer video versions to follow along, please head on over to https://youtu.be/UXXIl421W8g for a live-action video of me deploying virtual machines in Proxmox using Terraform and why we’re running each command.
#2 – Determine Authentication Method (use API keys)
You have two options here:
Username/password – you can use the existing default root user and root password here to make things easy… or
API keys – this involves setting up a new user, giving that new user the required permissions, and then setting up API keys so that user doesn’t have to type in a password to perform actions
I went with the API key method since it is not desirable to have your root password sitting in Terraform files (even as an environment variable isn’t a great idea). I didn’t really know what I was doing and I basically gave the new user full admin permissions anyways. Should I lock it down? Surely. Do I know what the minimum required permissions are to do so? Nope. If someone in the comments or on Reddit could enlighten me, I’d really appreciate it!
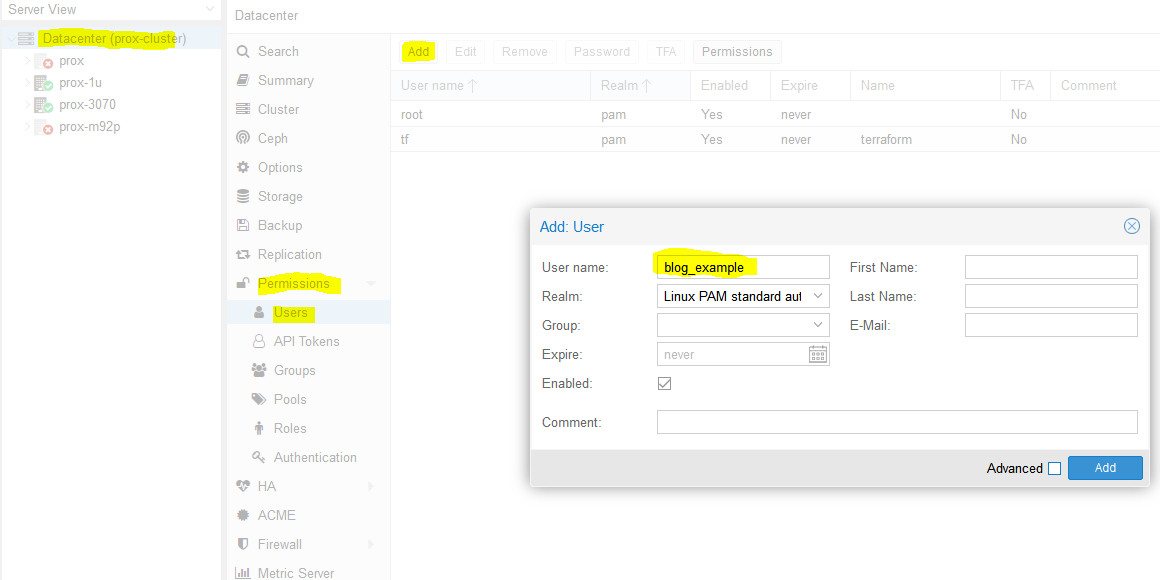
So we need to create a new user. We’ll name it ‘blog_example’. To add a new user go to Datacenter in the left tab, then Permissions -> Users -> Click add, name the user and click add.
Adding ‘blog_example’ user to my proxmox datacenter (cluster)
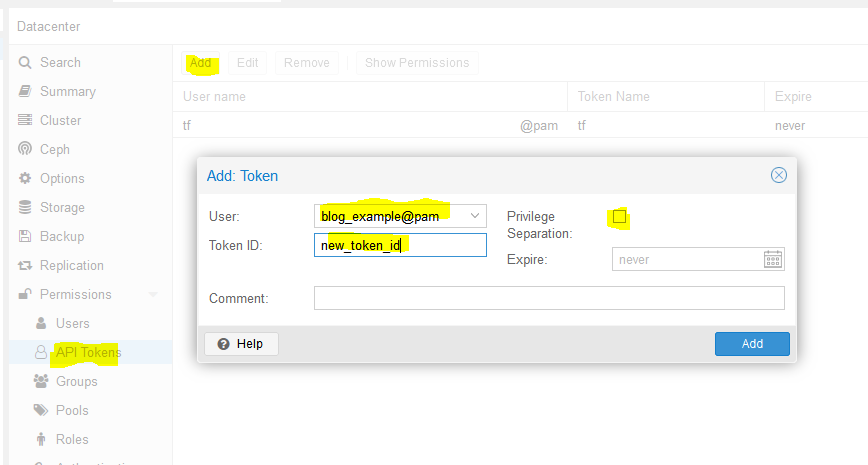
Next, we need to add API tokens. Click API tokens below users in the permissions category and click add. Select the user you just created and give the token an ID, and uncheck privilege separation (which means we want the token to have the same permissions as the user):
Adding a new API token for user ‘blog_example’
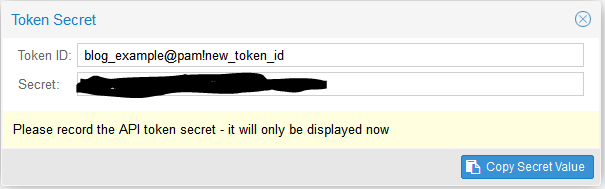
When you click Add it will show you the key. Save this key. It will never be displayed again!
Super secret API key secret
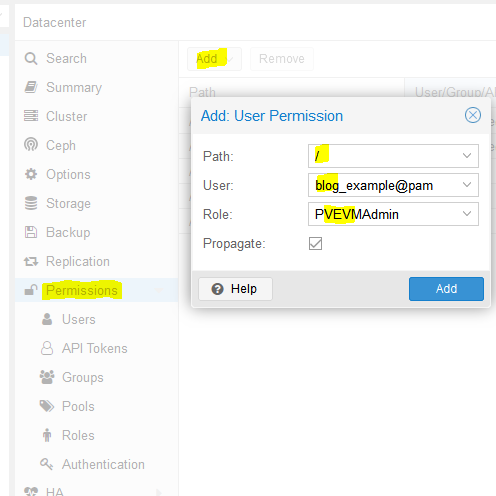
Next we need to add a role to the new user. Permissions -> Add -> Path = ‘/’, User is the one you just made, role = ‘PVEVMAdmin’. This gives the user (and associated API token!) rights to all nodes (the / for path) to do VMAdmin activities:
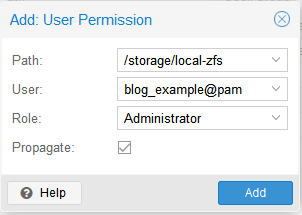
You also need to add permissions to the storage used by the VMs you want to deploy (both from and to), for me this is /storage/local-zfs (might be /storage/local-lvm for you). Add that too in the path section. Use Admin for the role here because the user also needs the ability to allocate space in the datastore (you could use PVEVMAdmin + a datastore role but I haven’t dove into which one yet):
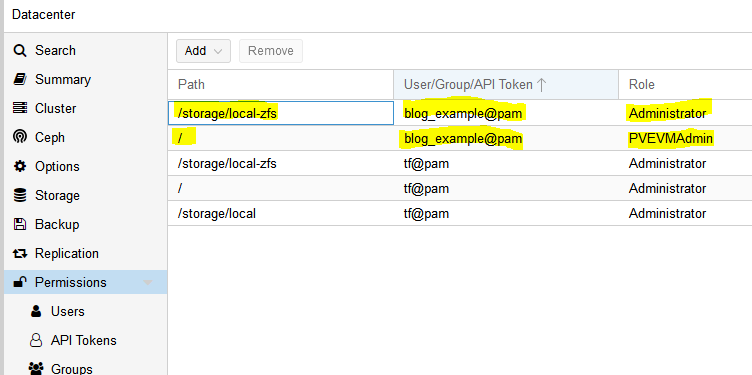
At this point we are done with the permissions:
It is time to turn to Terraform.
3 – Terraform basic information and provider installation
Terraform has three main stages: init, plan, and apply. We will start with describing the plans, which can be thought of a a type of configuration file for what you want to do. Plans are files stored in directories. Make a new directory (terraform-blog), and create two files: main.tf and vars.tf:
cd ~
mkdir terraform-blog && cd terraform-blog
touch main.tf vars.tf
The two files are hopefully reasonably named. The main content will be in main.tf and we will put a few variables in vars.tf. Everything could go in main.tf but it is a good practice to start splitting things out early. I actually don’t have as much in vars.tf as I should but we all gotta start somewhere
Ok so in main.tf let’s add the bare minimum. We need to tell Terraform to use a provider, which is the term they use for the connector to the entity Terraform will be interacting with. Since we are using Proxmox, we need to use a Proxmox provider. This is actually super easy – we just need to specify the name and version and Terraform goes out and grabs it from github and installs it. I used the Telmate Proxmox provider.
Save the file. Now we’ll initialize Terraform with our barebones plan (terraform init), which will force it to go out and grab the provider. If all goes well, we will be informed that the provider was installed and that Terraform has been initialized. Terraform is also really nice in that it tells you the next step towards the bottom of the output (“try running ‘terraform plan’ next”).
austin@EARTH:/mnt/c/Users/Austin/terraform-blog$ terraform init
Initializing the backend...
Initializing provider plugins...
- Finding telmate/proxmox versions matching "2.7.4"...
- Installing telmate/proxmox v2.7.4...
- Installed telmate/proxmox v2.7.4 (self-signed, key ID A9EBBE091B35AFCE)
Partner and community providers are signed by their developers.
If you'd like to know more about provider signing, you can read about it here:
https://www.terraform.io/docs/cli/plugins/signing.html
Terraform has created a lock file .terraform.lock.hcl to record the provider
selections it made above. Include this file in your version control repository
so that Terraform can guarantee to make the same selections by default when
you run "terraform init" in the future.
Terraform has been successfully initialized!
You may now begin working with Terraform. Try running "terraform plan" to see
any changes that are required for your infrastructure. All Terraform commands
should now work.
If you ever set or change modules or backend configuration for Terraform,
rerun this command to reinitialize your working directory. If you forget, other
commands will detect it and remind you to do so if necessary.
4 – Develop Terraform plan
Alright with the provider installed, it is time to use it to deploy a VM. We will use the template we created in the last post (How to create a Proxmox Ubuntu cloud-init image). Alter your main.tf file to be the following. I break it down inside the file with comments
terraform {
  required_providers {
    proxmox = {
      source = "telmate/proxmox"
      version = "2.7.4"
    }
  }
}
provider "proxmox" {
# url is the hostname (FQDN if you have one) for the proxmox host you'd like to connect to to issue the commands. my proxmox host is 'prox-1u'. Add /api2/json at the end for the API
pm_api_url = "https://prox-1u:8006/api2/json"
# api token id is in the form of: <username>@pam!<tokenId>
pm_api_token_id = "blog_example@pam!new_token_id"
# this is the full secret wrapped in quotes. don't worry, I've already deleted this from my proxmox cluster by the time you read this post
pm_api_token_secret = "9ec8e608-d834-4ce5-91d2-15dd59f9a8c1"
# leave tls_insecure set to true unless you have your proxmox SSL certificate situation fully sorted out (if you do, you will know)
pm_tls_insecure = true
}
# resource is formatted to be "[type]" "[entity_name]" so in this case
# we are looking to create a proxmox_vm_qemu entity named test_server
resource "proxmox_vm_qemu" "test_server" {
count = 1 # just want 1 for now, set to 0 and apply to destroy VM
name = "test-vm-${count.index + 1}" #count.index starts at 0, so + 1 means this VM will be named test-vm-1 in proxmox
# this now reaches out to the vars file. I could've also used this var above in the pm_api_url setting but wanted to spell it out up there. target_node is different than api_url. target_node is which node hosts the template and thus also which node will host the new VM. it can be different than the host you use to communicate with the API. the variable contains the contents "prox-1u"
target_node = var.proxmox_host
# another variable with contents "ubuntu-2004-cloudinit-template"
clone = var.template_name
# basic VM settings here. agent refers to guest agent
agent = 1
os_type = "cloud-init"
cores = 2
sockets = 1
cpu = "host"
memory = 2048
scsihw = "virtio-scsi-pci"
bootdisk = "scsi0"
disk {
slot = 0
# set disk size here. leave it small for testing because expanding the disk takes time.
size = "10G"
type = "scsi"
storage = "local-zfs"
iothread = 1
}
# if you want two NICs, just copy this whole network section and duplicate it
network {
model = "virtio"
bridge = "vmbr0"
}
# not sure exactly what this is for. presumably something about MAC addresses and ignore network changes during the life of the VM
lifecycle {
ignore_changes = [
network,
]
}
# the ${count.index + 1} thing appends text to the end of the ip address
# in this case, since we are only adding a single VM, the IP will
# be 10.98.1.91 since count.index starts at 0. this is how you can create
# multiple VMs and have an IP assigned to each (.91, .92, .93, etc.)
ipconfig0 = "ip=10.98.1.9${count.index + 1}/24,gw=10.98.1.1"
# sshkeys set using variables. the variable contains the text of the key.
sshkeys = <<EOF
${var.ssh_key}
EOF
}
There is a good amount going on in here. Hopefully the embedded comments explain everything. If not, let me know in the comments or on Reddit (u/Nerdy-Austin).
Now for the vars.tf file. This is a bit easier to understand. Just declare a variable, give it a name, and a default value. That’s all I know at this point and it works.
5 – Terraform plan (official term for “what will Terraform do next”)
Now with the .tf files completed, we can run the plan (terraform plan). We defined a count=1 resource, so we would expect Terraform to create a single VM. Let’s have Terraform run through the plan and tell us what it intends to do. It tells us a lot.
austin@EARTH:/mnt/c/Users/Austin/terraform-blog$ terraform plan

Terraform used the selected providers to generate the following execution plan. Resource actions
are indicated with the following symbols:
  + create

Terraform will perform the following actions:

  # proxmox_vm_qemu.test_server[0] will be created
  + resource "proxmox_vm_qemu" "test_server" {
      + additional_wait           = 15
      + agent                     = 1
      + balloon                   = 0
      + bios                      = "seabios"
      + boot                      = "cdn"
      + bootdisk                  = "scsi0"
      + clone                     = "ubuntu-2004-cloudinit-template"
      + clone_wait                = 15
      + cores                     = 2
      + cpu                       = "host"
      + default_ipv4_address      = (known after apply)
      + define_connection_info    = true
      + force_create              = false
      + full_clone                = true
      + guest_agent_ready_timeout = 600
      + hotplug                   = "network,disk,usb"
      + id                        = (known after apply)
      + ipconfig0                 = "ip=10.98.1.91/24,gw=10.98.1.1"
      + kvm                       = true
      + memory                    = 2048
      + name                      = "test-vm-1"
      + nameserver                = (known after apply)
      + numa                      = false
      + onboot                    = true
      + os_type                   = "cloud-init"
      + preprovision              = true
      + reboot_required           = (known after apply)
      + scsihw                    = "virtio-scsi-pci"
      + searchdomain              = (known after apply)
      + sockets                   = 1
      + ssh_host                  = (known after apply)
      + ssh_port                  = (known after apply)
      + sshkeys                   = <<-EOT
              ssh-rsa AAAAB3NzaC1yc2EAAAADAQABAAABAQDcwZAOfqf6E6p8IkrurF2vR3NccPbMlXFPaFe2+Eh/8QnQCJVTL6PKduXjXynuLziC9cubXIDzQA+4OpFYUV2u0fAkXLOXRIwgEmOrnsGAqJTqIsMC3XwGRhR9M84c4XPAX5sYpOsvZX/qwFE95GAdExCUkS3H39rpmSCnZG9AY4nPsVRlIIDP+/6YSy9KWp2YVYe5bDaMKRtwKSq3EOUhl3Mm8Ykzd35Z0Cysgm2hR2poN+EB7GD67fyi+6ohpdJHVhinHi7cQI4DUp+37nVZG4ofYFL9yRdULlHcFa9MocESvFVlVW0FCvwFKXDty6askpg9yf4FnM0OSbhgqXzD austin@EARTH
        EOT
      + target_node               = "prox-1u"
      + unused_disk               = (known after apply)
      + vcpus                     = 0
      + vlan                      = -1
      + vmid                      = (known after apply)

      + disk {
          + backup       = 0
          + cache        = "none"
          + file         = (known after apply)
          + format       = (known after apply)
          + iothread     = 1
          + mbps         = 0
          + mbps_rd      = 0
          + mbps_rd_max  = 0
          + mbps_wr      = 0
          + mbps_wr_max  = 0
          + media        = (known after apply)
          + replicate    = 0
          + size         = "10G"
          + slot         = 0
          + ssd          = 0
          + storage      = "local-zfs"
          + storage_type = (known after apply)
          + type         = "scsi"
          + volume       = (known after apply)
        }

      + network {
          + bridge    = "vmbr0"
          + firewall  = false
          + link_down = false
          + macaddr   = (known after apply)
          + model     = "virtio"
          + queues    = (known after apply)
          + rate      = (known after apply)
          + tag       = -1
        }
    }

Plan: 1 to add, 0 to change, 0 to destroy.

────────────────────────────────────────────────────────────────────────────────────────────────

Note: You didn't use the -out option to save this plan, so Terraform can't guarantee to take
exactly these actions if you run "terraform apply" now.
You can see the output of the planning phase of Terraform. It is telling us it will create proxmox_vm_qemu.test_server[0] with a list of parameters. You can double-check the IP address here, as well as the rest of the basic settings. At the bottom is the summary – “Plan: 1 to add, 0 to change, 0 to destroy.” Also note that it tells us again what step to run next – “terraform apply”.
6 – Execute the Terraform plan and watch the VMs appear!
With the summary stating what we want, we can now apply the plan (terraform apply). Note that it prompts you to type in ‘yes’ to apply the changes after it determines what the changes are. It typically takes 1m15s +/- 15s for my VMs to get created.
If all goes well, you will be informed that 1 resource was added!
Command and full output:
austin@EARTH:/mnt/c/Users/Austin/terraform-blog$ terraform apply

Terraform used the selected providers to generate the following execution plan. Resource actions are indicated with the following symbols:
  + create

Terraform will perform the following actions:

  # proxmox_vm_qemu.test_server[0] will be created
  + resource "proxmox_vm_qemu" "test_server" {
      + additional_wait           = 15
      + agent                     = 1
      + balloon                   = 0
      + bios                      = "seabios"
      + boot                      = "cdn"
      + bootdisk                  = "scsi0"
      + clone                     = "ubuntu-2004-cloudinit-template"
      + clone_wait                = 15
      + cores                     = 2
      + cpu                       = "host"
      + default_ipv4_address      = (known after apply)
      + define_connection_info    = true
      + force_create              = false
      + full_clone                = true
      + guest_agent_ready_timeout = 600
      + hotplug                   = "network,disk,usb"
      + id                        = (known after apply)
      + ipconfig0                 = "ip=10.98.1.91/24,gw=10.98.1.1"
      + kvm                       = true
      + memory                    = 2048
      + name                      = "test-vm-1"
      + nameserver                = (known after apply)
      + numa                      = false
      + onboot                    = true
      + os_type                   = "cloud-init"
      + preprovision              = true
      + reboot_required           = (known after apply)
      + scsihw                    = "virtio-scsi-pci"
      + searchdomain              = (known after apply)
      + sockets                   = 1
      + ssh_host                  = (known after apply)
      + ssh_port                  = (known after apply)
      + sshkeys                   = <<-EOT
              ssh-rsa AAAAB3NzaC1yc2EAAAADAQABAAABAQDcwZAOfqf6E6p8IkrurF2vR3NccPbMlXFPaFe2+Eh/8QnQCJVTL6PKduXjXynuLziC9cubXIDzQA+4OpFYUV2u0fAkXLOXRIwgEmOrnsGAqJTqIsMC3XwGRhR9M84c4XPAX5sYpOsvZX/qwFE95GAdExCUkS3H39rpmSCnZG9AY4nPsVRlIIDP+/6YSy9KWp2YVYe5bDaMKRtwKSq3EOUhl3Mm8Ykzd35Z0Cysgm2hR2poN+EB7GD67fyi+6ohpdJHVhinHi7cQI4DUp+37nVZG4ofYFL9yRdULlHcFa9MocESvFVlVW0FCvwFKXDty6askpg9yf4FnM0OSbhgqXzD austin@EARTH
        EOT
      + target_node               = "prox-1u"
      + unused_disk               = (known after apply)
      + vcpus                     = 0
      + vlan                      = -1
      + vmid                      = (known after apply)

      + disk {
          + backup       = 0
          + cache        = "none"
          + file         = (known after apply)
          + format       = (known after apply)
          + iothread     = 1
          + mbps         = 0
          + mbps_rd      = 0
          + mbps_rd_max  = 0
          + mbps_wr      = 0
          + mbps_wr_max  = 0
          + media        = (known after apply)
          + replicate    = 0
          + size         = "10G"
          + slot         = 0
          + ssd          = 0
          + storage      = "local-zfs"
          + storage_type = (known after apply)
          + type         = "scsi"
          + volume       = (known after apply)
        }

      + network {
          + bridge    = "vmbr0"
          + firewall  = false
          + link_down = false
          + macaddr   = (known after apply)
          + model     = "virtio"
          + queues    = (known after apply)
          + rate      = (known after apply)
          + tag       = -1
        }
    }

Plan: 1 to add, 0 to change, 0 to destroy.

Do you want to perform these actions?
  Terraform will perform the actions described above.
  Only 'yes' will be accepted to approve.

  Enter a value: yes

proxmox_vm_qemu.test_server[0]: Creating...
proxmox_vm_qemu.test_server[0]: Still creating... [10s elapsed]
proxmox_vm_qemu.test_server[0]: Still creating... [20s elapsed]
proxmox_vm_qemu.test_server[0]: Still creating... [30s elapsed]
proxmox_vm_qemu.test_server[0]: Still creating... [40s elapsed]
proxmox_vm_qemu.test_server[0]: Still creating... [50s elapsed]
proxmox_vm_qemu.test_server[0]: Still creating... [1m0s elapsed]
proxmox_vm_qemu.test_server[0]: Creation complete after 1m9s [id=prox-1u/qemu/142]

Apply complete! Resources: 1 added, 0 changed, 0 destroyed.
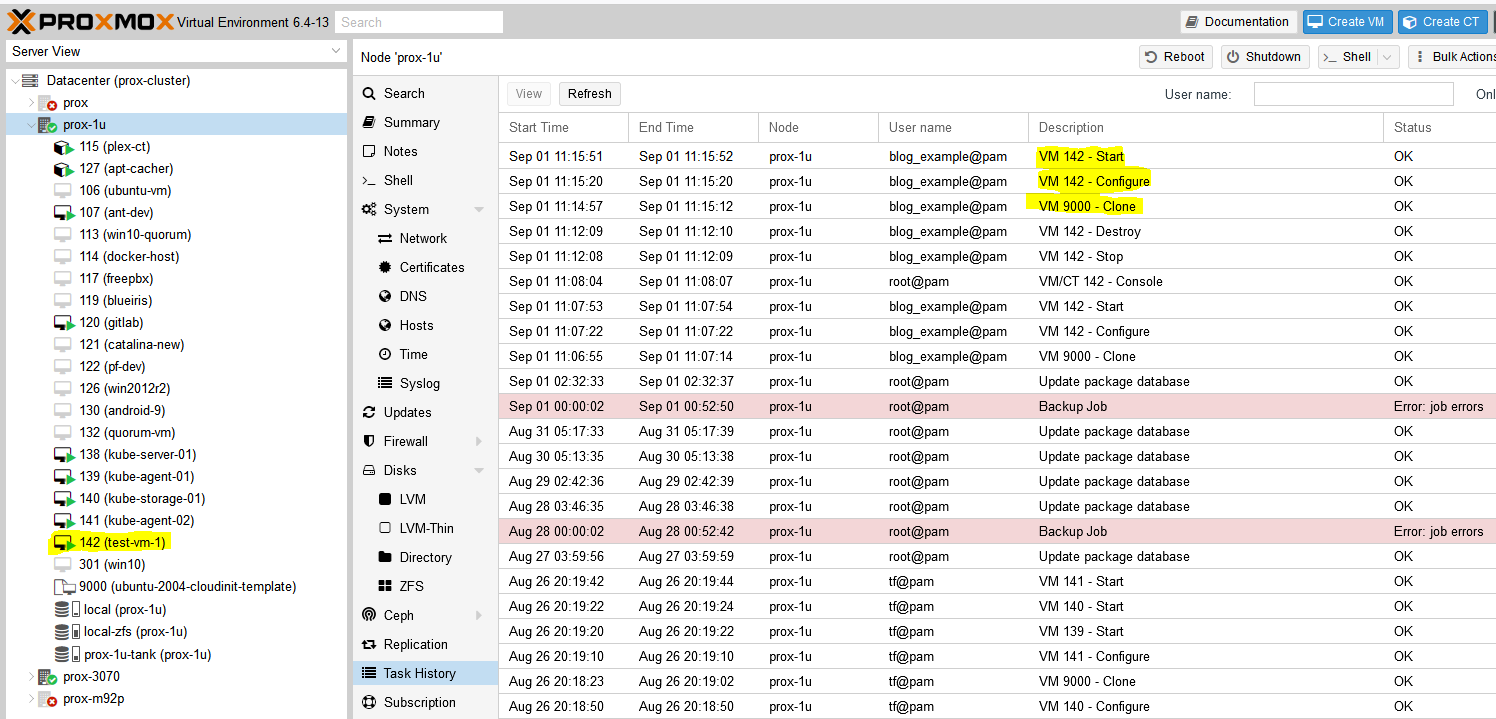
Now go check Proxmox and see if your VM was created:
Successfully added a virtual machine (VM) to Proxmox with Terraform
Success! You should now be able to SSH into the new VM with the key you already provided (note: the username will be ‘ubuntu’, not whatever you had set in your key).
Last – Removing the test VM
I just set the count to 0 for the resource in the main.tf file and apply and the VM is stopped and destroyed.
Conclusion
This felt like a quick-n-dirty tutorial for how to use Terraform to deploy virtual machines in Proxmox but looking back, there is a decent amount of detail. It took me quite a while to work through permission issues, hostnames being invalid (turns out you can’t have underscores (_) in hostnames, duh, that took an hour to find), assigning roles to users vs the associated API keys, etc. but I’m glad I worked through everything and can pass it along. Check back soon for my next post on using Terraform to deploy a full set of Kubernetes machines to a Proxmox cluster (and thrilling sequel to that post, Using Ansible to bootstrap a Kubernetes Cluster)!